

Painting leaf veins can feel tricky, right? If you’re learning watercolor or just curious about new methods, you might wonder which approach works best.
As Beala Art often shows, there’s no single “right” way—just different techniques that create different effects.
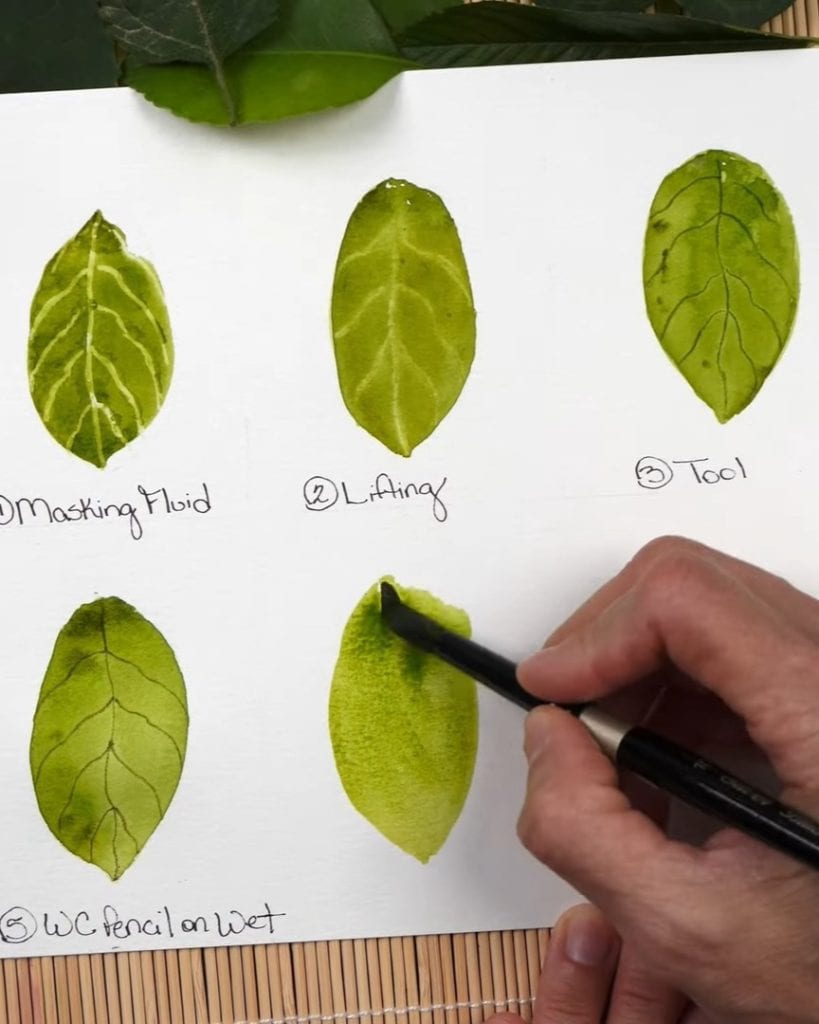
Today, Beala Art is excited to share seven ways to paint leaf veins with watercolor. Some of these methods are favorites, others are used less often, but you’ll see each one step-by-step so you can decide which suits your style best. Let’s dive in!
Contents
Technique 1: Using Masking Fluid
The first method they want to show is using masking fluid. Honestly, they don’t usually use masking fluid for painting leaf veins. But it’s an option, so they wanted to include it here.
For this, they pick a super fine paintbrush. It’s a brush they set aside just for masking fluid because masking fluid can ruin regular brushes.
They like their leaf veins to be very thin and delicate, so they chose such a tiny brush.
Since the brush is so small, it might be hard to see exactly what they’re doing at first. But don’t worry—stick with them for a minute.

After applying the masking fluid, they let it dry completely. Once it is dry, they simply paint right over it. It’s that simple! Now, they’re letting the paint dry again.

After a few minutes, everything is dry. They remove the masking fluid to reveal the veins.

The masking fluid left very bright white lines since it’s the untouched paper showing through. However, the veins turned out wider than they expected.
That happens sometimes because masking fluid can spread while it dries.

Technique 2: Lifting Pigment
Next, we have the lifting method. This one is simple and great for beginners! They’re keeping everything consistent for a fair comparison — same leaf shape, color, etc.
For lifting, they use a fine liner brush. The idea is to lift the pigment off the paper while it’s still wet. Firstly, they paint a green wash.

Every time they stroke, they dab the brush on a paper towel. This helps remove the pigment. If the leaf is still pretty wet and the pigment keeps seeping back, they keep lifting and dabbing.

If they wait too long and the paint dries, they can still lift the color by wetting the brush and gently rubbing the area.
But they are careful. Too much water might remove more pigment than they want. It’s always easier if the paint is still damp.
Technique 3: Using a Tool to Scratch In Veins
Next, they’ll use a tool to scratch in the veins. This method is easy and fun; they can use whatever tool they like. They prefer the end of a paint tube because it gives nice, thin lines.
But they could also use a palette knife, the end of a paintbrush, or even a credit card. It’s up to them!
The key here is to be careful with the pressure they apply. The tool can be sharp, so pressing too hard might tear the paper.
They want to create clean, defined lines, not damage the paper.
It’s essential to scratch while the paint is still wet. They won’t get the same effect if they wait until the paint is dry.
They can also scratch before painting, as with the masking fluid method, by etching lines into the paper and then painting over them.
However, they prefer painting the leaf first and then scratching in the veins. They think this method gives a much better result and feels easier to control.

Once they’ve scratched in the veins, they’ll notice how the tool reveals the paper underneath, creating a striking contrast with the painted leaf.
This adds a wonderful natural look to the veins and makes them stand out.
Technique 4: Wet-on-Wet Technique
Now, let’s move on to the wet-on-wet technique. They see this method used quite a lot, and it always gives a soft, natural effect.
The first thing they do is paint the leaf. But they don’t draw the veins right away. If they start too soon, the paint will be too wet, and the color will bleed across the leaf.

Instead, they let the paint sit for a moment. It should not be dry, but also not freshly wet. They wait just enough so the surface is damp, not soaking.
Then, they take a darker color and gently draw in the veins. Because the leaf is still damp, the veins spread a little, creating a beautiful, soft look.
Since the leaf dries at different speeds, some areas may still be wet. When they lift their brush at the end of a vein, it sometimes leaves a little spot.
They think these spots look very natural, so they don’t stress about them.

Some veins will have these spots, and some won’t. The parts that dry faster won’t leave a spot when they lift the brush.
They usually draw the veins from the center of the leaf outward. They feel like the spots look more natural near the edges.
But others might like starting from the edges and moving toward the center. They suggest trying both ways to see which one feels right.
Also, if they want the veins to stand out more, they can add another layer of color. As long as the leaf is still damp, it works perfectly.
This method gives the veins a lovely, soft, blended look that they love.
Technique 5: Watercolor Pencil on Wet Paper
This method is a little different but fun. It’s similar to wet-on-wet. They still let the leaf dry slightly until it’s damp, not soaking wet.

Then, they take a watercolor pencil and draw the veins. They chose a brown watercolor pencil because they love the natural look it gives. But they can use any color they want.
Watercolor pencils create a slightly grainy texture, which adds a unique effect. They notice that having a sharp point on the pencil helps a lot.
Their pencil is dull, so they go back over the lines to make them stand out more.

Draw the veins with a watercolor pencil
Technique 6: Wet-on-Dry Painting
Now they’re moving into wet-on-dry techniques. After painting the leaf, they let it dry completely.
Then, they paint the veins on top of the dry surface.
For this method, they can use regular watercolor, a paint marker, a gel pen, or even a magic marker — anything that appears on the dried leaf.
They decided to stick with regular watercolor for this example.

At first, their lines looked light because they had too much water in the mix. Remember, watercolor always dries lighter than it looks when wet.
So, after their first pass, they went back over the veins with more pigment to make them stand out better for comparison.
Technique 7: Negative Painting
Now, the most challenging method: negative painting. Instead of painting the veins themselves, they paint the spaces between them. It’s the opposite way of thinking!
They use a basic round brush here because it holds less water and gives more control. First, they start with a very light wash for the entire leaf — this layer will act as the vein color.

Then, using slightly darker paint, they start filling the spaces around where they want the veins to be.

If it helps, they lightly draw the vein layout with a pencil first. They didn’t do that here, but it would have helped them avoid painting over the middle vein by accident!
They can keep adding darker layers to create more definition and depth. They stopped after about four layers for this example, but they can go as dark as they like.
The more layers they add, the more striking the veins will look.

Closing Words
Which method do they feel excited to try first? Painting leaf veins adds such beautiful detail to watercolor leaves, and now they have seven techniques to explore.
They can try making a sample card like they did — it’s so helpful for comparing results later. If they found these tips helpful, they could comment and share their favorite method!