
What if you could create beautiful, playful flowers without stressing about perfect lines? Matches & Clashes loves scribble drawing because it’s fun, freeing, and full of personality.
In this guide, the artist walks readers through simple steps and easy techniques to turn messy scribbles into charming floral art.
Whether you’re a beginner or hoping to loosen up your style, this tutorial invites you to dive in and start scribbling with joy!
Contents
- 1 What the Artist Will Need to Get Started
- 2 Step-by-Step: Drawing Your Scribble Flowers
- 3 Try It in Reverse: A Fun Twist on Scribble Drawing
- 4 Wrapping Up
What the Artist Will Need to Get Started
Let’s begin with the basics! Before diving into the fun scribbling part, the artist wants to ensure everything is ready.
Here’s what the artist uses for this project:
- A piece of paper (I’m using a 110-pound mixed media sketchbook, but feel free to use whatever paper you have on hand)
- Two or three markers for adding color
- A black pen for outlining and details
The artist personally loves using Posca markers and recommends picking one or two light colors for the base layers. Then, a darker shade is grabbed to add some accent touches.
For the black pen, the artist always reaches for Micron fineliners, using the 005 tip because of its tiny and precise size.

Now that the tools are ready, let’s start scribbling!
Step-by-Step: Drawing Your Scribble Flowers
Now that the tools are ready, it’s time to start creating those fun, messy flowers! The steps are followed so the viewer can enjoy the process without overthinking.
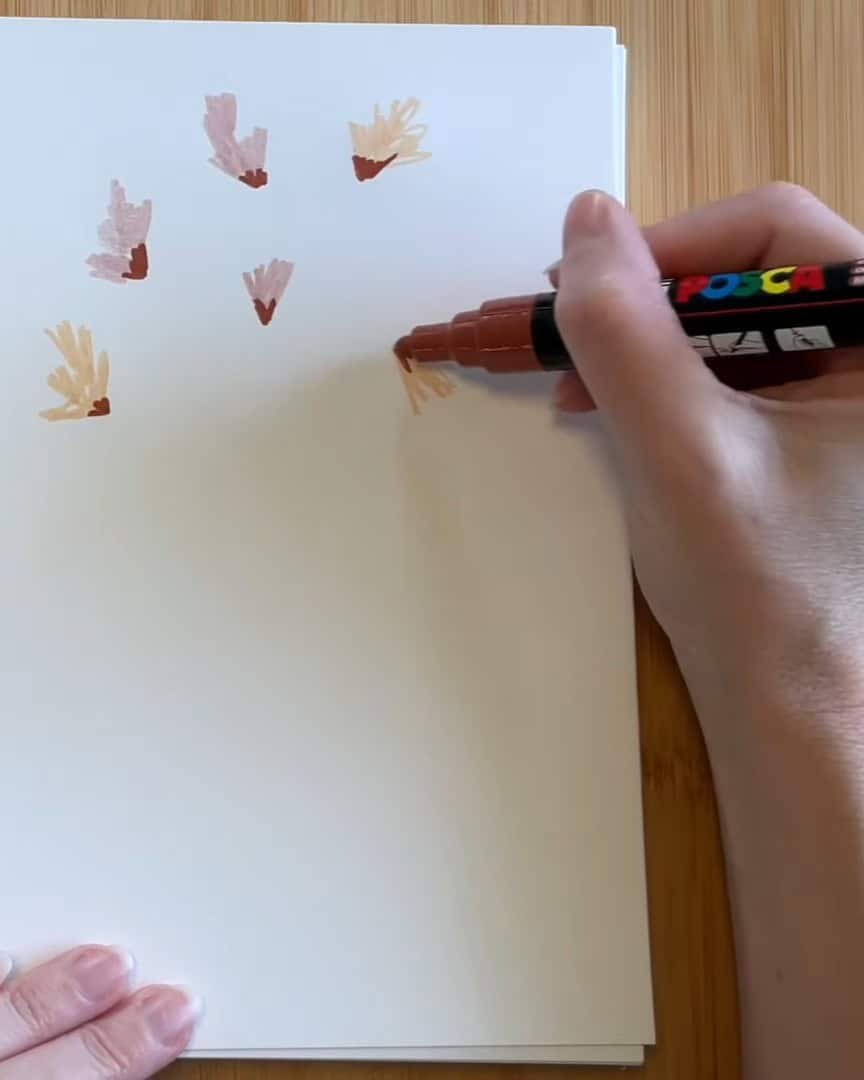
Step 1: Scribble in Color
The artist starts with one of the light-colored markers and quickly scribbles some scratchy, uneven blobs onto the paper. These don’t need to look like petals—honestly, they won’t at first, and that’s okay.

Next, the artist switches to another light color and adds a few more scribbly blobs around the first ones. This helps build up the flower shape.

Then the artist grabs the darker accent color and gives each flower a quick little scribble right in the center. It’s a simple touch, but it ties everything together nicely.
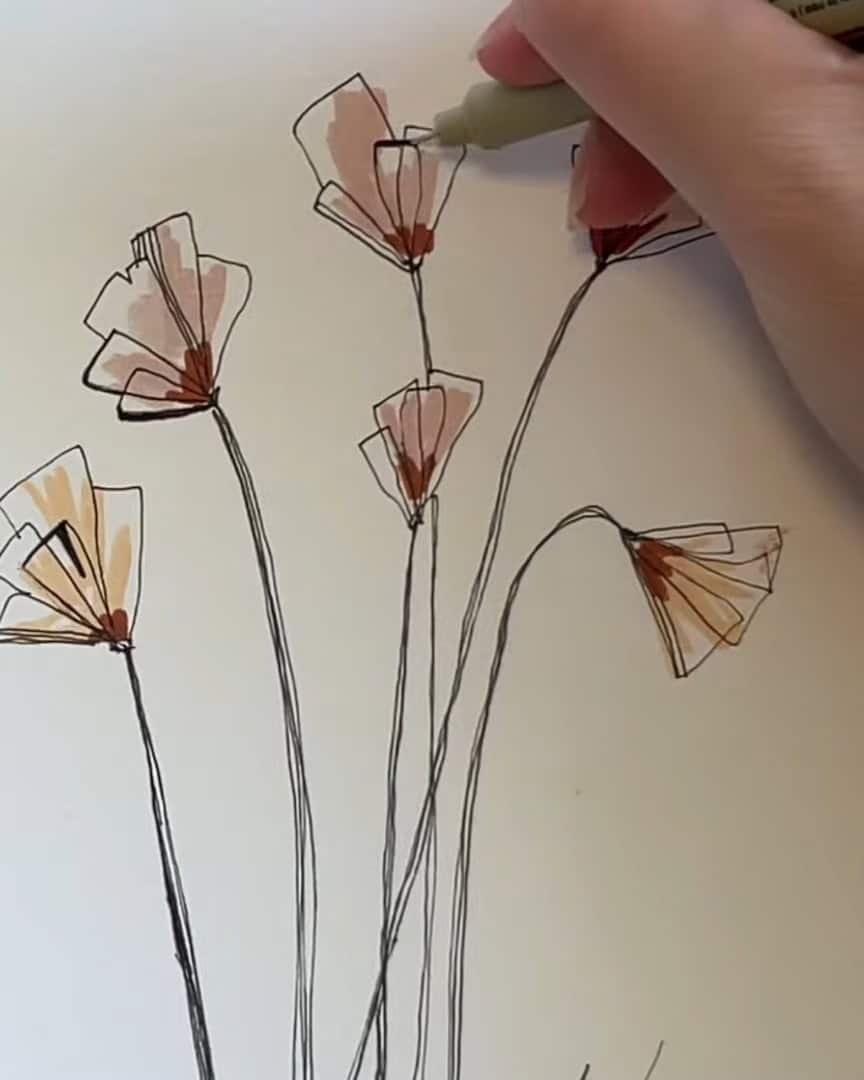
Step 2: Outline with Black Fineliner
Once the color is down, it’s time to switch to the black fineliner. This is where things start coming together! The artist begins outlining around the petals but is not precise.
The artist treats the scribbles like a guide—just corralling the color, like building a loose fence around each flower. The artist enjoys letting the petals overlap a little. It gives that messy, chaotic charm being created.

The lines are boxy and rectangular, keeping it fun and straightforward. As the artist moves around the page, the reason for using light colors becomes clear—these bold black lines stand out.
They do the heavy lifting when adding detail and visual interest. And if the marker smudges? No worries—the artist draws around it and ropes it in!
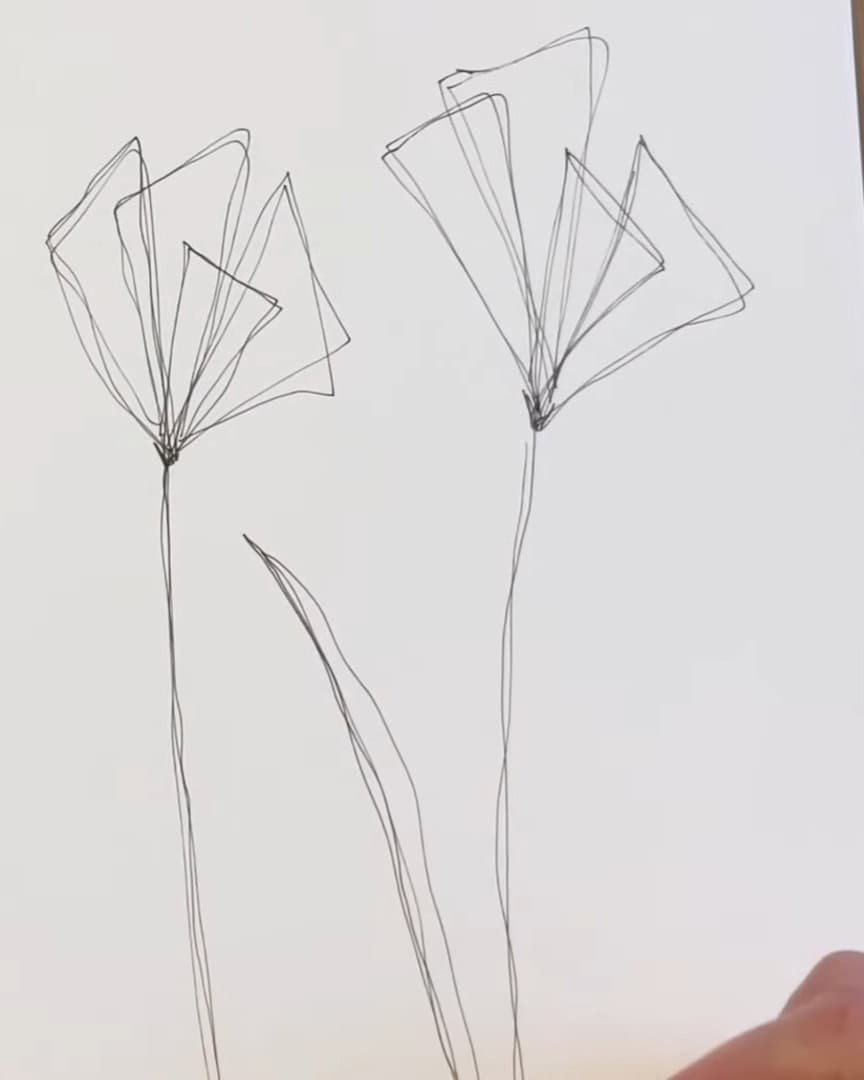
Step 3: Add Loose, Scribbly Stems
Now that the flowers are outlined, it’s time to give them some loose, scribbly stems. The artist goes with long, thin stems for this bundle.
A bit of overlap is good, but the artist makes sure not to place them too close together—more lines are coming later, and things shouldn’t look too crowded.
For each stem, the artist adds 2 to 5 lines. The hand is kept loose, and the artist doesn’t try to make the lines perfectly parallel. That’s not what scribble flowers are about!

The artist lets the lines intersect naturally. It creates a cool illusion of twisted stems, adding to the playful vibe.
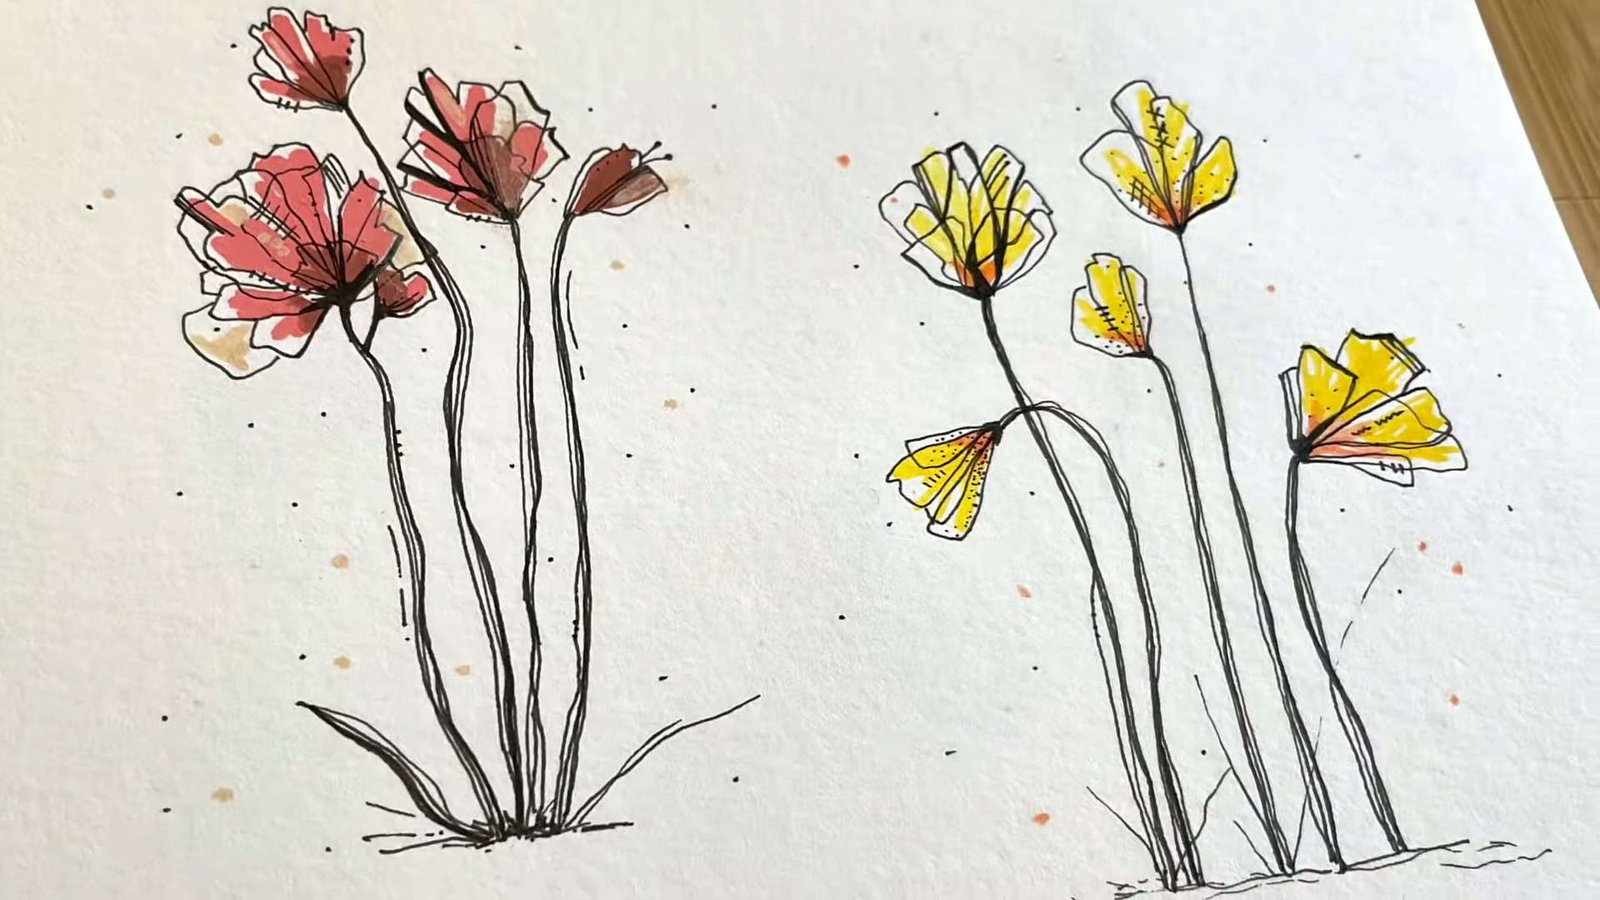
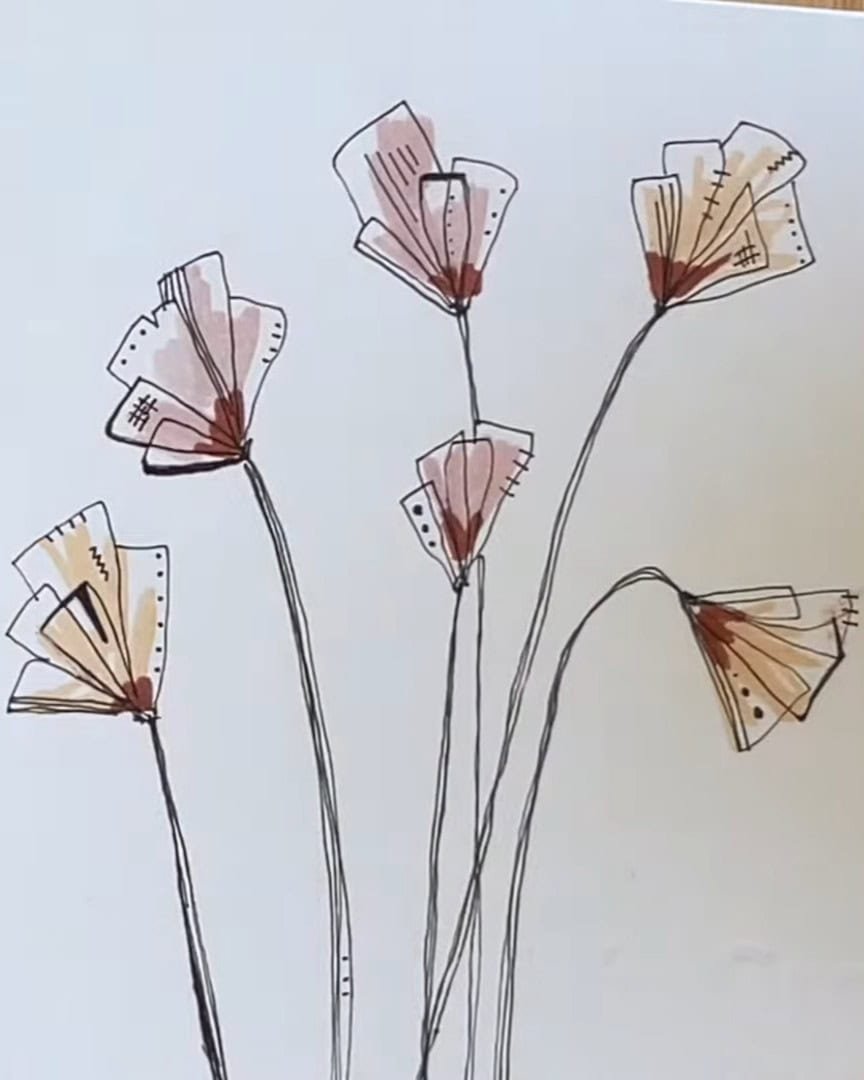
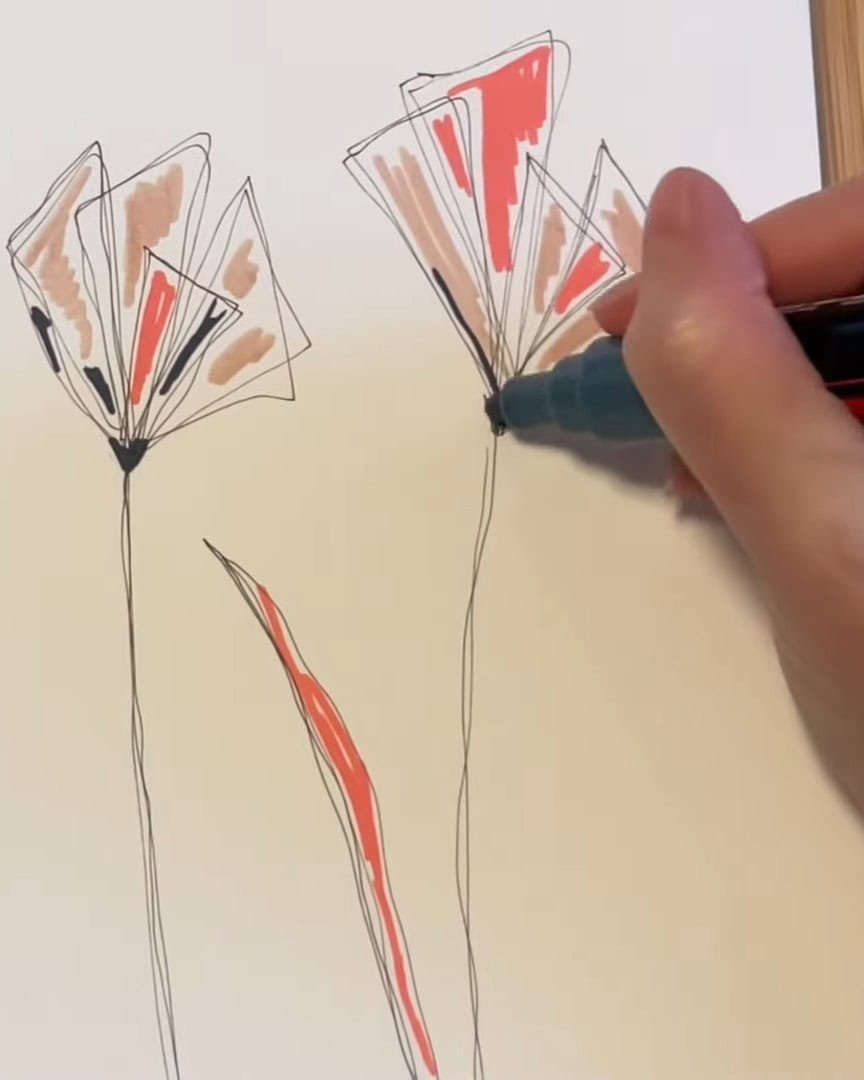
Step 4: 6 Easy Techniques to Add Personality to Scribble Drawings
Now comes the part the artist enjoys the most—adding personality! These simple techniques turn scribbles into something fun and truly one-of-a-kind.
1. Multi-Lines
This trick works like what was done with the stems. The artist takes the pen and reviews the same path multiple times, changing it slightly each time.
The lines can be neat and parallel, but the artist prefers them a bit wonky—it looks more playful and enjoyable that way!

2. Fill in the Black
Another fun method is filling in the black. The artist darkens small parts of the flowers by coloring them in sections or thickening a few lines.
This helps certain areas stand out. But the artist makes sure not to overdo it. If everything is bold, then nothing pops. So this technique is used sparingly for the best effect.
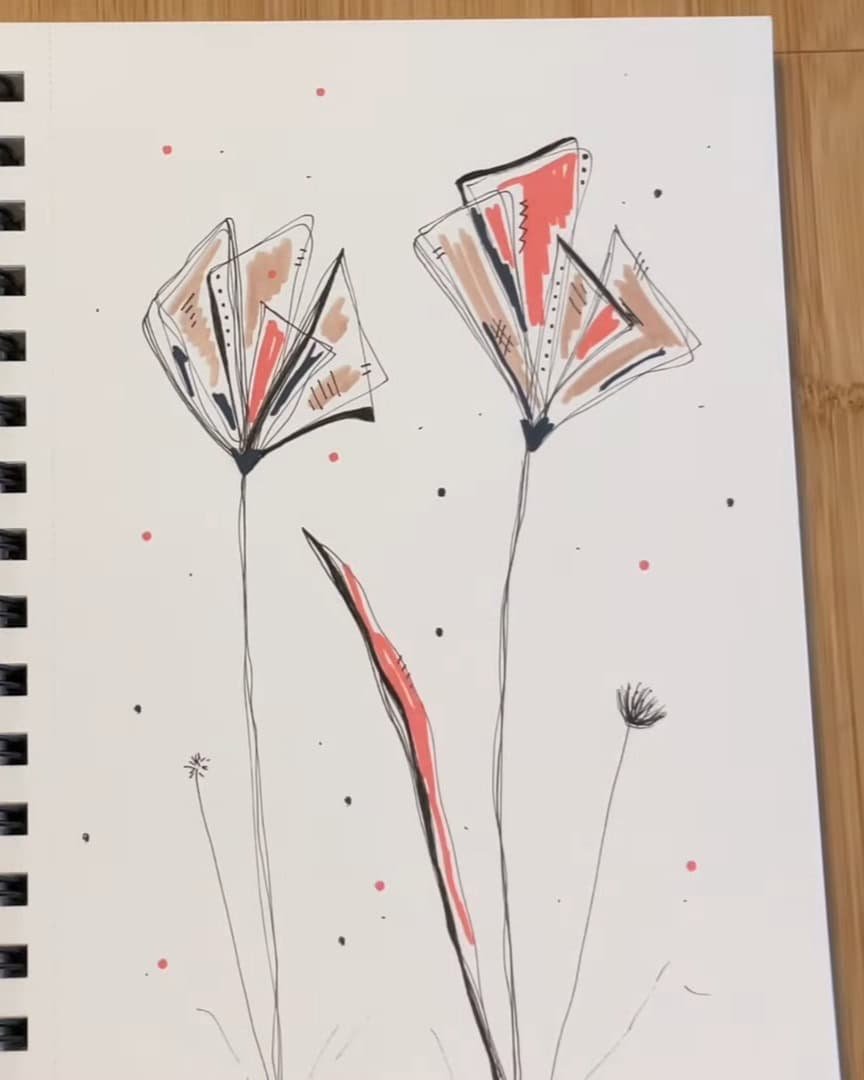
3. Lines or Hatching
This simple but striking trick involves adding rows of short lines to create texture and interest.
The artist mixes up the length and placement. Some lines even go past the petals or cross over each other. It’s a subtle touch that keeps things playful.

4. Stipple Dots
Dots or stippling are next, one of the artist’s favorite techniques. For these playful sketches, dots are used more as a design element than for shading.
The dot sizes are varied—from tiny to larger—moving from the thinnest part of the petal to the widest. This adds a fun texture.
The light colors underneath are key. If the colors were too dark, these delicate dots would get lost.

5. Zigzags
Another technique the artist enjoys is zigzags, though it is used sparingly. It resembles a sewing stitch and gives the petals a fun, torn look.
This little detail adds a unique edge to the scribble flowers without overwhelming them.

6. Crosshatching
Last but not least is crosshatching. To the artist, it always feels like something worn out or tattered—like the knees of an old pair of jeans. This technique adds a textured, weathered look that gives scribble flowers more character and charm.
Step 4: Add Final Touches for a Whimsical Look
Now, the artist adds some final details to the grass and stems.

The little parts up top—stamens—get a few touches too.

Then, the artist returns to the markers to add colorful dots. There’s something about these dots that screams whimsical. If watercolor were used, this would be the perfect time to add splatters.

That’s all done! Let’s take a closer look at the scribble drawing!

Try It in Reverse: A Fun Twist on Scribble Drawing
Now that the basics are understood, it’s time to shake things up. The artist shows how to create a scribble drawing in reverse. It’s a fresh way to enjoy this playful style and tap into creativity.
Starting with the Petals and Stems
This time, the artist begins by drawing the petals first. They are overlapped and reviewed multiple times along the same lines. The pen is held loosely, moving quickly without overthinking.
Honestly, it might look like a total mess at first, but that’s okay! Embracing this chaos feels freeing and relaxing.
 Draw the petals and stems
Adding Color and Details
Once the lines are down, the artist adds pops of color with quick scribbles here and there.
Then, details are added using the six techniques covered:
- Multi-lines
- Fill in the black
- Hatch lines
- Stipple dots
- Zigzags
- Crosshatches

The artist works around the flowers, sprinkling in a little bit of everything to bring the drawing to life.

Why Try This Reverse Method?
This reverse scribble drawing is perfect when feeling stuck but still wanting to create something. It’s a fun, no-pressure way to loosen up and see where the lines go.
The artist is excited to share more ideas for scribble art soon — not just flowers but all playful subjects!
Wrapping Up
Now that these fun scribble techniques are explored, why not give them a try? The beauty of scribble drawing lies in its freedom and playfulness—there’s no right or wrong way.
So grab a pen, embrace the chaos, and let creativity run wild. The artist can’t wait to see what comes next!