
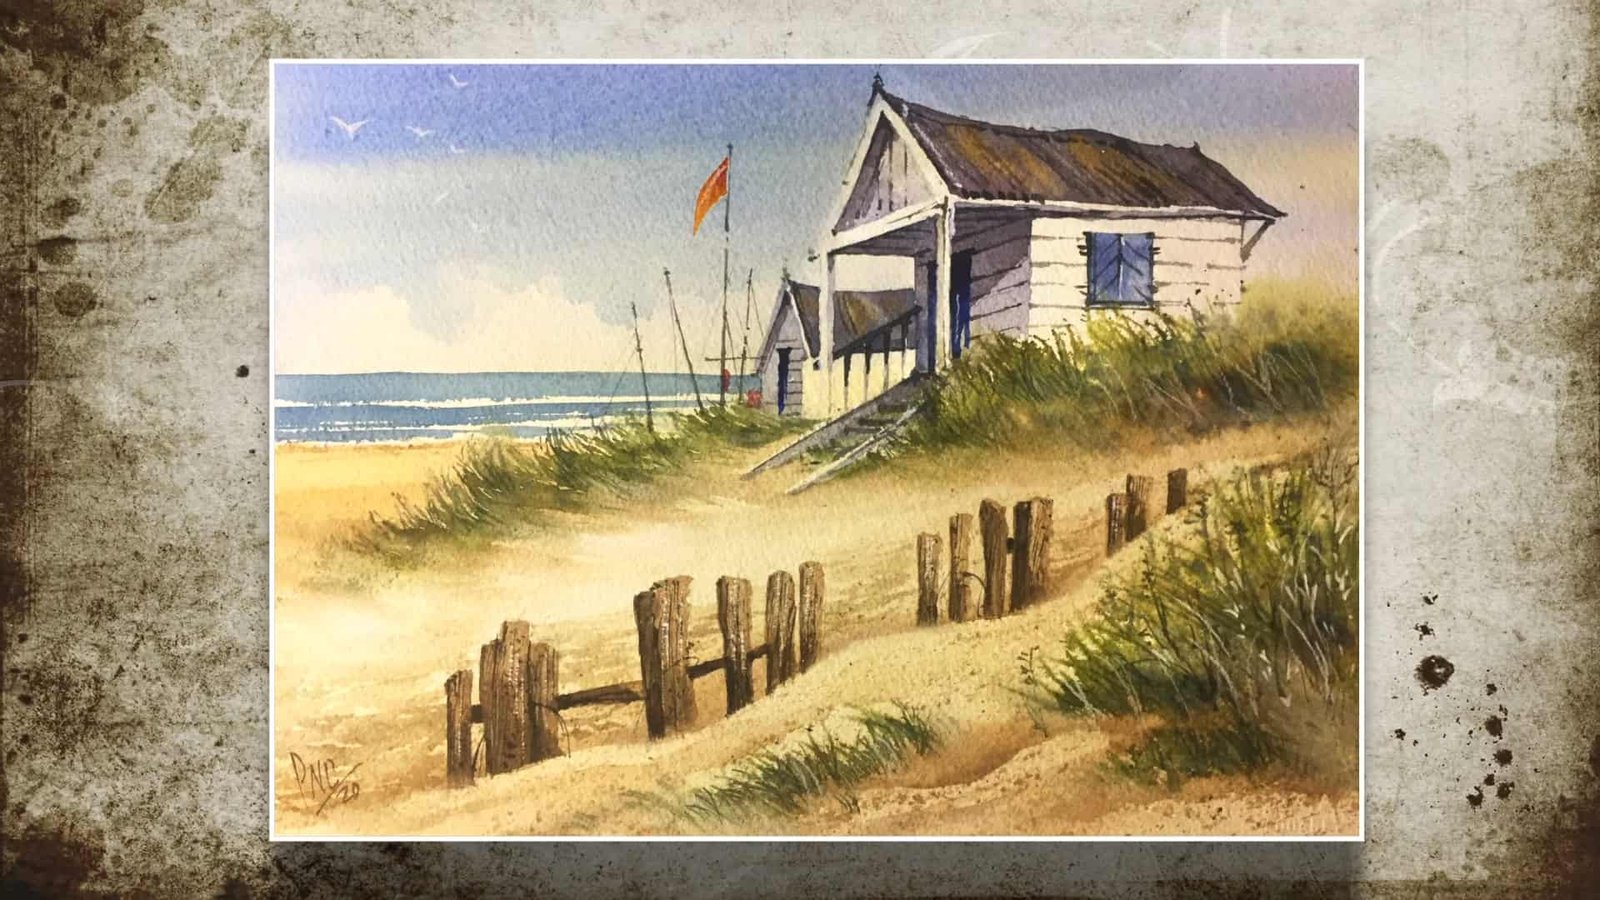
Painting a beach scene can transport you to the seaside even if you are sitting in your studio at home.
Paul Clark from the Art by Paul Clark shows you how to bring that feeling onto paper with watercolor.
His step-by-step guide makes painting a beach hut and coastal scene both fun and easy. Ready to enjoy this process? Let’s begin together.
Contents
- 1 Step 1: Gather Your Watercolor Materials
- 2 Step 2: Make a Simple Beach Scene Drawing
- 3 Step 3: Paint the Warm Underwash
- 4 Step 4: Paint the Sand and Add Natural Texture
- 5 Step 5: Paint the Watercolor Sky
- 6 Step 6: Paint the Sea and Breaking Waves
- 7 Step 7: Add Shadows and Depth to the Sand
- 8 Step 8: Use Splatter Techniques for Realistic Texture
- 9 Step 9: Paint the Beach Huts in Watercolor
- 10 Step 10: Paint the Grass and Foreground Details
- 11 Step 11: Add Fine Shadows and Final Hut Details
- 12 Step 12: Add Decorative Details to the Scene
- 13 Step 13: Sign and Finish Your Watercolor Beach Scene
- 14 Final Thoughts
Step 1: Gather Your Watercolor Materials
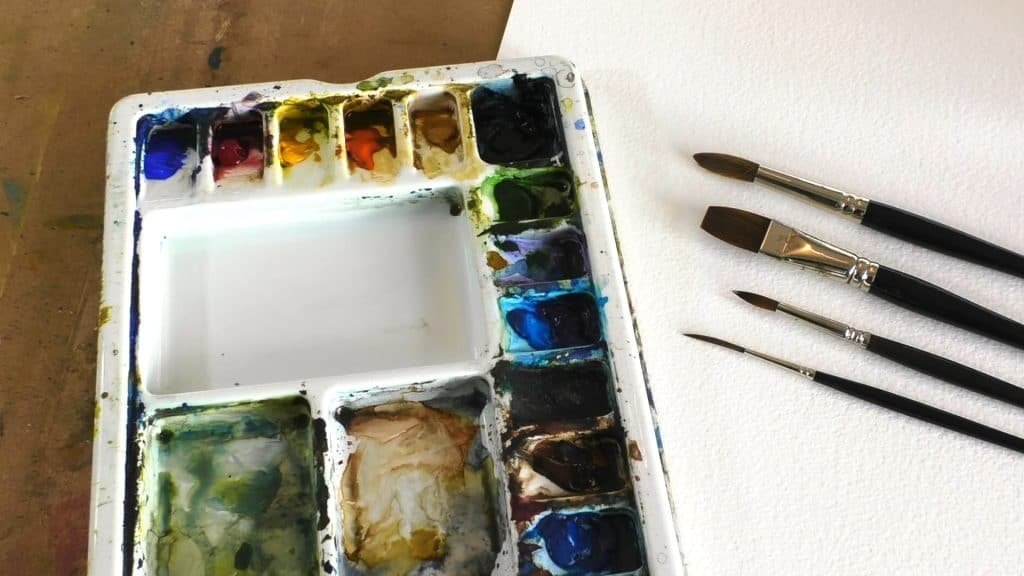
Before you begin, you need the right supplies. Paul Clark lists his trusted materials so you can prepare them too.
Essential Watercolor Paint Colors
Paul Clark uses a mix of primaries and earth tones. These include:
- Cobalt Blue
- Alizarin Crimson
- Cadmium Yellow
- Cadmium Orange
- Yellow Ochre
- Payne’s Grey
- Cerulean Blue
- Burnt Umber
This mix allows you to paint skies, sand, grass, and shadows without extra colors.
Choosing the Right Watercolor Paper
Clark paints on 300 lb Arches Rough paper. He recommends it because it can handle lots of water and texture. The rough surface also creates a natural grain, perfect for sand and waves.
Best Brushes and Tools for Beach Painting
You also need the right brushes. Paul uses:
- A number 12 round
- A ¾ inch flat
- A number 8 round
- A number 3 rigger
Other useful tools include a tissue, a spray bottle, and even the sharpened end of a brush. Later, you will also use a scalpel and a white pastel pencil for details.
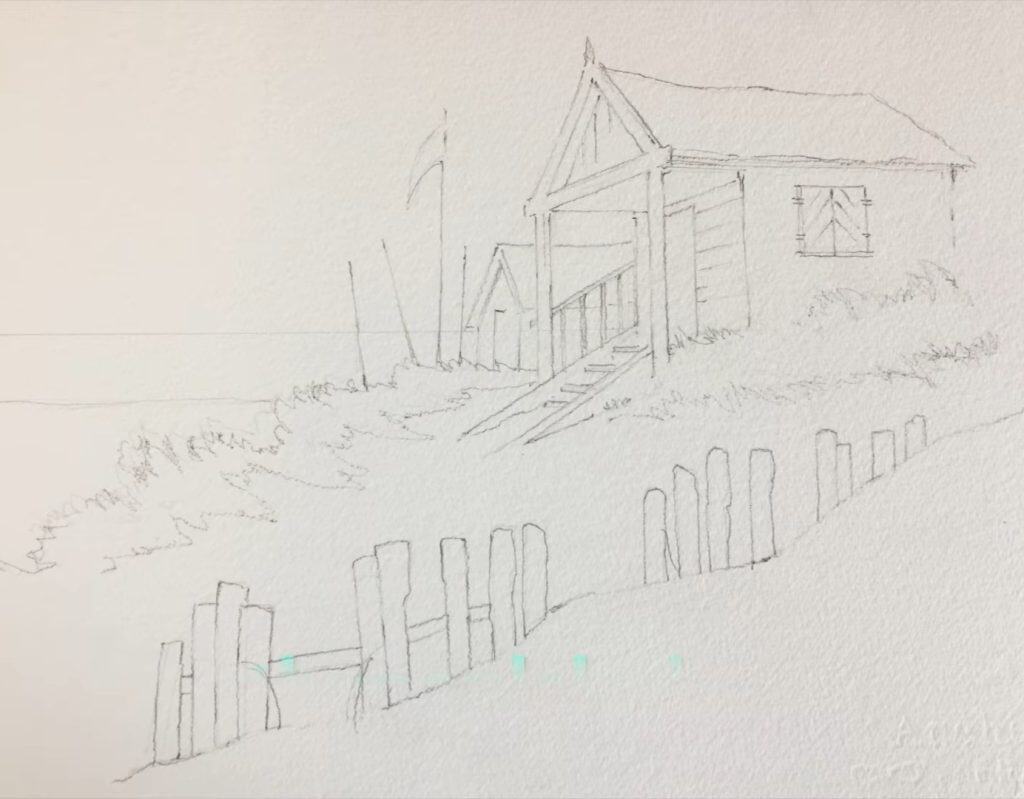
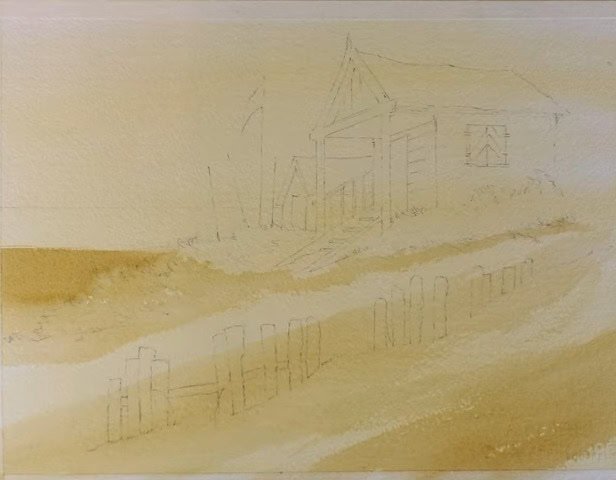
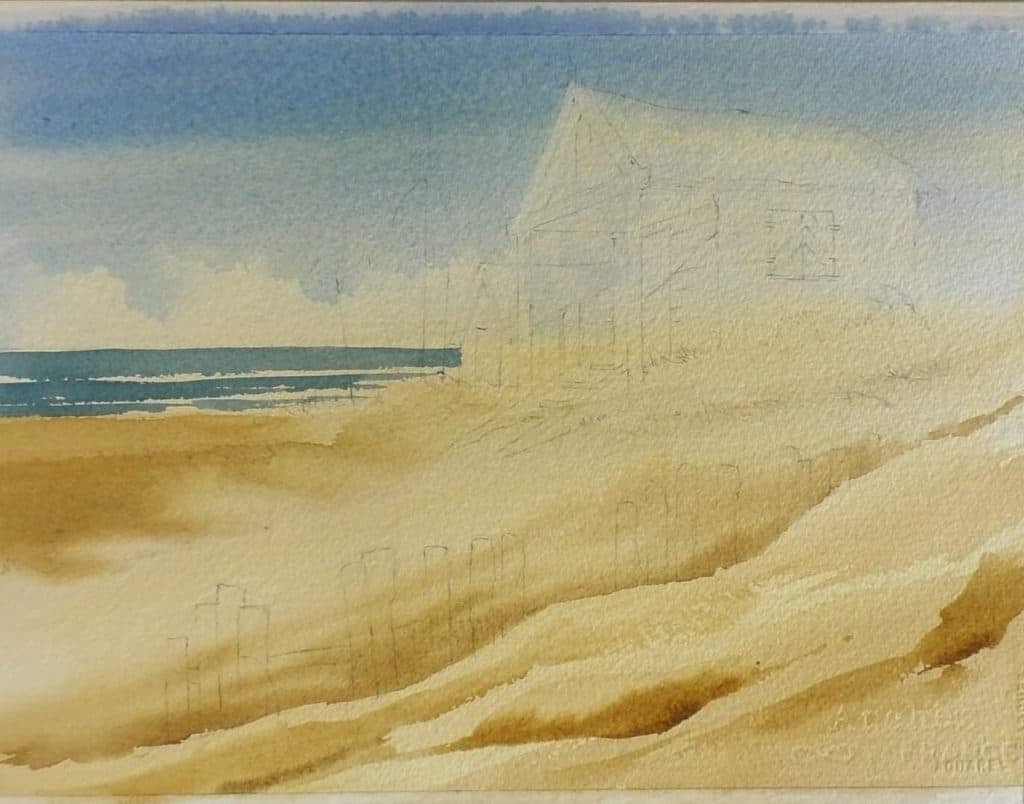
Step 2: Make a Simple Beach Scene Drawing
Now it’s time to sketch. Clark suggests a basic line drawing of the huts and dunes.
If drawing feels difficult, he provides a downloadable template. Keep the sketch light, since watercolor layers will cover the lines.
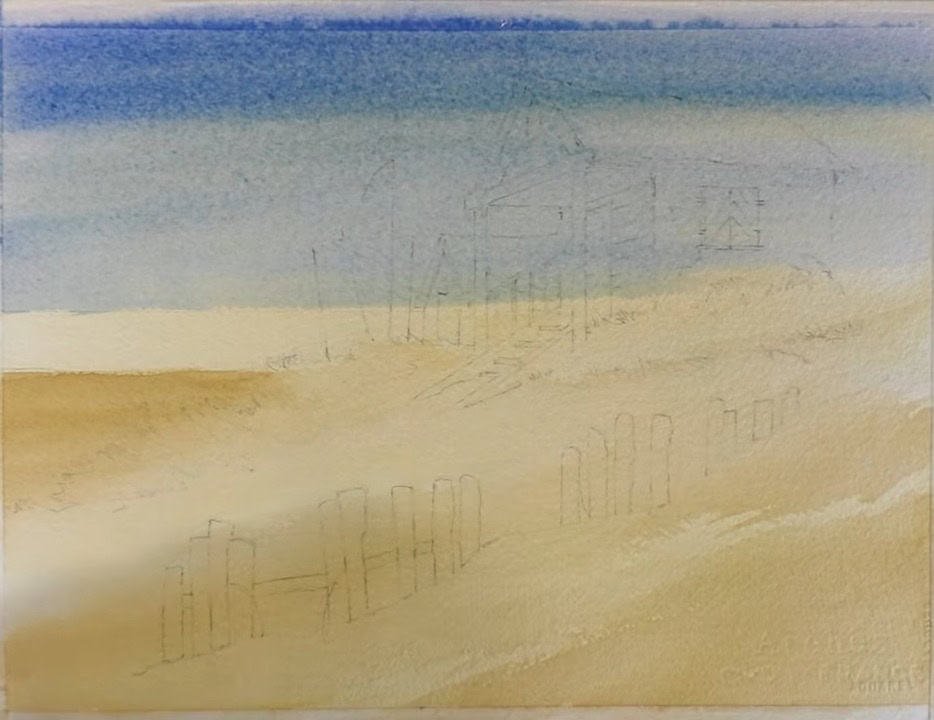
Step 3: Paint the Warm Underwash
The first wash sets the overall tone. Paul wants the whole painting to feel warm.
He mixes Cadmium Yellow with a touch of Alizarin Crimson. This creates a golden glow, like sunshine on the sand.
Paul wets the entire paper with clean water. Then he lays a wash of the warm yellow.
Using a flat brush, he lifts out a few lighter areas for highlights.
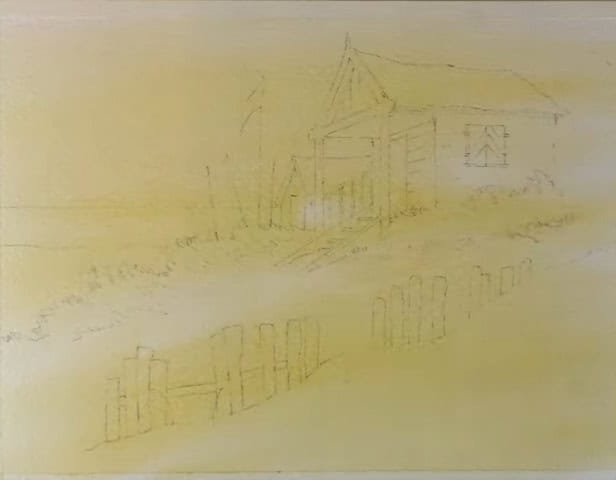
To deepen the base, he adds a touch of Burnt Umber into the yellow mix.
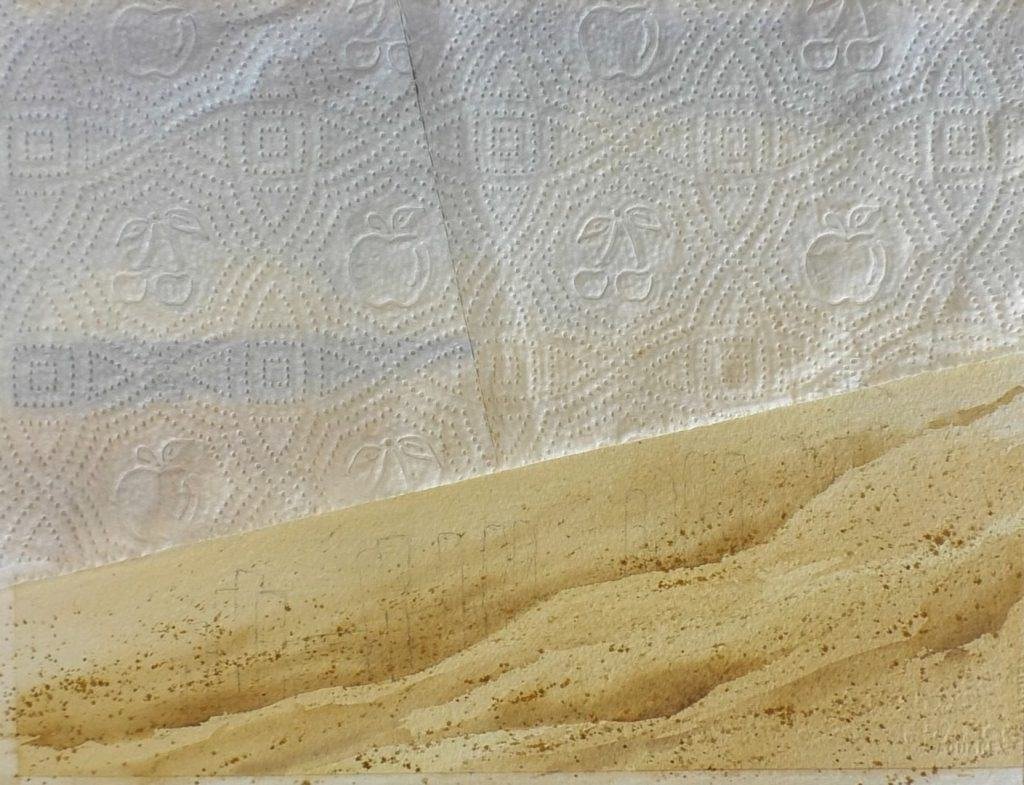
Step 4: Paint the Sand and Add Natural Texture
Once the underwash dries a bit, you can move to the sandy areas. This step builds the beach feeling.
Using the flat brush, Paul applies sandy tones. He mixes yellow and Burnt Umber in various strengths.
He follows the slope of the dunes with angled strokes. Dropping clean water in places helps soften edges and gives the sand a natural texture.
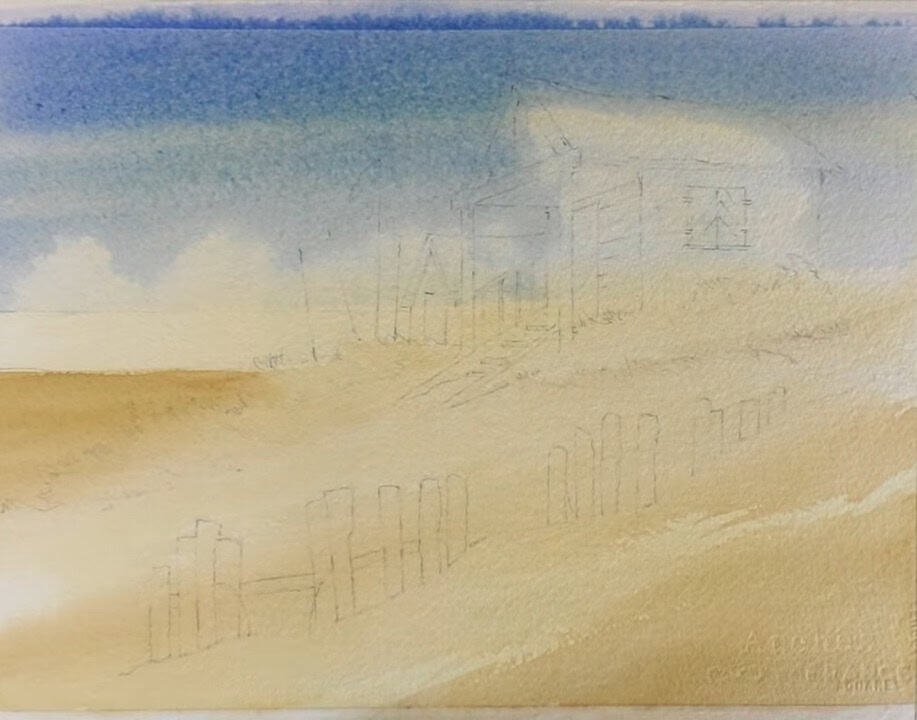
Step 5: Paint the Watercolor Sky
Now you’ll paint the wide, open sky. Paul keeps it soft but full of depth.
For the sky, he mixes a 50/50 blend of Cobalt Blue and Cerulean Blue. This balance makes the color natural and fresh.
He re-wets the sky area down to the horizon. Using bold, confident strokes with the flat brush, he lays the wash darker at the top and lighter near the horizon.
Quickly, he dabs with a tissue to lift out cloud shapes. Timing matters here. Do it before the paper dries.
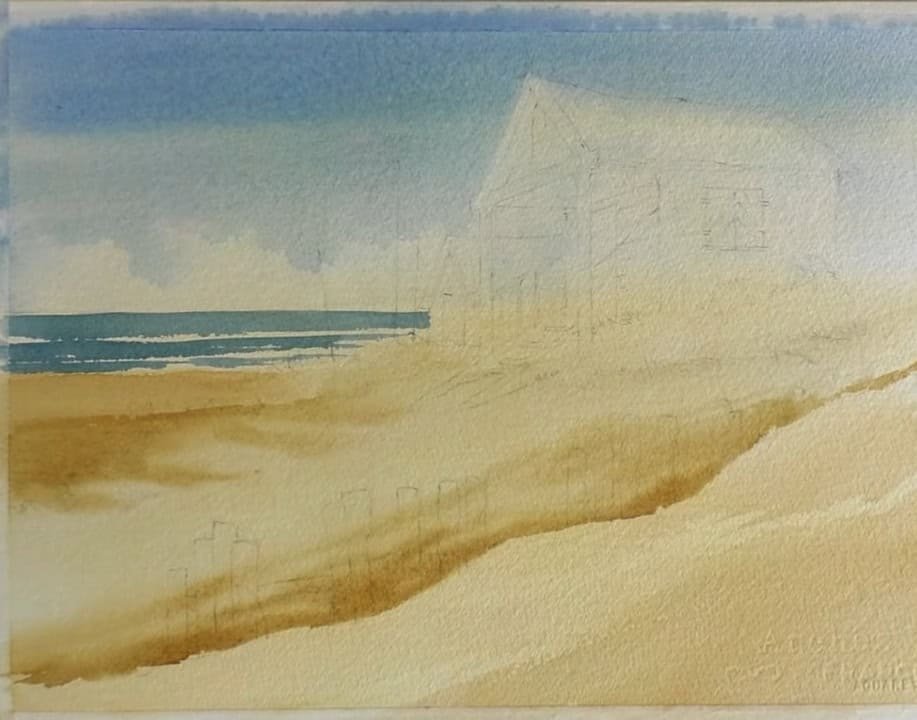
Step 6: Paint the Sea and Breaking Waves
The sea connects the sky and sand. Paul shows you how to keep colors harmonious.
He reuses the sky mix, adding a little Cadmium Yellow. This keeps the scene balanced.
With a number 12 brush, Paul paints a straight horizon line. Near the beach, he leaves gaps of white paper to suggest breaking waves.
Step 7: Add Shadows and Depth to the Sand
Sand looks flat without shadows. Adding contrast brings life to the beach.
Paul mixes Yellow Ochre, Burnt Umber, and water for darker sand tones. This gives warm, natural shadows.
He wets the sand area above the dunes again, then drops in this darker mix. In the foreground, he paints shapes of clean water first, then adds color along the edges. This creates dents and natural forms in the sand.
Step 8: Use Splatter Techniques for Realistic Texture
Sand often has random speckles. Paul introduces what he calls “the king of splat.”
- Load your brush with paint
- Tap it to create small splatters.
- Use tissue to remove any that are too strong.
This adds a natural, random texture.
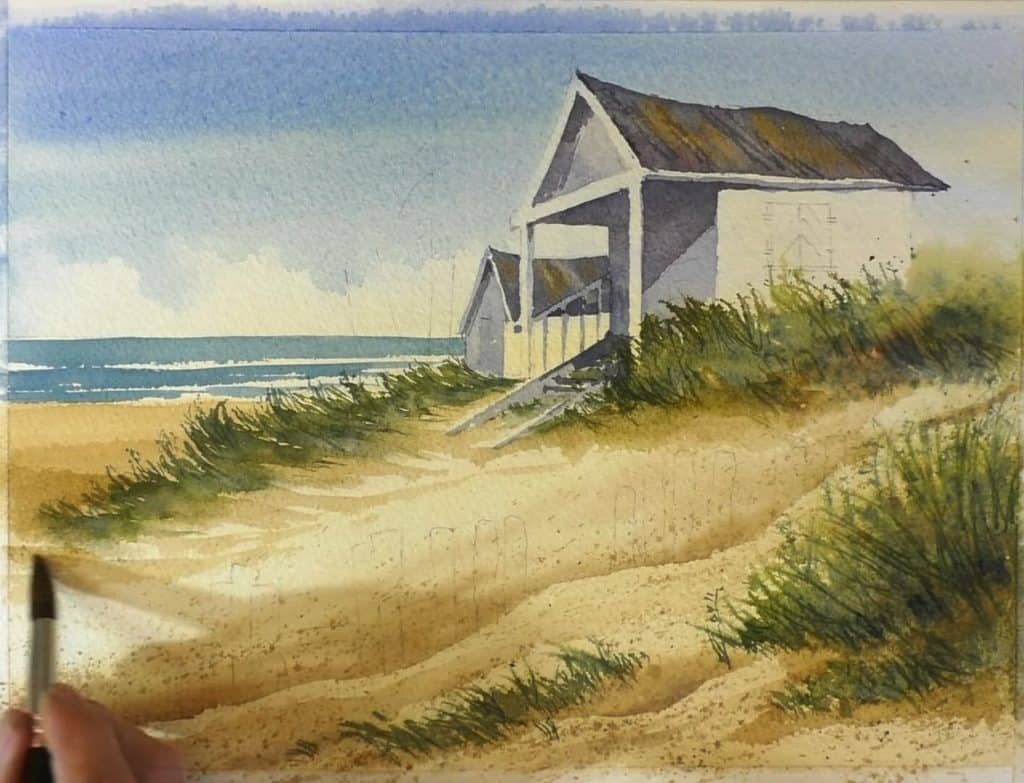
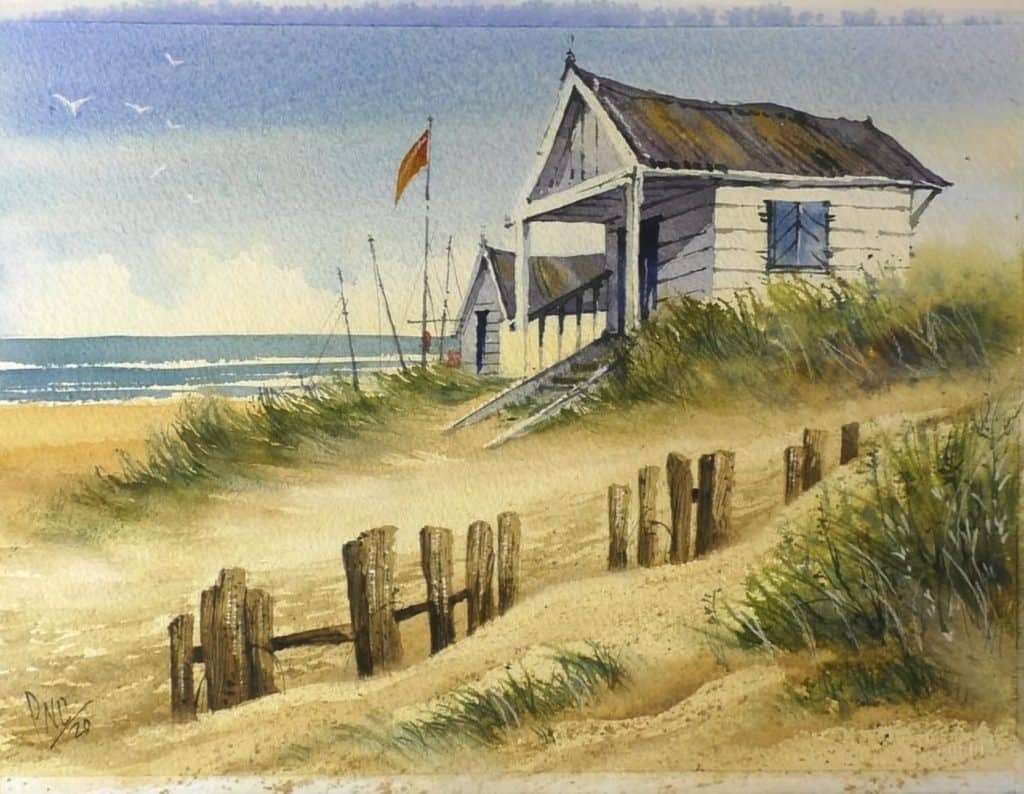
Step 9: Paint the Beach Huts in Watercolor
The beach huts add charm to the scene. Paul suggests working carefully here.
He mixes Cobalt Blue and Alizarin Crimson with a little Yellow Ochre for a bluish grey. With this, he paints the shadow sides of the huts.
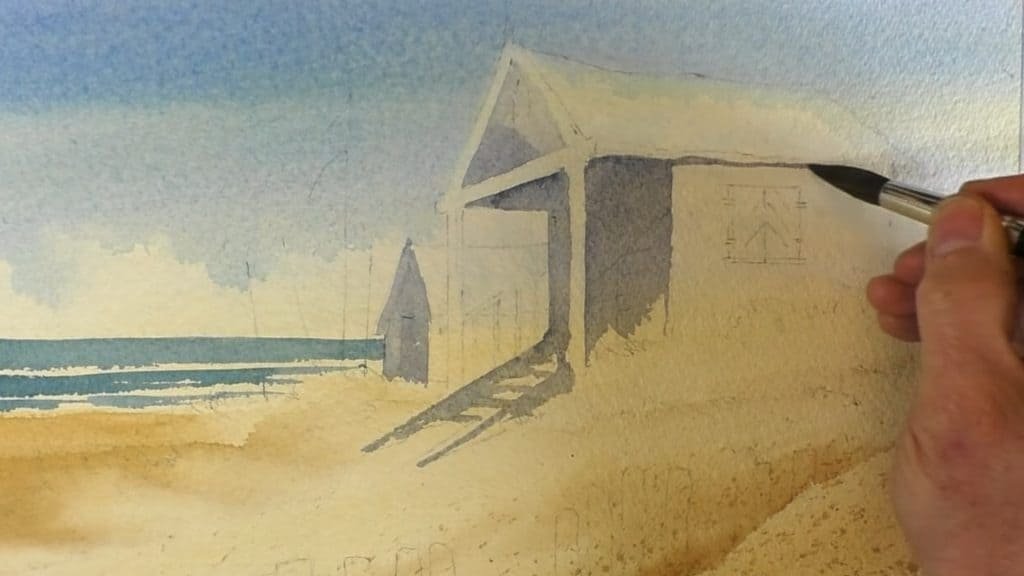
For the roof, he strengthens the mix with Payne’s Grey. He also drops in Cadmium Orange to suggest rust or growth. Using the sharpened end of his brush, he scratches roof details for texture.
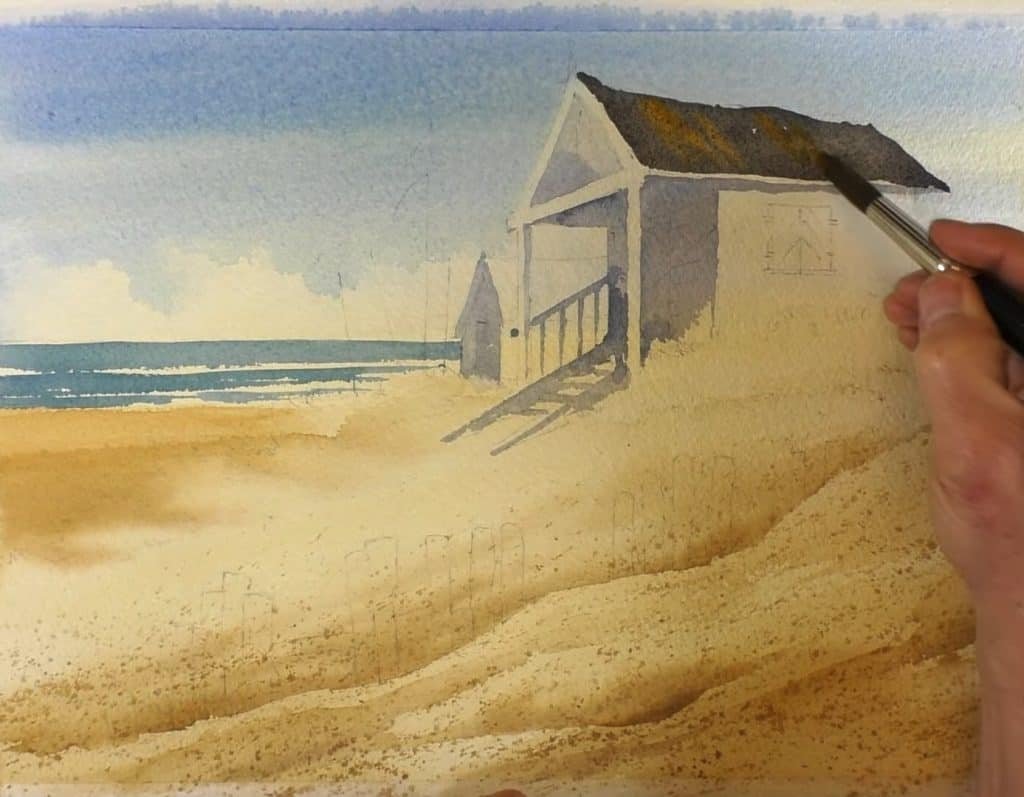
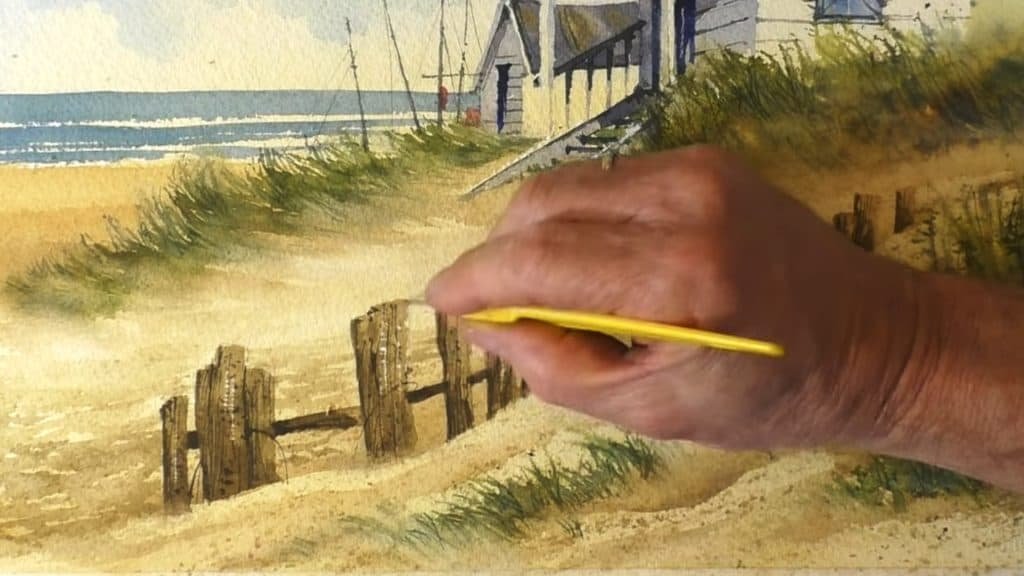
Next, he paints doors and shutters in Cobalt Blue, adding Payne’s Grey at the top for depth. The wooden fence is painted with Yellow Ochre, Burnt Umber, and a hint of Cobalt Blue.

While the wash is still wet, he drops in darker tones. Then, using the brush end, he scratches wood grain lines.
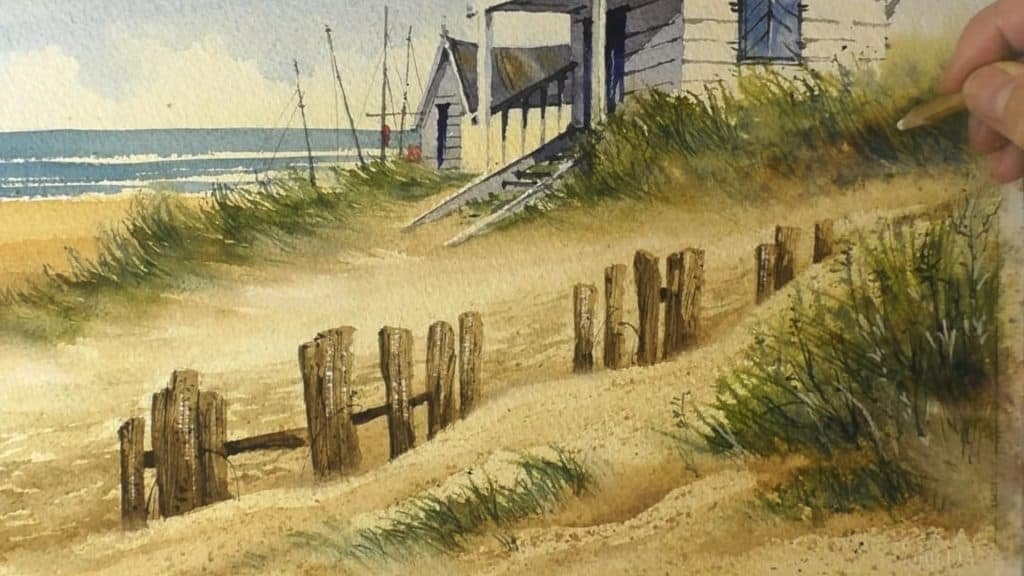
Step 10: Paint the Grass and Foreground Details
Grasses bring the dunes to life. Paul uses two green mixes.
- Light green: Cobalt Blue + Cadmium Yellow + a touch of Crimson
- Dark green: More Cobalt Blue and Crimson added
With the lighter green, Paul makes quick dabby strokes using the number 12 brush. Then he drops the darker green into the wet base near the bottom.
He also scratches details with the brush end and softens edges with clean water.
Paul sprays small droplets of water over grassy areas. Then he paints light washes and drops in darker tones wet-in-wet. This creates soft, blended textures. With his rigger, he adds thin grassy details.

Step 11: Add Fine Shadows and Final Hut Details
Now it’s time to deepen the shadows and finish the huts. Paul mixes Yellow Ochre, Burnt Umber, and a little Cobalt Blue.

He uses this for darker sand shadows under grasses and along the ridge. After drying, he softens the edges with damp tissue.
He revisits the fence, layering watery Payne’s Grey for subtle details. Less is more here. Your eye can fill in missing lines.
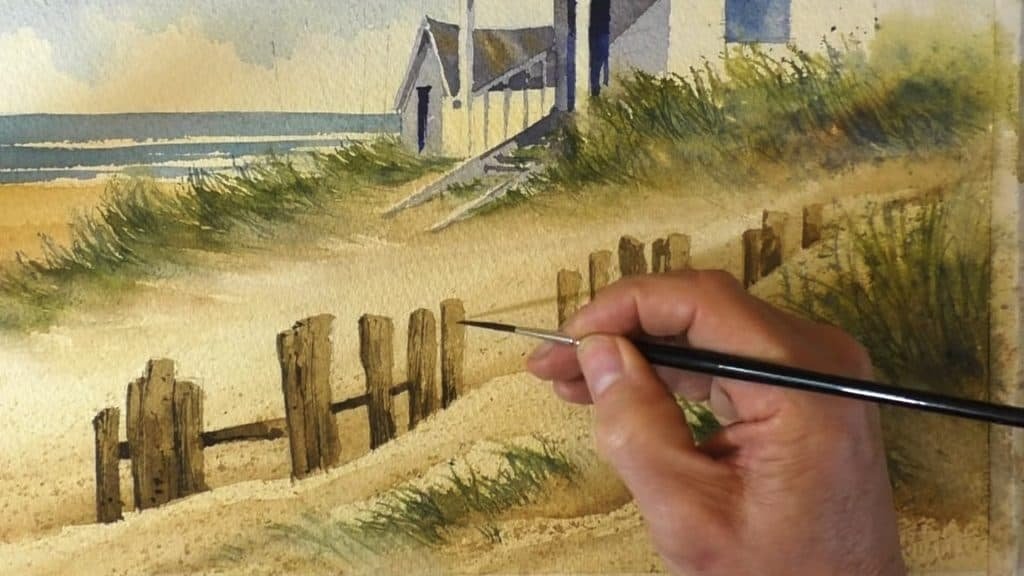
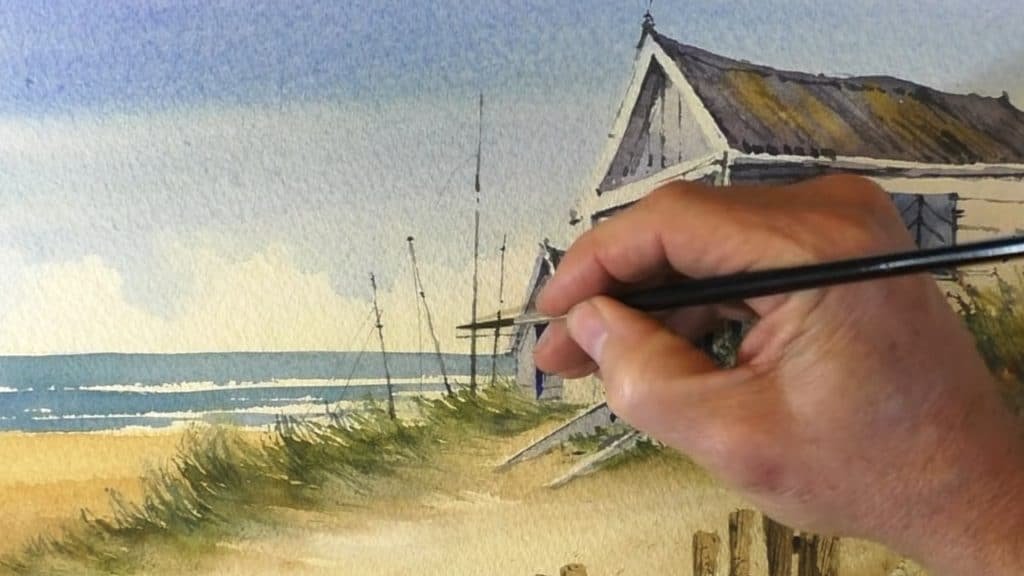
Paul adds mast cables using the rigger brush. With quick, confident strokes, he suggests lines without overworking. He also softens a few areas with tissue.
Step 12: Add Decorative Details to the Scene
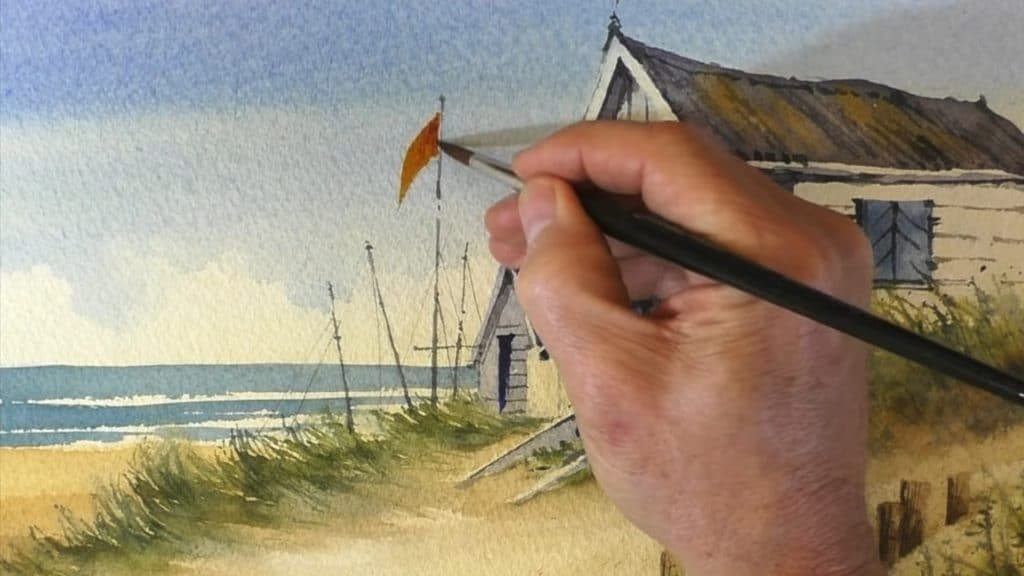
These final details bring the painting to life. Paul paints a small flag with Cadmium Orange. He notes you can choose any color—it’s your painting. He also adds a few red touches for balance.
He decides the foreground path needs more texture. With a watery mix of Yellow Ochre and Burnt Umber, he paints a transparent wash that lets earlier texture show through.
Paul scratches wave details into the sea using a scalpel.
He adds sparkle with a white pastel pencil. Finally, he paints simple seagulls and beige grass for extra charm.
Step 13: Sign and Finish Your Watercolor Beach Scene
The last step is to sign your painting. Paul reminds you that this is your personal stamp.
Step back and enjoy how loose brushwork, bold washes, and playful details come together to create a coastal scene full of life.
Final Thoughts
Painting a beach scene in watercolor is not just about technique. It’s about capturing a mood. Paul Clark’s step-by-step guide gives you tools to create sand, sky, sea, and huts with confidence.
Now it’s your turn. Will you try this beach scene and add your own twist? Pick up your brushes and start today.