
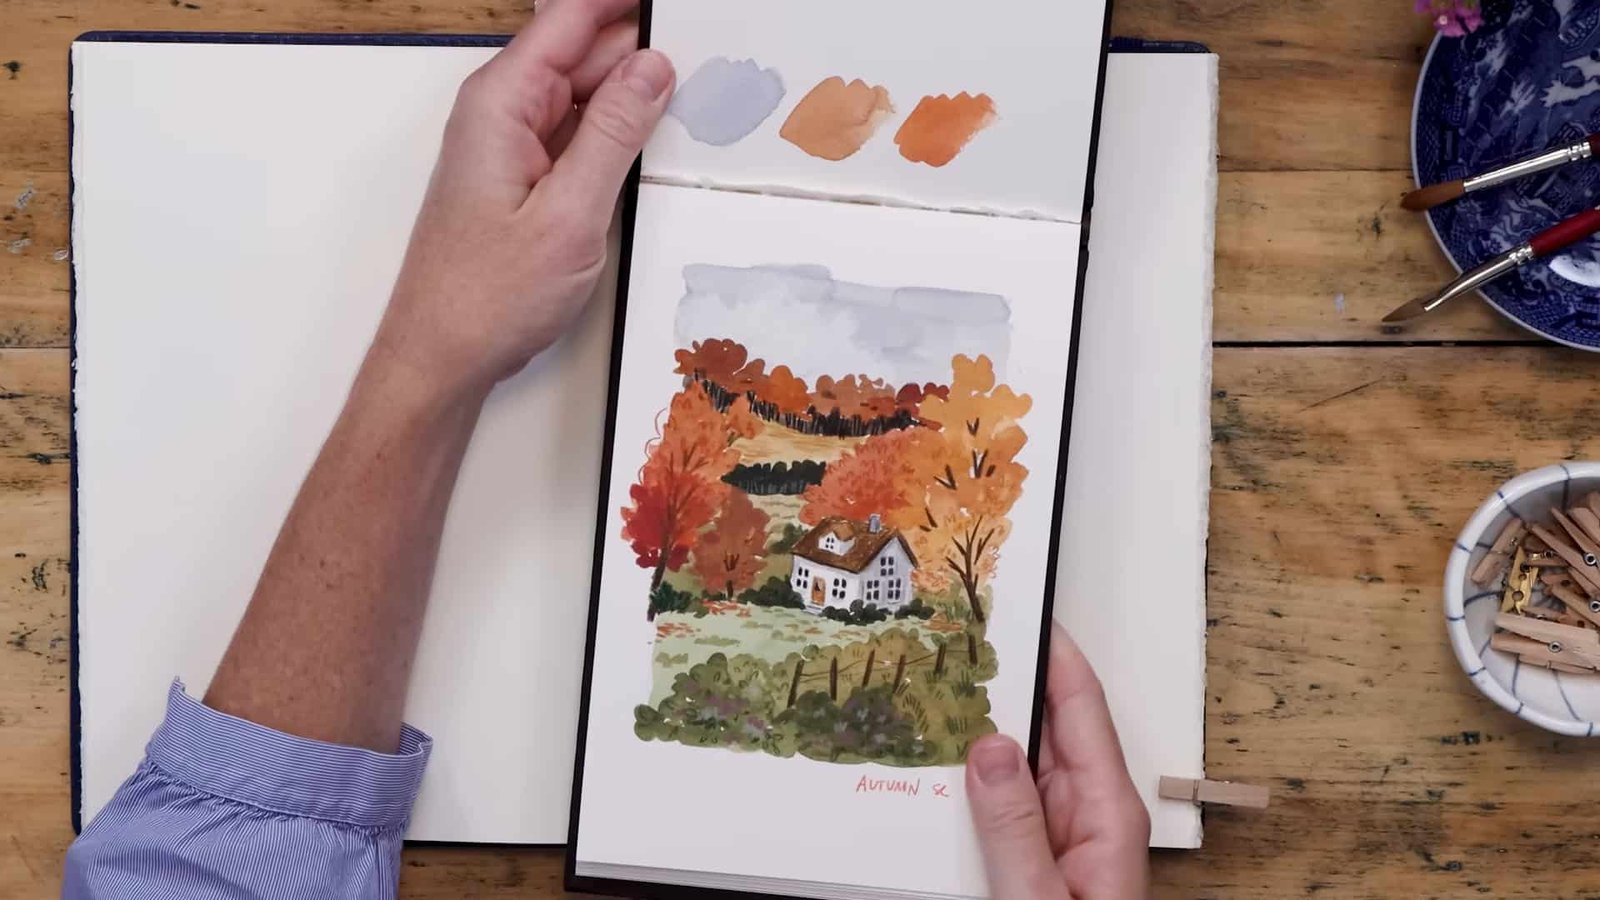
How can a simple watercolor wash turn into a beautiful autumn storybook scene? That’s exactly what artist Shayda Campbell shows in her fall illustration tutorial.
She combines soft watercolor washes with colored pencil to create a whimsical farmhouse landscape. The result feels warm, cozy, and full of personality.
This tutorial makes mixed media fun and approachable. Let’s explore how Shayda Campbell builds her autumn farm step by step.
Step 1: Choose and Simplify a Reference Photo
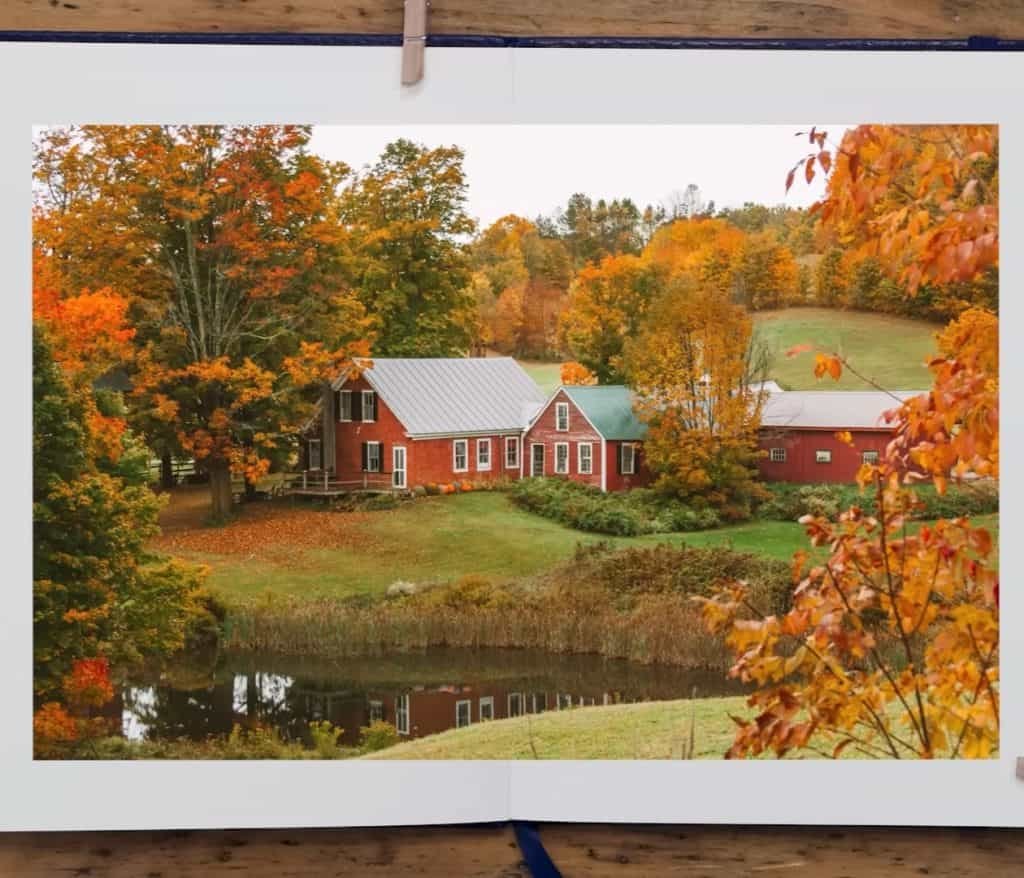
Shayda Campbell says that the illustration begins with inspiration. She starts with a photo of a farm in fall, but she reminds viewers that an image does not need to be copied exactly. The reference is only a guide.
Picking the Farm in Fall Scene
She chooses a Pinterest photo that shows a farmhouse surrounded by autumn colors. It has multiple buildings, trees, a fence, and even water in the foreground. While the image is lovely, she decides to make it her own.
Deciding What to Keep or Remove
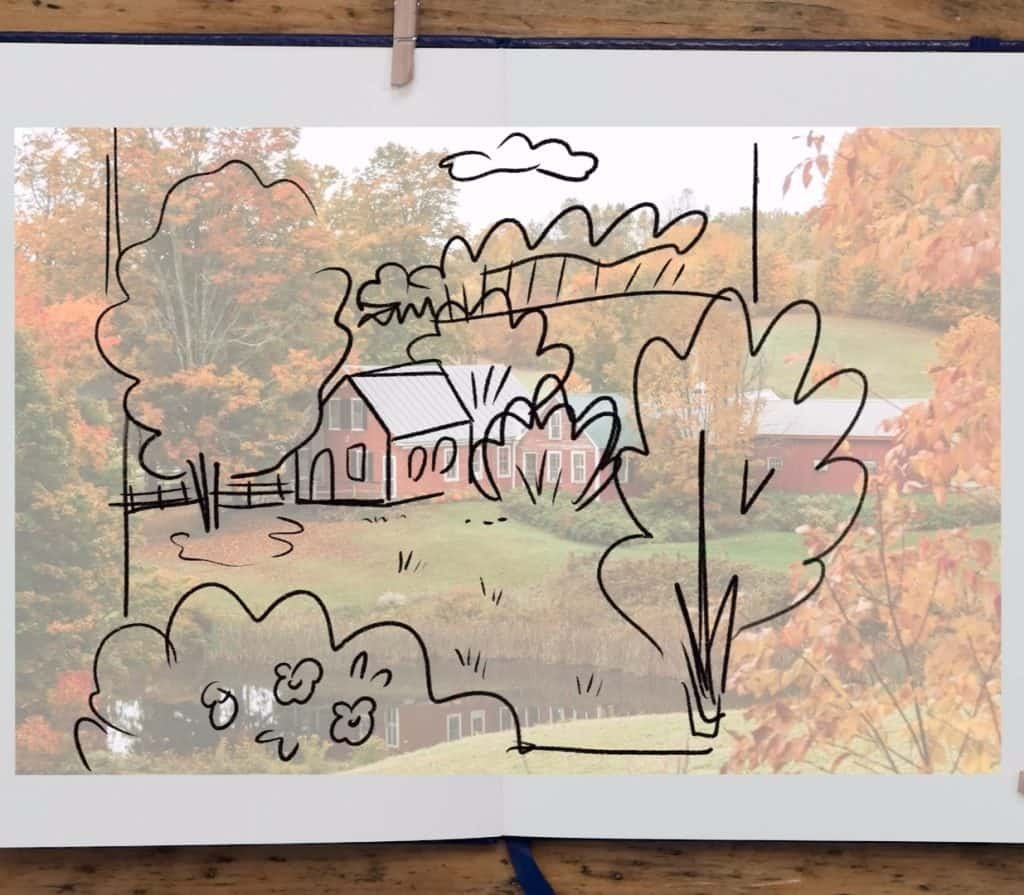
Not every part of a photo is necessary. Shayda Campbell suggests focusing only on the elements that support the story.
She keeps:
- The main tree
- The white house
- A fence near the house
She removes:
- Extra buildings
- Some water in the foreground
- Overly busy background details
This allows the illustration to feel lighter and more like a storybook page.
Moving Trees and Adjusting Composition
Composition is about balance. Shayda Campbell shifts some of the trees to sit behind the house.
She also adjusts the tree line, tucking it higher in the background to give depth. These small changes make the scene easier to read and more storybook-like.
Adding Hedges, Fence, and Extra Sky
Not all edits involve removal. Some involve addition. Shayda Campbell places a hedge in the foreground to replace a patch of water from the photo.
She also extends the sky, making it taller in her sketchbook rectangle. This gives the scene a more open, airy feel.
Breaking Free from Exact Photo Copies
This stage is about freedom. Shayda Campbell highlights that artists can use Pinterest or Instagram photos as inspiration, but they don’t have to follow every detail. Changing the layout is part of the fun.
Her tip: treat the photo as a guide, not a strict rule.
Step 2: Create a Light Pencil Sketch
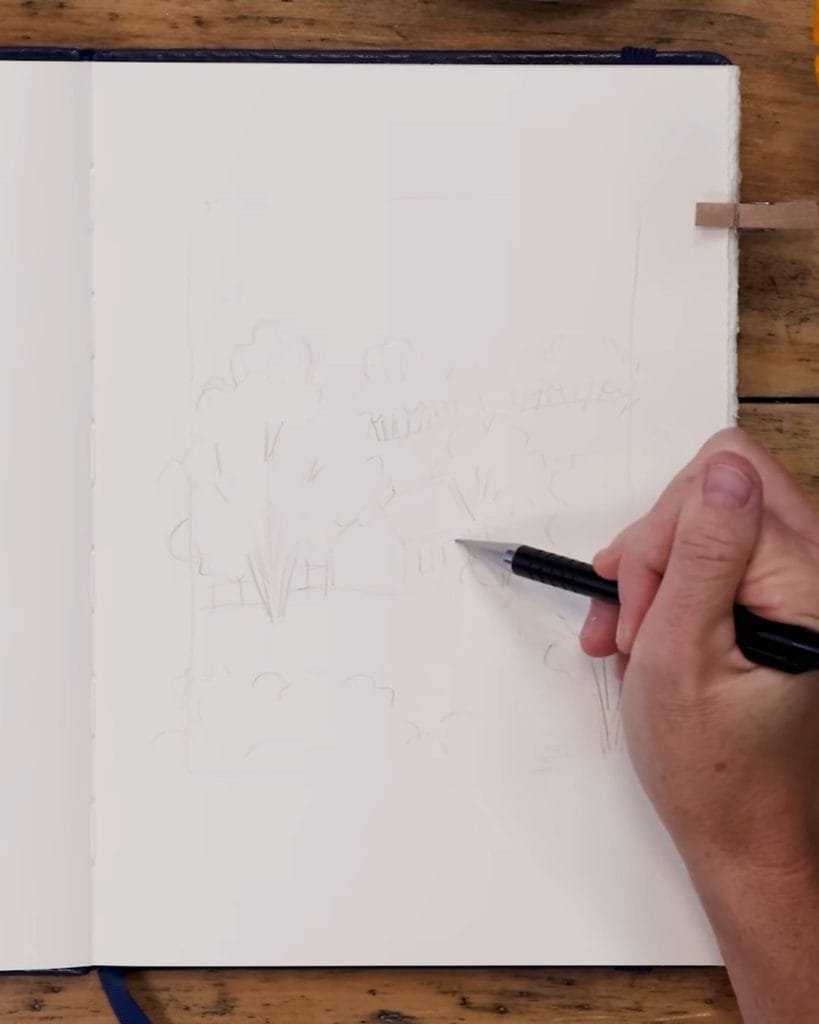
With the composition in mind, it’s time to sketch. Shayda Campbell keeps her lines very light and simple.
Drawing the Rectangle Frame
She begins by drawing a rectangle directly on the sketchbook page. This frame helps organize the space and creates clear boundaries for the painting.
By keeping a defined box, she avoids running out of space as the illustration grows.
Blocking the Big Tree Shape
The big tree is drawn first. Shayda Campbell uses a messy V shape for the trunk, then a loose cloud-like shape for the foliage.
She explains that these basic forms act as placeholders. The watercolor later fills them with organic details.
Sketching the House Beside the Tree
Next comes the house. She places it just to the side of the tree, keeping it smaller so the foliage remains dominant.
Simple lines define the roof and corners. The building doesn’t need perfection—it only needs enough structure to suggest a home.
Adding Bushes, Tree Line, and Horizon
She adds small trees or bushes on both sides of the house. These extra plants frame the building and make it look cozy.
Above the roof, she sketches a line of trees. The horizon line is lightly drawn to separate the meadow from the background.
Keeping the Sketch Loose and Light
Finally, Shayda Campbell erases unnecessary lines. She reminds viewers that watercolor works best over light sketches.
The goal is not to create a detailed drawing but to leave space for color and texture.
Step 3: Mix an Autumn Watercolor Palette
Before painting, the right colors need to be mixed. Shayda Campbell carefully prepares her palette to capture the warm tones of fall.
Mixing Warm Yellows for Foliage
For golden leaves, Shayda uses:
- Cadmium yellow
- Naples yellow
- Burnt umber
Adding a touch of white creates a softer shade. These colors produce a warm glow that feels true to autumn.

Mixing Rich Oranges with Browns
To mix natural oranges, she blends light red with Naples yellow. A hint of burnt umber tones it down.
This prevents the orange from appearing too bright or artificial. Instead, it feels earthy and natural.
Mixing Reds with Natural Undertones
For red leaves, she suggests mixing rose madder hue with light red. Adding a little yellow makes the shade warmer.
The key is avoiding harsh, primary red. A softer, muted red blends better with other fall tones.

Mixing Organic Greens for Fields
For the meadow and bushes, Shayda Campbell mixes greens with a brown or rose madder hue. This creates what she calls a “dead green” that suits fall.
Instead of bright, summer greens, these shades look muted and seasonal.
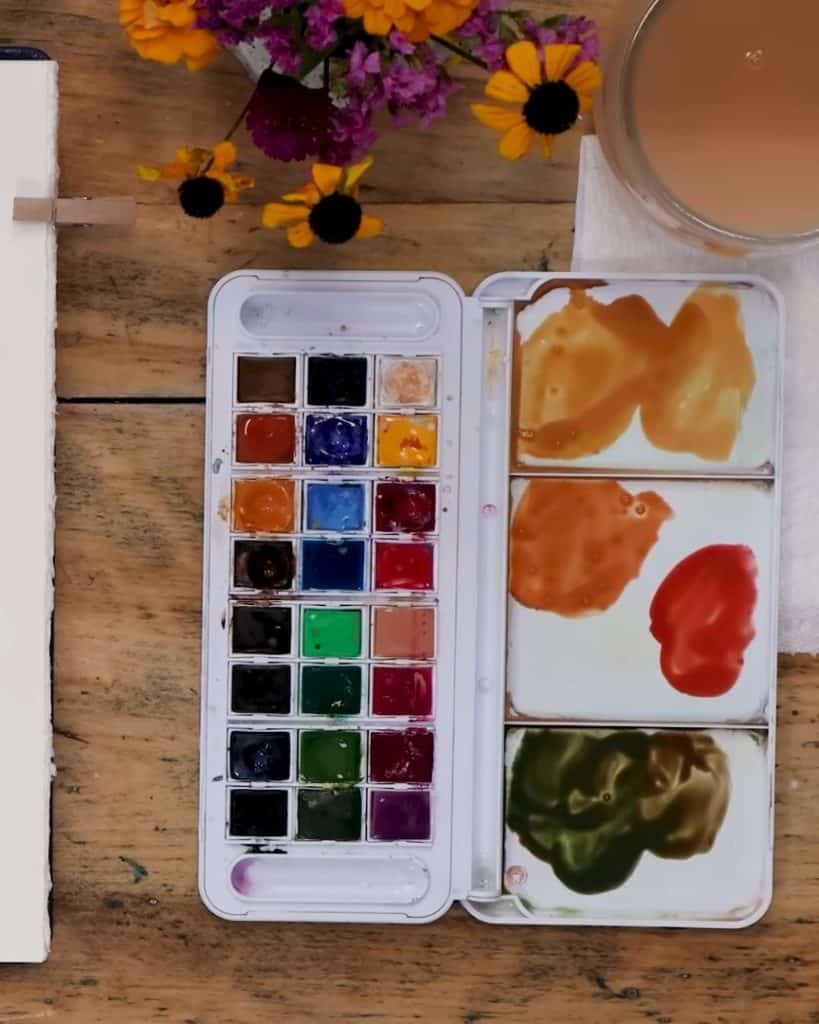
Mixing Soft Gray Tones for the Sky
Finally, she prepares the sky wash. Lots of white with a touch of Payne’s gray creates a pale, moody gray.
She adds extra water so the sky feels light and airy.

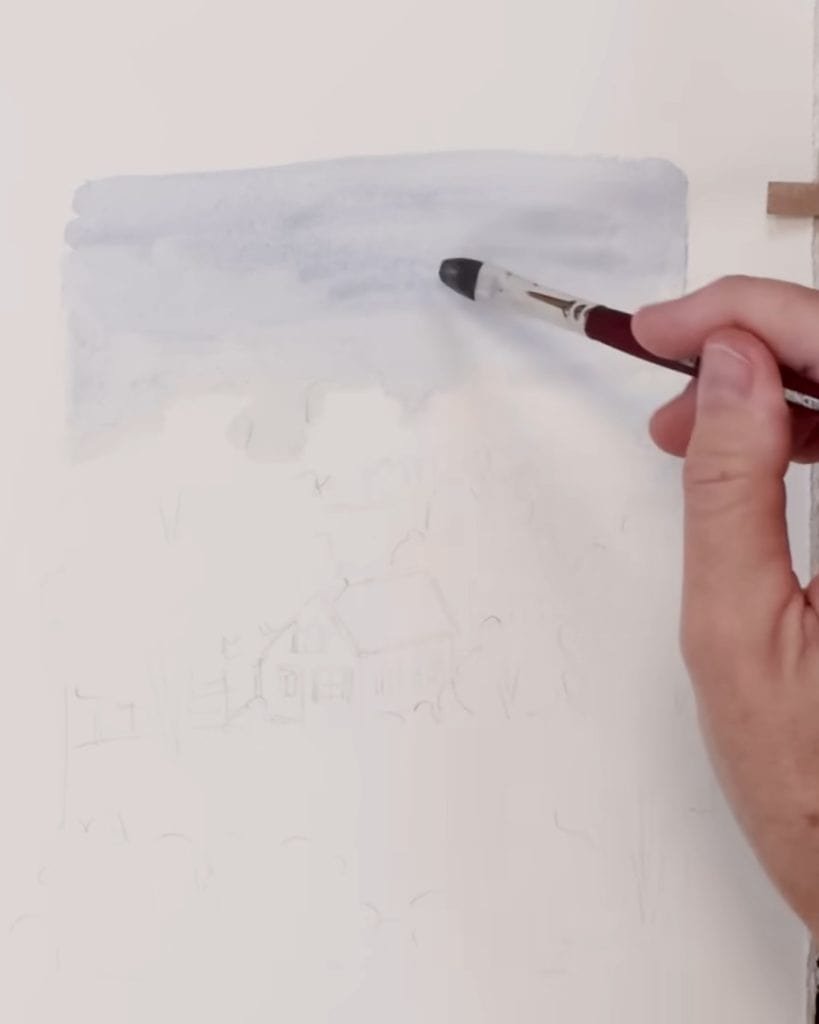
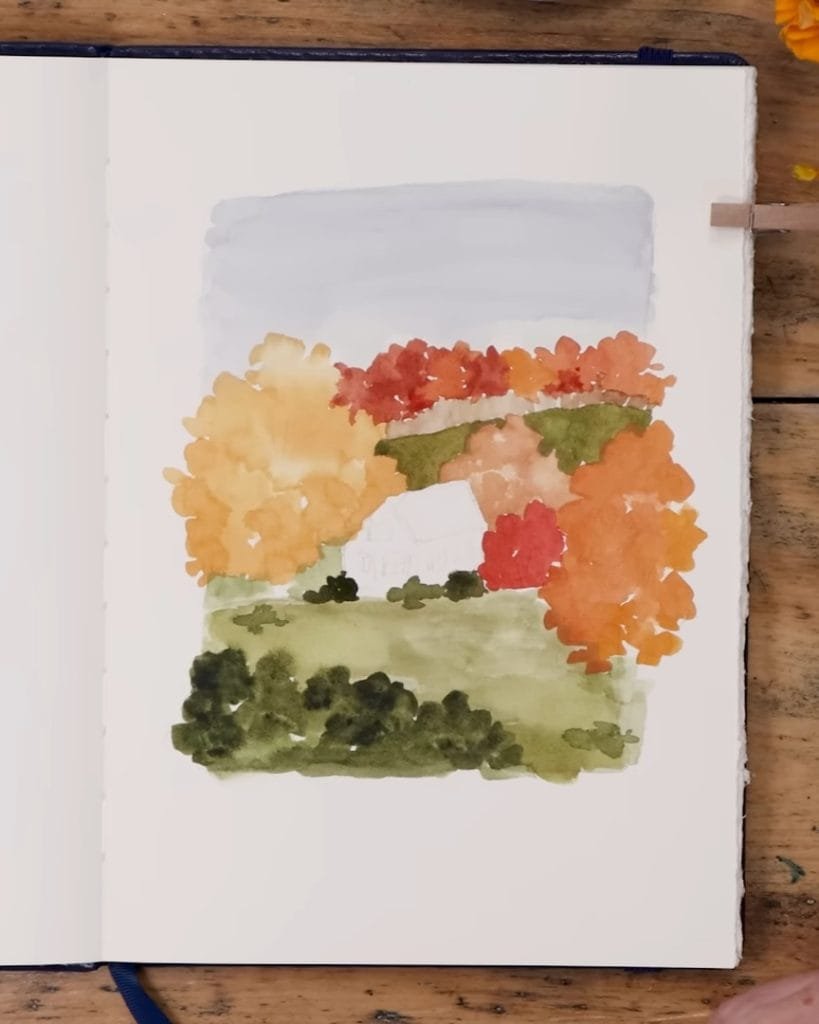
Step 4: Paint the Sky Background
With colors ready, it’s time to begin painting. Shayda Campbell starts with the sky because it sets the mood of the piece.
Creating a Soft Gray Wash
She uses a number eight filbert brush to spread the gray wash across the sky. The wide bristles cover large areas quickly.
By keeping the wash watery, the result feels soft and natural.
Blending Water and Pigment Smoothly
She adds more water as she moves downward, keeping the area behind the trees lighter. This prepares the background for layers of foliage.
The smooth gradient helps the painting look cohesive.
Building Contrast Behind Trees
Shayda Campbell notes that lighter areas behind foliage help the leaves stand out. Planning this early prevents the trees from getting lost against the background.
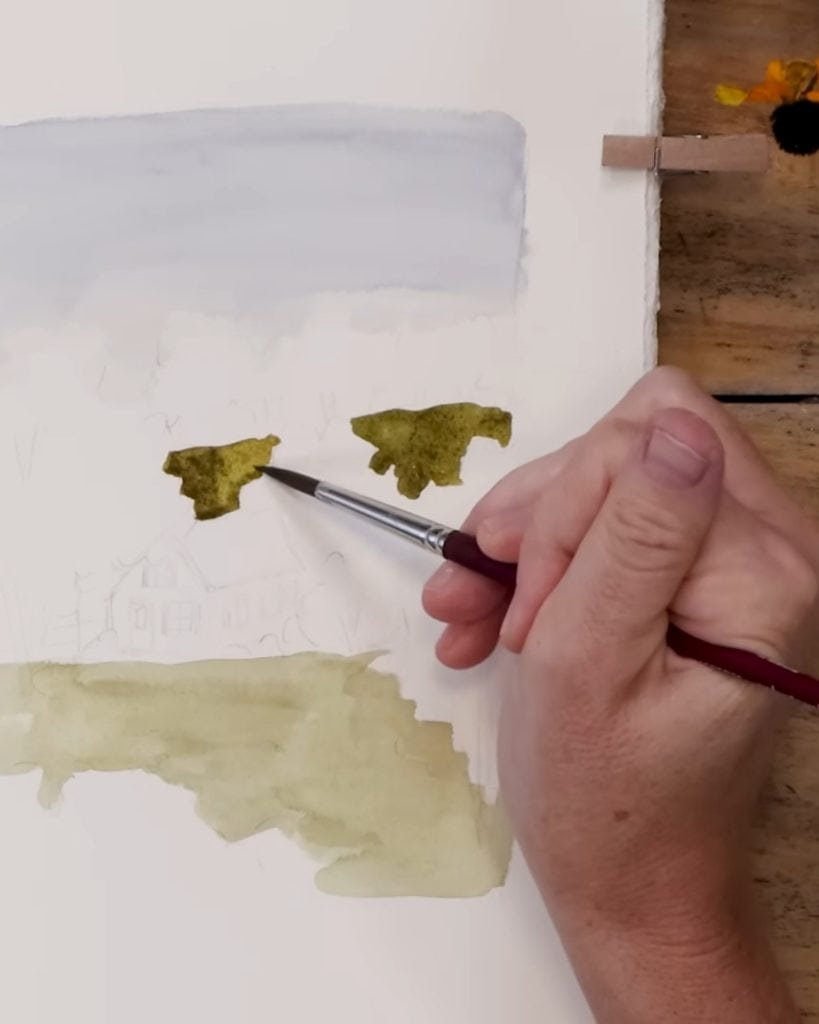
Step 5: Paint Fields and Hedges
Once the sky is finished, she moves to the land. The fields and bushes add depth and help frame the house.
Filling Foreground Meadow with Light Green
She uses a watery green wash for the foreground meadow. The paint is light, leaving room for later details.
The goal is to cover the area without making it too dark.

Deepening Upper Meadow with Pigment
The upper meadow, near the horizon, is painted with a stronger green. She mixes Hooker’s green, sap green, and burnt umber.
Less water makes the pigment darker, showing that this area is farther away.
Adding Hedge Texture with Round Brush
Switching to a round brush, she creates messy strokes for hedges. The dabs of darker green suggest bushes without needing precision.
Changing the green slightly adds variety and makes the texture feel natural.
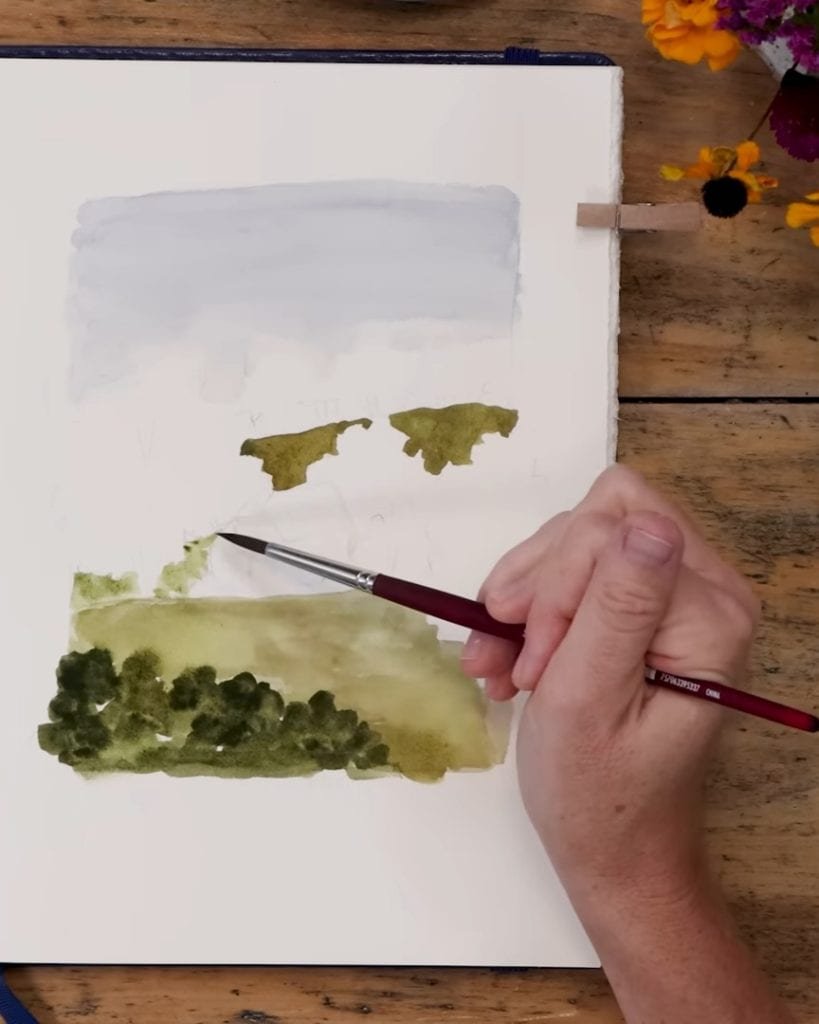
Fixing Mistakes and Adjusting Grass
Shayda Campbell reminds you not to panic if a section is missed. Grass behind the fence, for example, can be added later.
Her tip: watercolor is flexible, and small mistakes can always be fixed.
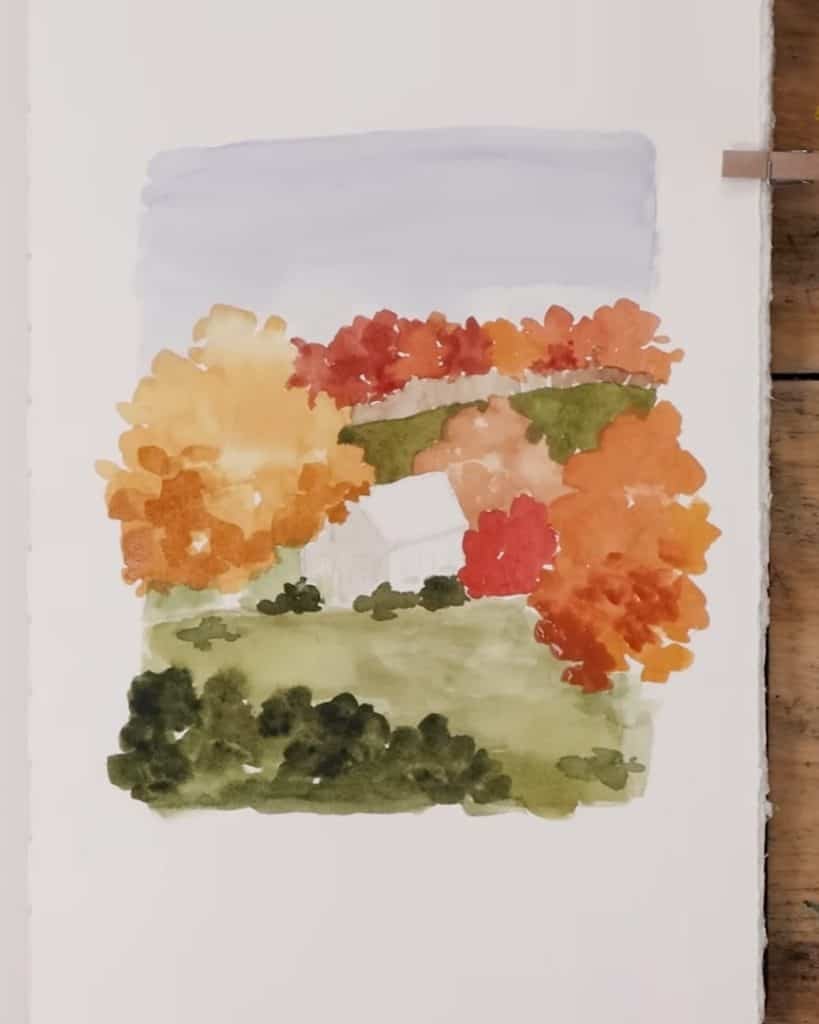
Step 6: Paint Autumn Foliage Layers
This is the most exciting step. Shayda Campbell paints the colorful fall leaves, starting with bold oranges and moving through layers of red and yellow.
Painting the Foreground Orange Tree
She begins with the largest tree in the foreground. Using the orange mix, she dabs the brush against the page, forming loose clusters of leaves.
Adding a little burnt umber prevents the orange from feeling too bright.
Balancing Yellows, Oranges, and Reds
She adds Naples yellow mixed with brown for golden leaves. Then she layers in soft red shades.
By combining three main tones, yellow, orange, and red, she creates depth and variation.
Using Wet-on-Wet for Leaf Blending
Sometimes she adds water first, then drops pigment into the wet area. The color spreads softly, giving a natural look.
This technique works well for leaves, where blending and transparency matter.
Adding Color Variations for Realism
She mixes small changes into each color. A bit more brown, or a bit more yellow, creates subtle shifts.
These variations stop the foliage from looking flat or repetitive.
Painting Final Tree with Muted Tones
For the last tree, she uses a softer mix of burnt umber, white, and Naples yellow. This muted color balances the brighter trees and adds harmony.
Step 7: Paint the House and Details
After the foliage is complete, the farmhouse becomes the next focus. Shayda Campbell paints it in a way that contrasts beautifully with the warm autumn colors.
Choosing White House for Contrast
She chooses to keep the house white. Against the orange tree, this bright choice makes the structure stand out. The white walls provide calm balance in the composition.
Adding Light and Shadow Effects
Even though the house is white, Shayda Campbell does not leave it flat. She adds faint gray shadows under the roofline and around the windows. These gentle touches suggest depth and sunlight without overpowering the building.
Painting Roof Texture and Shingles
The roof receives careful brushwork. She paints it in earthy gray tones and hints at shingle texture with soft strokes. This detail makes the house feel cozy and adds a touch of realism.
Keeping the Look Whimsical
Shayda Campbell notes that the house does not need perfect lines. If the roof leans or the windows are uneven, the charm increases. Storybook style thrives on quirks, not perfection.
Step 8: Let Painting Dry Before Pencils
Before picking up pencils, the watercolor layers must dry fully. Shayda Campbell explains why this step is important.
Why Dry Layers Are Important
If the watercolor is still wet, pencil marks will tear the paper or smudge the paint. Allowing the piece to dry ensures that the pencil lines remain crisp and clean.
Preparing Colored Pencils and Tools
As the painting dries, Shayda Campbell chooses her pencil set. She gathers warm browns, dark grays, and other earthy shades that match the autumn palette. This preparation makes the next stage smooth.
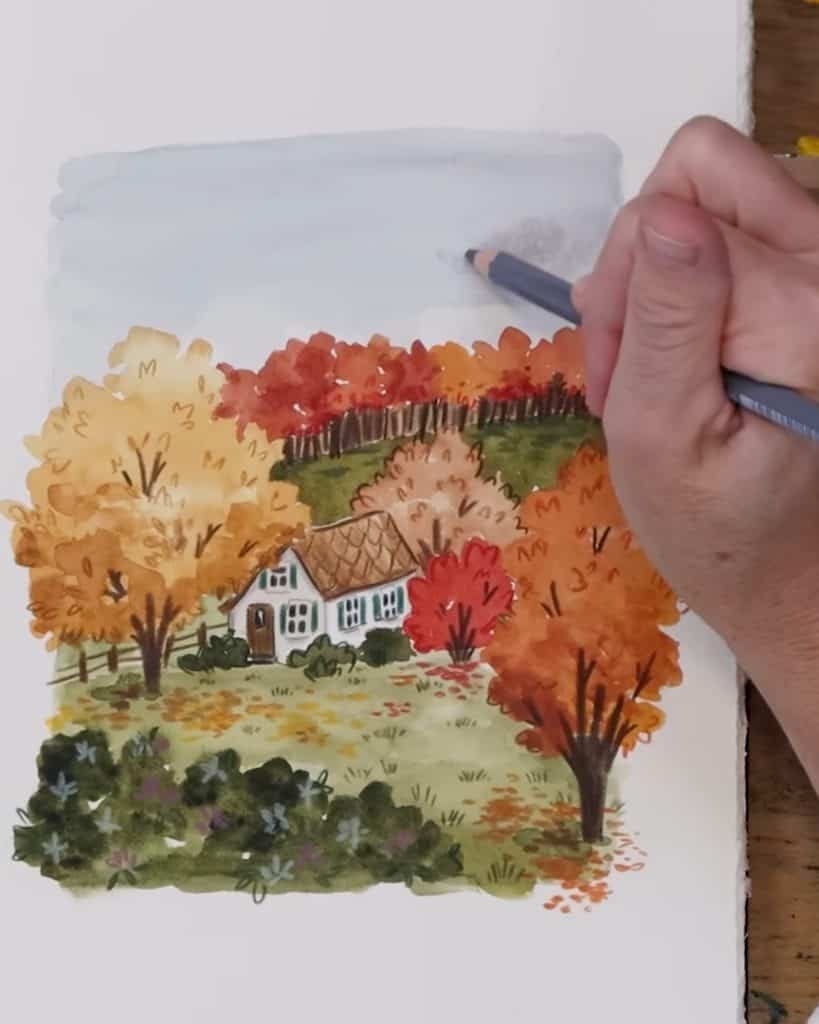
Step 9: Add Storybook Details with Pencil
Now the storybook magic begins. With colored pencils, Shayda Campbell adds character and fine details that watercolor alone cannot provide.
Drawing Tree Trunks and Branches
She starts with the tree trunks. Using a dark brown pencil, she sketches simple vertical lines. Then she extends small branches into the foliage. These marks break up the paint and add structure to the tree.
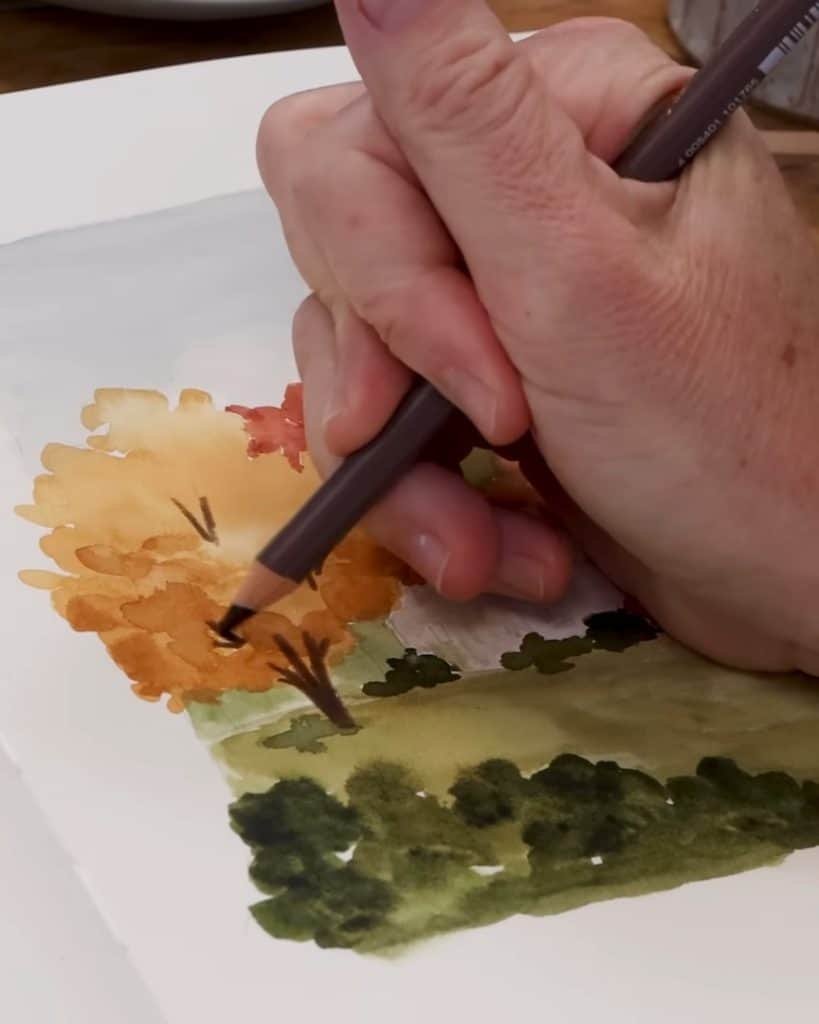
Scribbles for Leaves and Texture
The pencil work does not need to be neat. Shayda Campbell uses scribbles to suggest clusters of leaves. These irregular lines make the trees feel playful and less formal.
Enhancing Tree Line with Browns
For the background trees, she shades softly with muted brown. This helps separate them from the bright orange tree without drawing too much attention.
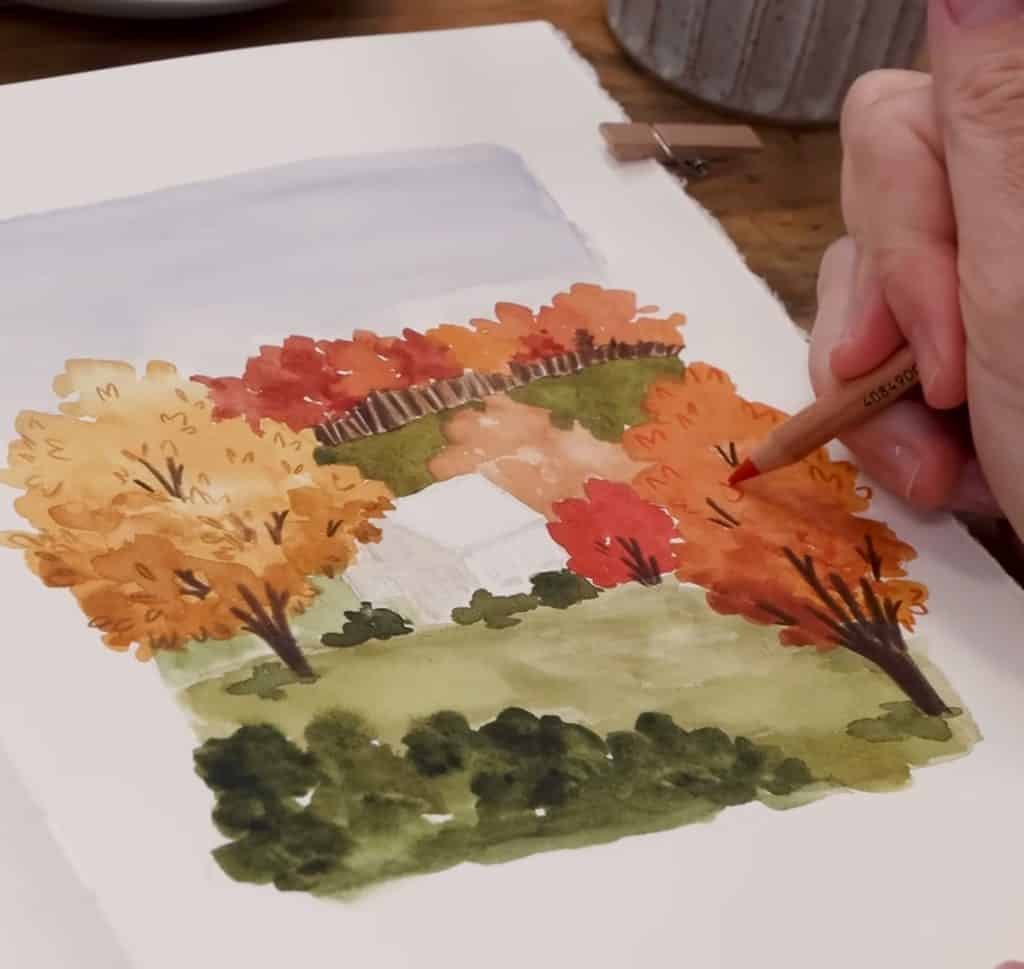
Adding Windows, Fence, and Shutters
The farmhouse receives final touches: windows, shutters, and a little fence. All of these are drawn quickly with pencil, adding charm rather than technical accuracy.

Creating Grass Tufts and Shadows
In the meadow, she uses quick strokes to add tufts of grass. With a darker pencil, she sketches shadows under bushes and hedges. The small touches increase depth and realism.

Step 10: Build Storybook Charm
At this stage, the painting already looks complete. But Shayda Campbell adds extra details to build charm and whimsy.
Adding Flowers, Pumpkins, or Extras
She suggests adding seasonal details like flowers near the hedge or pumpkins by the house. These are tiny additions, but they create a stronger autumn feeling.
Making Leaves Fall Beyond the Frame
To push the storybook mood, she draws a few leaves floating outside the rectangle frame. This breaks the border and makes the scene more lively.
Enhancing Roof and Hedge Textures
She adds a few extra strokes on the roof and hedge. These are small, uneven marks that enhance texture. Again, she stresses that looseness is more effective than precision.
Adding Whimsical Clouds
Shayda Campbell would like to sketch a few soft clouds above the house. She shares that they balance the sky and continue the lighthearted mood.
Step 11: Embrace Imperfect Storybook Style
Shayda Campbell emphasizes the importance of imperfection. She reminds that a storybook illustration is not about accuracy but about feeling.
She points out that a crooked roof or uneven tree can be more charming than a perfect one. The quirks make the scene feel handmade and personal.
She encourages artists to enjoy the process. Scribbles, loose lines, and playful textures are not mistakes. They are what make the art magical.
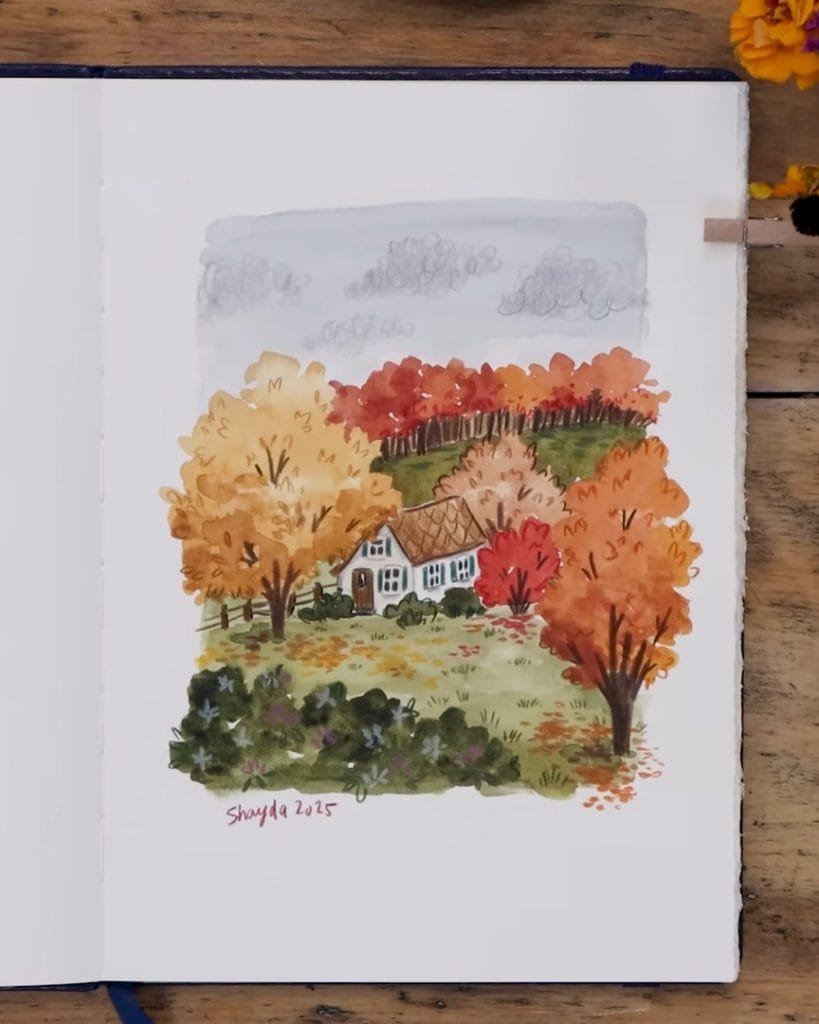
Step 12: Final Touches and Finishing
The last step is about bringing closure to the painting. Shayda Campbell keeps it simple but intentional.
She scans the painting for any empty areas. A few last scribbles or pencil shadows can balance the composition. These tiny touches bring everything together.
She signs her name in the corner. Signing is important, she says, because it marks the piece as finished. It is also a way of owning the work with pride.
The Bottom Line
A storybook painting blends watercolor softness with pencil detail. Shayda Campbell shows how simple shapes and imperfect marks become charming illustrations.
The process celebrates creativity rather than perfection. Try creating an autumn farmhouse scene, or invent one of your own, and enjoy the playful magic of storybook art.