
Hello
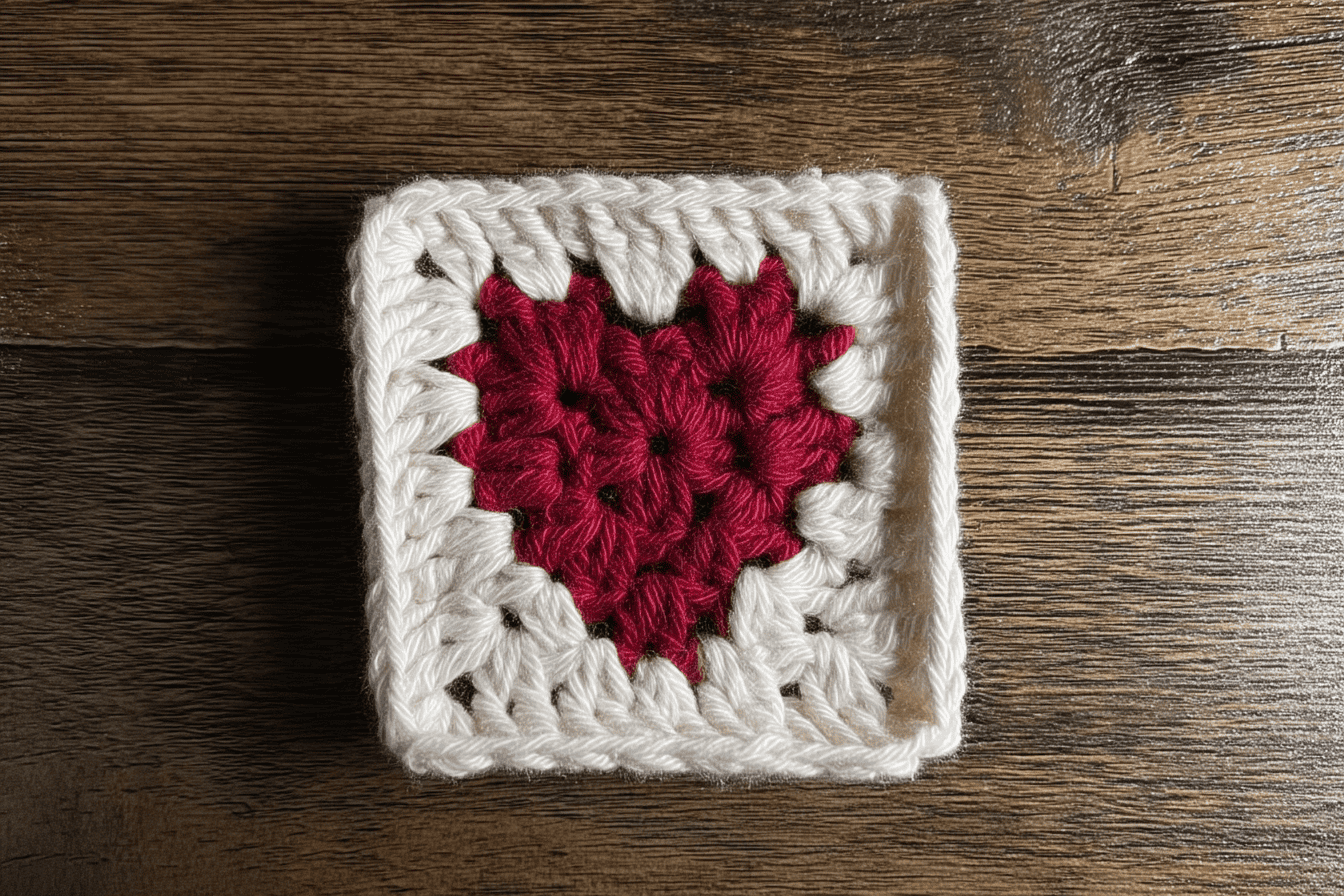
Struggling to find an easy way to crochet a heart granny square? This tutorial offers a free written pattern from vivccrochet.com to guide you. It includes clear steps and tips for using popular stitches like double crochet and treble crochet.
Keep reading for simple instructions that will inspire your next project!
Contents
- 1 Materials
- 2 Starting the Project with a Slip Knot
- 3 Creating the Foundation Chain
- 4 Beginning Round One
- 5 Round Two (Heart Formation)
- 6 Transitioning to the Square
- 7 Starting Round Three (Forming the Square)
- 8 Detailed Crochet Stitches
- 9 Completing the Square
- 10 Fastening Off and Weaving in Loose Ends
- 11 Utilization of Completed Squares
- 12 Conclusion
- 13 FAQs
Materials
You don’t need much to start this fun project. Gather your favorite medium-weight yarn, a 5 mm crochet hook, and some simple tools like scissors and a needle.

Scrap yarn: Karen big cakes in toffee Brickle and Red Heart Super Saver in white
Karen Big Cakes in the “Toffee Brickle” color adds a warm, earthy touch to the crochet heart granny square. Its medium-weight acrylic texture works well for this design.
Red Heart Super Saver in white brings contrast and balance to the pattern. This durable yarn complements Toffee Brickle while keeping the design soft yet sturdy for various projects.
Yarn type: Both are medium weight acrylic yarn
Both yarns used, Karen Big Cakes in Toffee Brickle and Red Heart Super Saver in white, are medium weight. Medium-weight acrylic yarn is easy to work with and perfect for most crochet projects.
This type of yarn holds its shape well while staying soft and durable. Acrylic material is also machine washable, making it great for items like blankets or bags. Crocheters love using it because it balances thickness with flexibility.
Crochet hook size: 5 mm
The 5 mm crochet hook is perfect for this project. It pairs well with medium-weight acrylic yarn, like Karen Big Cakes or Red Heart Super Saver.
This size allows smooth stitches and gives a neat heart granny square design. Many crocheters love it for its balance between comfort and precision.
Additional tools: Scissors and a yarn needle
Scissors are a must. They help cut the yarn when finishing the project. A sharp pair works best for clean cuts.
A yarn needle is also vital. It helps weave in loose ends after crocheting. This step keeps the heart granny square neat and secure.
Starting the Project with a Slip Knot
Start by making a simple slip knot—it’s quick and sets the stage for your crochet heart granny square!
Method for creating a slip knot
Hold the yarn so the tail end points downward. Wrap the yarn over two fingers to make an X shape. Hook the yarn around your pinky for tension.
Slide a crochet hook under one side of the X. Grab the other strand, then pull it through carefully. Take your fingers out and tighten it gently to form a slip knot.
Creating the Foundation Chain
Start simple with a chain stitch—it’s the base of your square. Keep your tension steady, and watch it grow!
Step-by-step process for forming the foundation chain
Begin with a slip knot on the crochet hook. Wrap the yarn around your fingers, create a loop, and pull it through. Pull gently to tighten.
Chain four using medium-weight acrylic yarn. Do this by yarning over and pulling through each time. To form a small ring, connect the last chain to the first one using a slip stitch (sl st).
This ring will be the center of your heart granny square crochet design!
Beginning Round One
Start the first round with basic crochet stitches. Follow each step closely to shape your heart piece.
Instructions for starting the first round of the project
Make a slip knot and place it on the crochet hook. Create a magic ring by forming a circle with your yarn.
Chain three to count as the first double crochet (dc). Work 11 more double crochets into the ring. Pull the loose end of the yarn to close the circle tightly. Slip stitch (sl st) into the top of your starting chain-three.
This finishes round one with exactly 12 stitches in total.
Round Two (Heart Formation)
This step adds the heart shape using crochet stitches like double crochets and trebles—get ready, it’s where the magic begins!
Detailed steps for creating the heart shape within the square
Skip two stitches first. Work eight treble crochet (tr) into the third stitch. Make one double crochet (dc) in the next stitch. Then do one double crochet and one treble crochet in the following stitch.
Chain one to form the heart’s bottom point. Repeat all these steps backward to mirror the heart shape. Close this round with a slip stitch (sl st).
Transitioning to the Square
Now comes the fun part—shaping your heart into a square! Follow these steps to frame your design with neat edges.
Instructions for transitioning from the heart to the square
Make a slip knot using the white yarn. Insert the crochet hook into the fourth treble crochet at the top left of the heart. Pull the slip knot through this stitch and tighten it gently to secure.
Work around evenly to form a square outline. Use crochet stitches like double crochets (dc) or half double crochets (hdc). Keep consistent tension for neat edges and align each corner clearly while expanding from the heart shape.
Starting Round Three (Forming the Square)
Round three begins the transformation into a square! Use simple stitches and follow the pattern to shape it perfectly.
Process for beginning the third round and forming the square
Chain three to start, as it counts as the first double crochet (dc). Work another dc in the same stitch for half of the top left corner.
Continue by crocheting a series of double crochets along each side. Add two dc stitches in the corners to shape them. Use slip stitches (sl st) to close this round and connect everything neatly.
Detailed Crochet Stitches
This section explains the key stitches—perfect for adding charm to your crochet heart granny square, so keep reading!
Explanation of specific crochet stitches used in the pattern
The heart granny square uses a mix of simple and advanced stitches. The treble crochet (tr) stitch is key for forming the heart shape. To work it, yarn over twice, insert the hook into the stitch, yarn over again, pull through two loops at a time until one loop remains.
Half double crochet (hdc) stitches create smooth transitions in the design. Start by yarning over, inserting the hook into a stitch, pulling up a loop, then yarning over to pull through all three loops on the hook.
Double crochet two together (dc2tog) adds texture by combining two stitches into one. It starts like regular doubles but pauses before finishing each part until they get joined at the top.
Single crochets outline edges with neat detail and include basic steps: insert hook, yarn over, pull through two loops twice total on completion.
Completing the Square
Finish the square by working carefully around each edge. Use smooth stitches to shape and complete your crochet heart granny square.
Step-by-step guide for finishing the heart granny square
Start with two trebles in the bottom left corner, followed by a chain of two, then add another pair of trebles into the same stitch. Move along with double crochet stitches, leading to half double crochets at the chain-one space.
Place one single crochet in that chain-one space for balance.
Mirror these steps on the other side while checking for any hidden stitches. In the bottom right corner, work two trebles, chain two, and another set of trebles into one spot. For the top right corner: make two double crochets, a chain of two, then repeat that pair of doubles.
End by adding one treble crochet where you slip-stitched earlier alongside finishing touches like hdc and dc2tog as needed.
Fastening Off and Weaving in Loose Ends
Finish up by cutting the yarn and pulling it through the final loop. Use the yarn needle to tuck in any loose ends for a clean look!
Instructions for completing the project and achieving a neat finish
Chain one before cutting the yarn. Leave a tail about four inches long. Use your crochet hook to pull the cut end through the chain loop and tighten it firmly. This secures your work.
Thread the loose end onto a yarn needle. Weave it under nearby stitches in one direction, then move up a row and weave back the other way. Repeat this step as needed for a clean look.
Trim off any leftover yarn close to the stitches for an even finish.
Utilization of Completed Squares
Turn your squares into cozy blankets, cute bags, or stylish pillow covers—endless possibilities await!
Suggestions for using the completed squares in various projects
Completed heart granny squares can be used for many projects. Sew them together to create a crochet bag or pouch. These items are great for carrying small things like yarn, hooks, or other crafting tools.
Heart squares also make cozy blankets. Join several squares into rows and add a border for a neat finish. They can even become cute decorations, such as wall hangings or pillow covers.
Be sure to weave in loose ends for clean and professional results!
Conclusion
Making a crochet heart granny square is fun and simple. This pattern lets crafters create something unique with just basic tools and stitches. These squares can turn into bags, blankets, or even gifts.
The free written guide helps every step of the way. It’s a great project for new and experienced crocheters alike!
FAQs
1. What is a crochet heart granny square?
A crochet heart granny square is a small crocheted design that combines a heart shape with the classic granny square pattern.
2. Which stitches are used to make this pattern?
This pattern uses double crochet (dc), half double crochet (hdc), treble crochet (tr), and slip stitch (sl st) techniques.
3. Do I need special tools or yarn for this project?
You will need a standard crochet hook, cotton yarn, and basic knowledge of how to use a magic ring to get started.
4. Can beginners follow this tutorial?
Yes! The free written pattern and video tutorial include simple steps, clear instructions, and helpful tips for all skill levels.
5. How can I use my finished heart granny squares?
You can turn them into fun projects like bags, blankets, or other creative crocheted items by joining multiple squares together!