
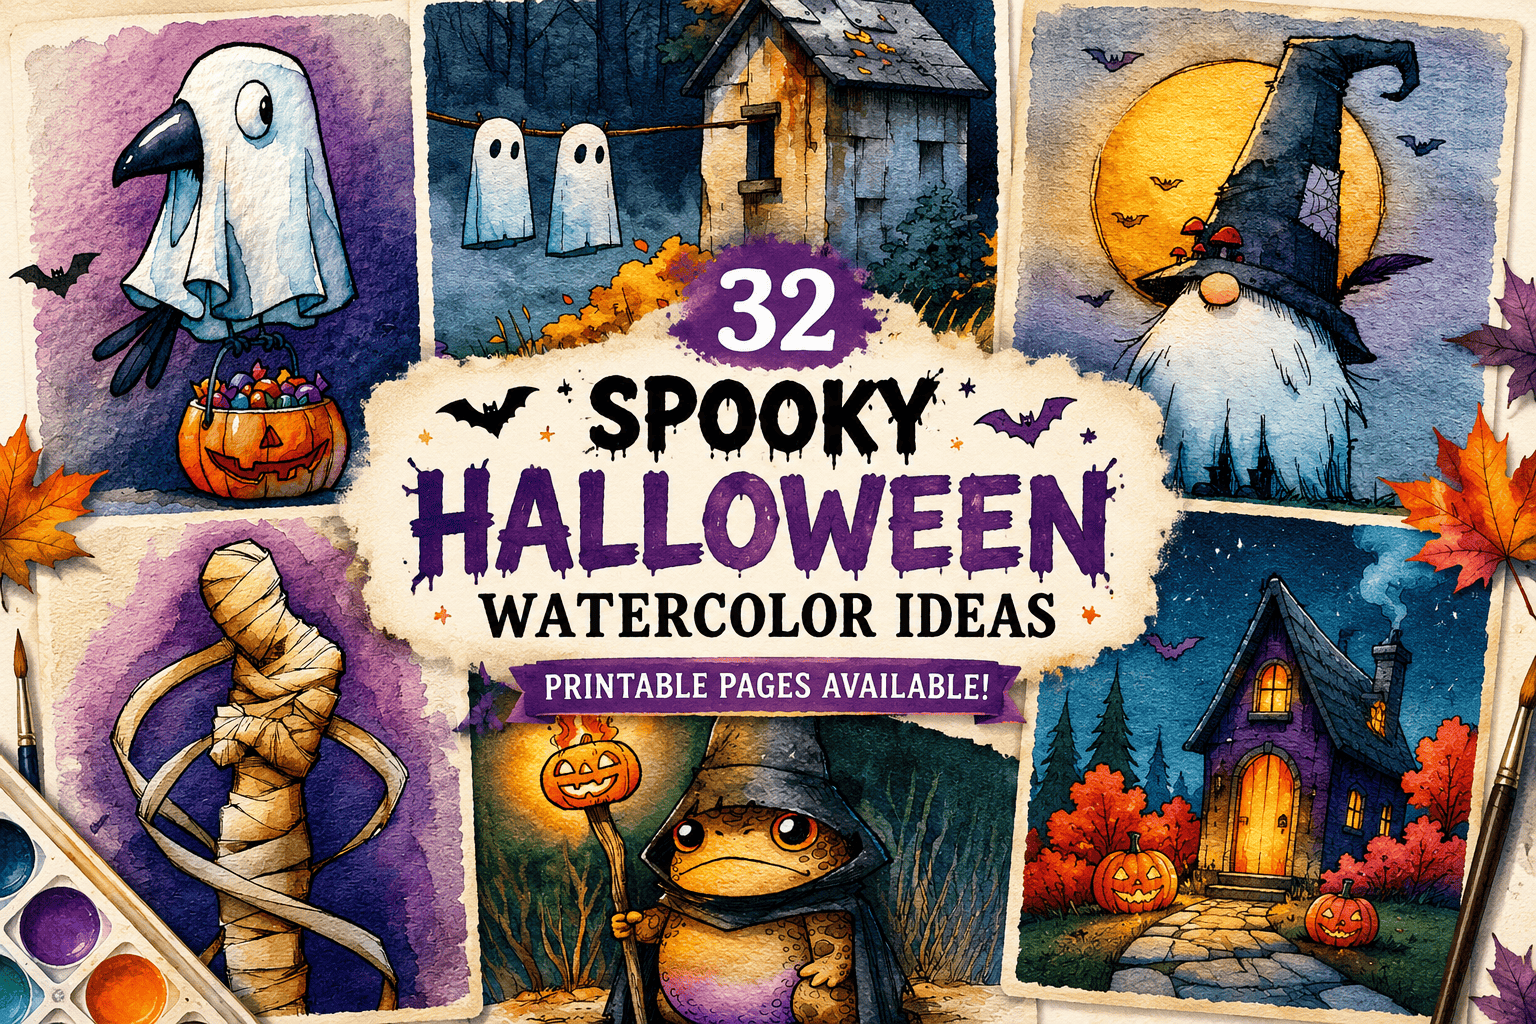
Looking for fun Halloween painting inspiration? Explore 32 spooky watercolor ideas featuring pumpkins, ghosts, witches, bats, black cats, and more. Whether you’re a beginner or an experienced artist, these creative designs—and their free printable pages—make it easy to enjoy festive watercolor painting.

32 Cute & Spooky Halloween Watercolor Ideas to Paint Today
A bat wearing a crimson vampire cape
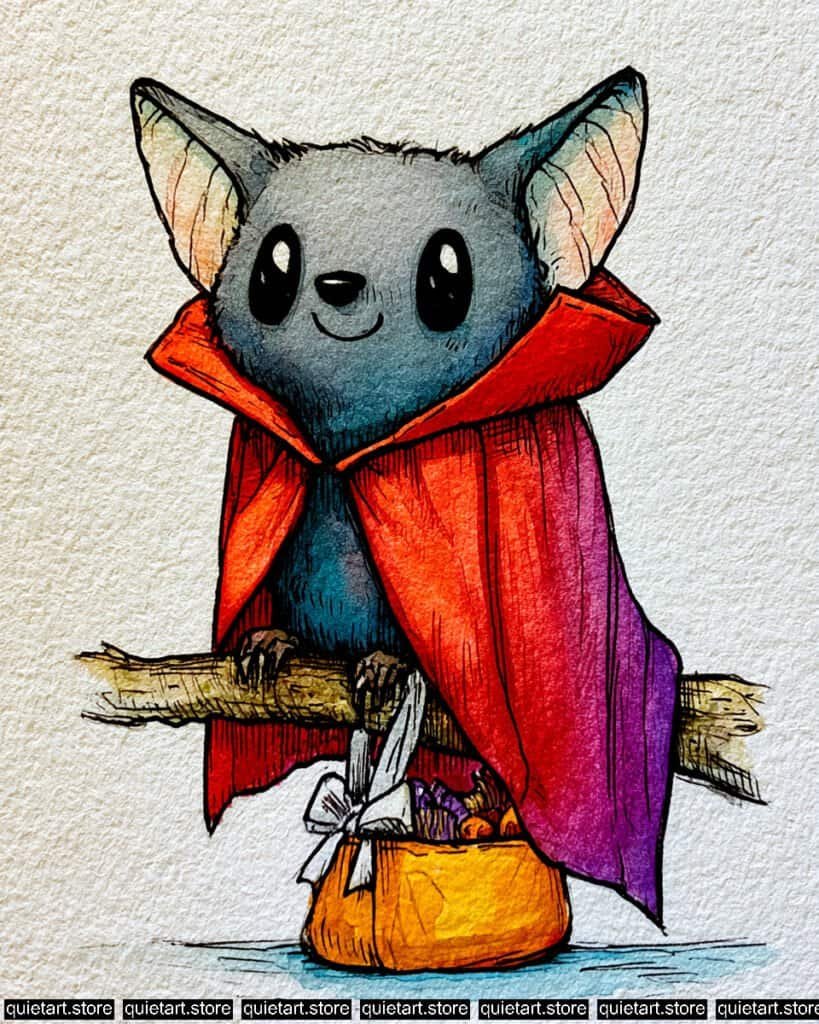
Start by transferring a clean pencil sketch onto cold-press watercolor paper, focusing on the cute proportions of the bat, its cape, and the branch setup. Begin painting with a wet-on-dry technique, layering soft base washes of cool grey for the body, a gentle blush pink inside the ears, and a vibrant red-orange transition across the bright cape.
Once your initial wash is dry, build up depth by blending deep magenta into cool purple along the shaded folds of the cape and applying darker grey-teal washes to the fur. After all watercolor layers are completely dry, use a fine-liner waterproof ink pen to trace clean contours and add detailed cross-hatching texture across the cape, branch, and fur to achieve an illustration style.
Recommended Watercolor Pigments:
- Payne’s Grey (PB15, PBk6) or Davy’s Gray – For the soft grey body fur and cool shadow accents.
- Cadmium Red Medium / Pyrrol Red (PR254) – For the vibrant, bright red dynamic highlights on the cape.
- Quinacridone Violet / Magenta (PR122) – For blending the deep shadows on the folds of the cape.
- Dioxazine Purple (PV23) – For the darkest purple shadows on the edge of the cloak.
- Yellow Ochre (PY43) or Raw Sienna (PBr7) – For the warm, earthy tone of the small basket and tree branch.
- Opera Pink / Shell Pink (PR122 / White blend) – For the delicate blush inside the bat’s ears.
Love these watercolor ideas? Get our 30 Spooky Halloween Watercolor Coloring Pages (PDF Download) for even more fun, printable designs to paint this Halloween.
A black crow ghost
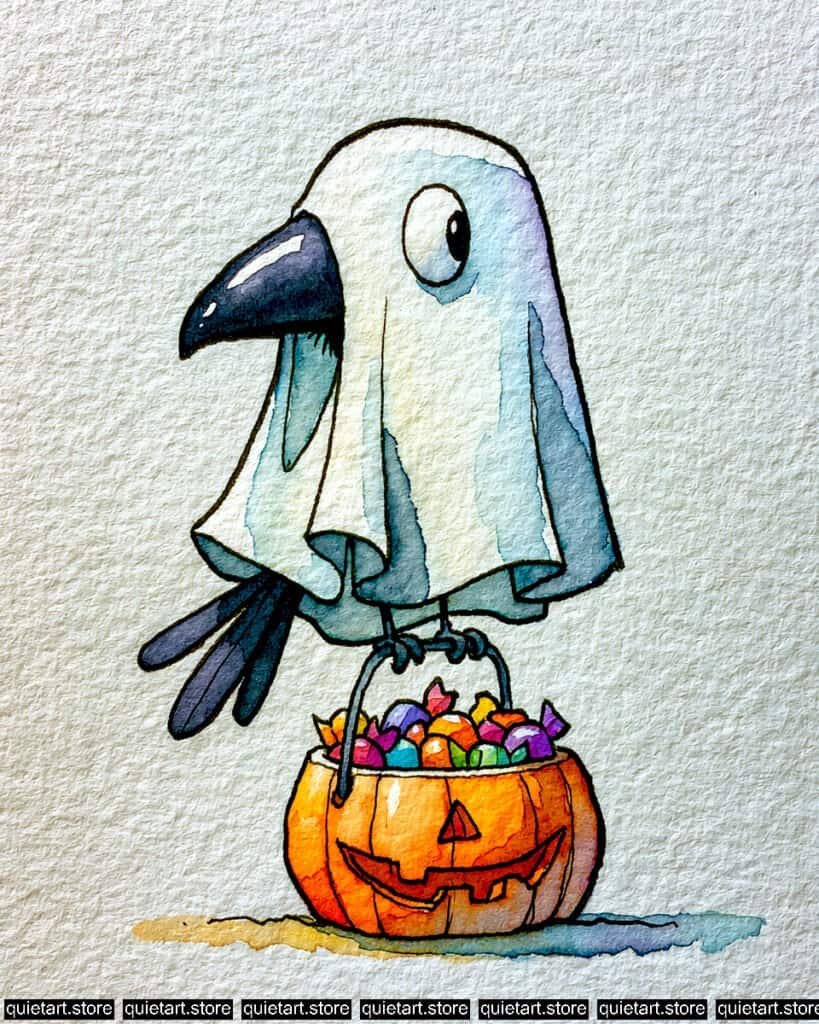
Start with a careful pencil sketch of the crow in its sheet costume and the jack-o’-lantern below, ensuring you place the details like the bulging eye and the specific candy shapes accurately. This piece relies on a mix of wet-on-dry for the sharp lines of the beak and a controlled wet-on-wet blend for the ghostly sheet, where you should establish the cool blue and purple shadow tones while the paper is still moist. Be precise with the washes to keep the sheet predominantly white, allowing the paper color to do much of the work.
Once the main body is dry, build up the saturated colors in the pumpkin and candies, applying clean, individual washes to each element and adding deep shadows to the pumpkin’s face for definition. The final step is to refine the features using a very small brush or, as suggested by the style, a fine-liner waterproof ink pen for all the intricate details, cross-hatching texture on the beak, and final, clear outlines. Preserve a clean white paper background throughout, adding only the subtle ground wash of cool tones.
Recommended Watercolor Pigments:
- Payne’s Grey (PB15, PBk6) or Davy’s Gray – Essential for the rich, deep grey and blue-black tones of the beak, eye, and tail feathers.
- Cobalt Blue (PB28) or Cerulean Blue (PB35) – Perfect for creating the very subtle, clean, cool shadow washes on the white sheet.
- Cobalt Violet (PV14) or Permanent Magenta (PR122) – Ideal for creating the soft, iridescent purple shadow areas and the deep purple candy colors.
- Yellow Ochre (PY43) or Raw Sienna (PBr7) – For the warm, glowing core color of the jack-o’-lantern and the base of the ground shadow.
- Cadmium Orange (PO20) or Pyrrol Orange (PO73) – For building the deep, saturated orange on the pumpkin.
- Quinacridone Gold (PO48, PY150) – Can add richness and light to the pumpkin and candy highlights.
- Viridian (PG18) or Phthalo Green (BS) (PG7) – For specific candy details and small accents.
Love these watercolor ideas? Get our 30 Spooky Halloween Watercolor Coloring Pages (PDF Download) for even more fun, printable designs to paint this Halloween.
A black rooster skeleton
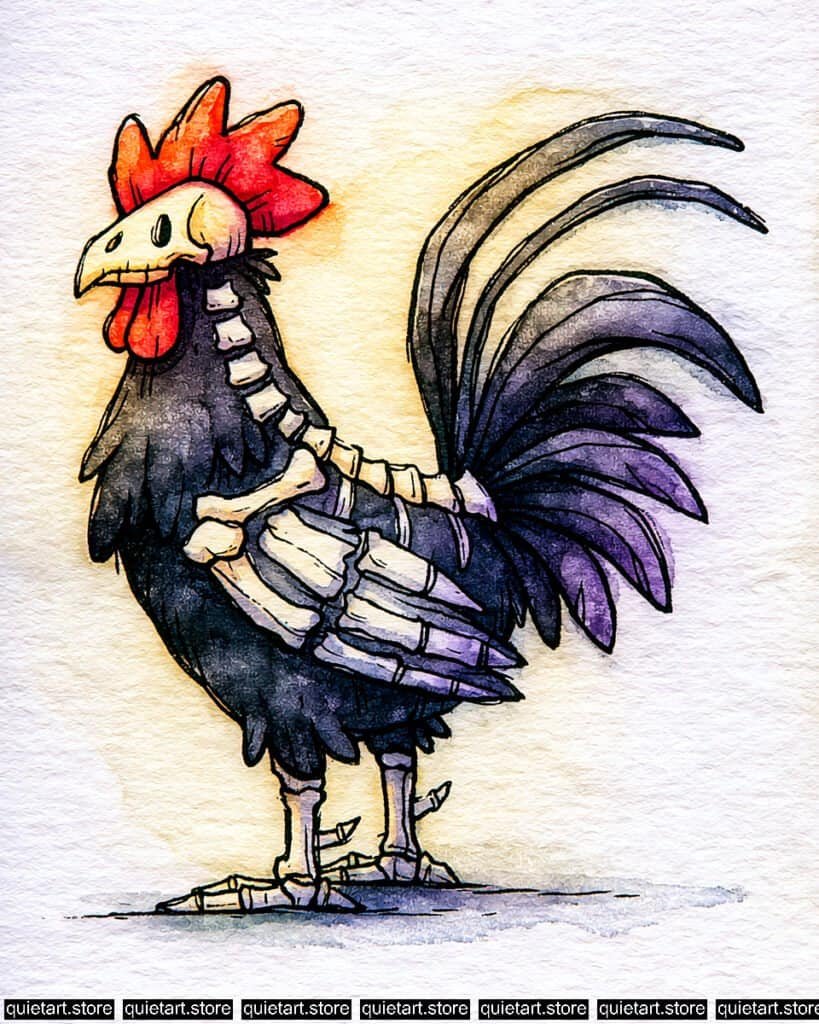
Start with a clean pencil sketch that defines the intricate skeleton structure over the rooster’s form, paying close attention to the specific bone shapes in the wing and body. The process requires careful wet-on-dry layering, beginning with light base washes for the red comb and wattle, a cool grey-violet for the main feathers, and a delicate, creamy ochre for the bones. Avoid pre-wetting large areas to prevent colors from bleeding together, except for the subtle yellow and purple backwash which can be applied after the main figure is dry to avoid any accidental mixing.
Once the initial layers are dry, build depth by re-applying darker, richer washes of purple and deep grey-blue to the feathers, blending the colors to create the iridescent effect seen in the tail. For the bones, use a slightly darker mix of the bone-base color or a cool grey to paint precise shadows, preserving the light base color on the prominent areas to give them three-dimensional form. Finally, once all watercolor layers are completely dry, use a fine-liner waterproof ink pen to create all the detailed, crisp contours and add texture through small cross-hatching marks.
Recommended Watercolor Pigments:
- Permanent Alizarin Crimson (PR177) or Pyrrol Red (PR254) – For the intense, warm red on the comb and wattle.
- Payne’s Grey (PB15, PBk6) or Davy’s Gray – Essential for the core body feathers and establishing deep shadow areas.
- Cobalt Blue (PB28) or Cerulean Blue (PB35) – Perfect for blending with the greys to create cool undertones in the feathers and the floor shadow.
- Cobalt Violet (PV14) or Permanent Magenta (PR122) – Ideal for creating the rich iridescent purple sheens in the feathers and tail.
- Raw Sienna (PBr7) or Yellow Ochre (PY43) – For the underlying warm, aged bone color and the soft backwash.
- Buff Titanium (PW6:1) – A useful pigment for the base-layer of the bones if you don’t want a clear transparent wash, mixing into the sienna for variations.
Love these watercolor ideas? Get our 30 Spooky Halloween Watercolor Coloring Pages (PDF Download) for even more fun, printable designs to paint this Halloween.
A charming white country church nestled among a sea of brilliant autumn foliage

To create a painting with this clear, illustrative style, you will want to work in defined sections, focusing on clean washes rather than complex blending. For the initial layer, apply a soft, transparent wet-on-wet wash across the upper background to establish the muted, cool tones of the sky, allowing a gentle vertical gradient while preserving the pure white area for the church spire. Once the background is dry, apply flat, solid washes of vibrant color—starting with the yellows and bright oranges and moving toward the reds—to individual leaf sections, ensuring that adjacent areas dry fully before you paint next to them to keep the edges sharp.
Once all the color blocks have dried completely, use a fine-liner waterproof ink pen or a very small round brush with a thick, opaque neutral paint to trace consistent, clean outlines around every shape. This pen work is crucial for defining the distinctive maple leaf pattern and the architectural lines of the church, giving the piece its finished, stained-glass appearance. Be careful to apply a very light, desaturated blue or lavender shadow wash only to the sides of the white steeple to give it depth, while keeping the main face bright white.
Recommended Watercolor Pigments:
- Cadmium Orange (PO20) or Pyrrol Orange (PO73) – For the intense, bright orange leaves.
- Azo Yellow (PY151) or Cadmium Yellow Light (PY35) – For the vibrant, clear yellow foliage.
- Pyrrol Red (PR254) or Cadmium Red Medium (PR108) – For the dominant, bold red leaf patches.
- Alizarin Crimson (PR83) – Used for layering to create the deep, slightly cool, dark maroon sections of the trees.
- Hooker’s Green (PG7, PY150, PO49) or Sap Green (PG36, PY110) – For the rich, distinct greens in the foreground.
- Ultramarine Blue (PB29) – A versatile pigment used diluted for the soft sky wash, and very lightly for shadows on the white church walls.
- Buff Titanium (PW6:1) or Titanium White (PW6) – Useful if your paper isn’t bright white, mixed with a tiny bit of blue to paint the light face of the church steeple.
Love these watercolor ideas? Get our 30 Spooky Halloween Watercolor Coloring Pages (PDF Download) for even more fun, printable designs to paint this Halloween.
A dog ghost
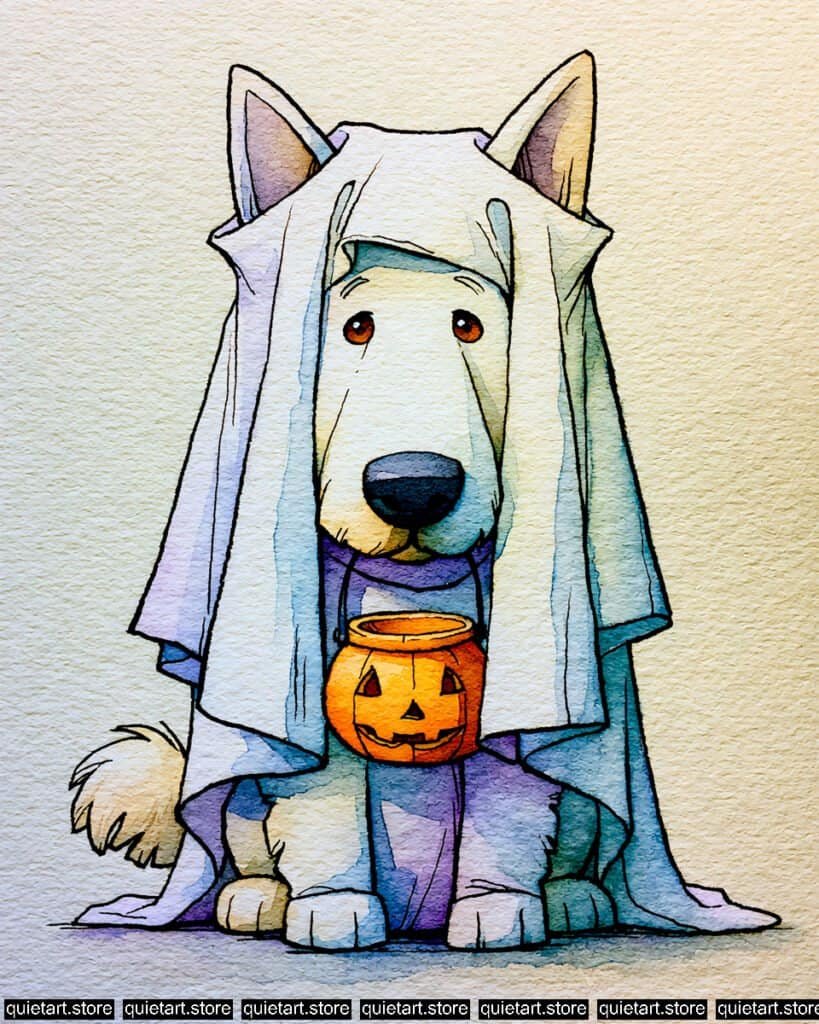
Start with a light pencil sketch, ensuring you place the dog and its specific ghost costume and pumpkin correctly. Then, use a wet-on-dry technique to build up the delicate colors, applying a soft, desaturated lavender for the inner ears, and layering cool blues and purples in shadows to create depth on the white sheet, keeping the overall look subtle and predominantly white. Maintain a fresh and clean background by avoiding heavy washes.
For the prominent orange element, apply a single, rich wash of deep pumpkin orange to the jack-o’-lantern, using a drier brush for precision on the facial features. After the paper is completely dry, use a fine-liner waterproof ink pen or a very small round brush with a thick, opaque neutral paint to trace consistent, clean outlines around every shape. Finally, use a very dark grey or a soft black mix, with minimal water, to define the dog’s eyes and large nose. Preserve the white areas of the paper for bright highlights.
Recommended Watercolor Pigments:
- Ultramarine Violet (PV15) – For the delicate lavender color in the inner ears and shadow details.
- Cobalt Blue (PB28) – A key pigment for creating the subtle, cool shadow washes on the white sheet.
- Dioxazine Purple (PV23) – For deeper, rich shadows on the cloak and around the figure.
- Cadmium Orange (PO20) or Pyrrol Orange (PO73) – For the vibrant, saturated orange on the pumpkin.
- Payne’s Grey (PB15, PBk6) or Davy’s Gray – For creating dark, cool tones for the nose and eye pupils.
- Azo Yellow (PY151) or Cadmium Yellow Light (PY35) – To add subtle warm glazes to the white areas and mix for natural shadows.
Love these watercolor ideas? Get our 30 Spooky Halloween Watercolor Coloring Pages (PDF Download) for even more fun, printable designs to paint this Halloween.
A ghost bat
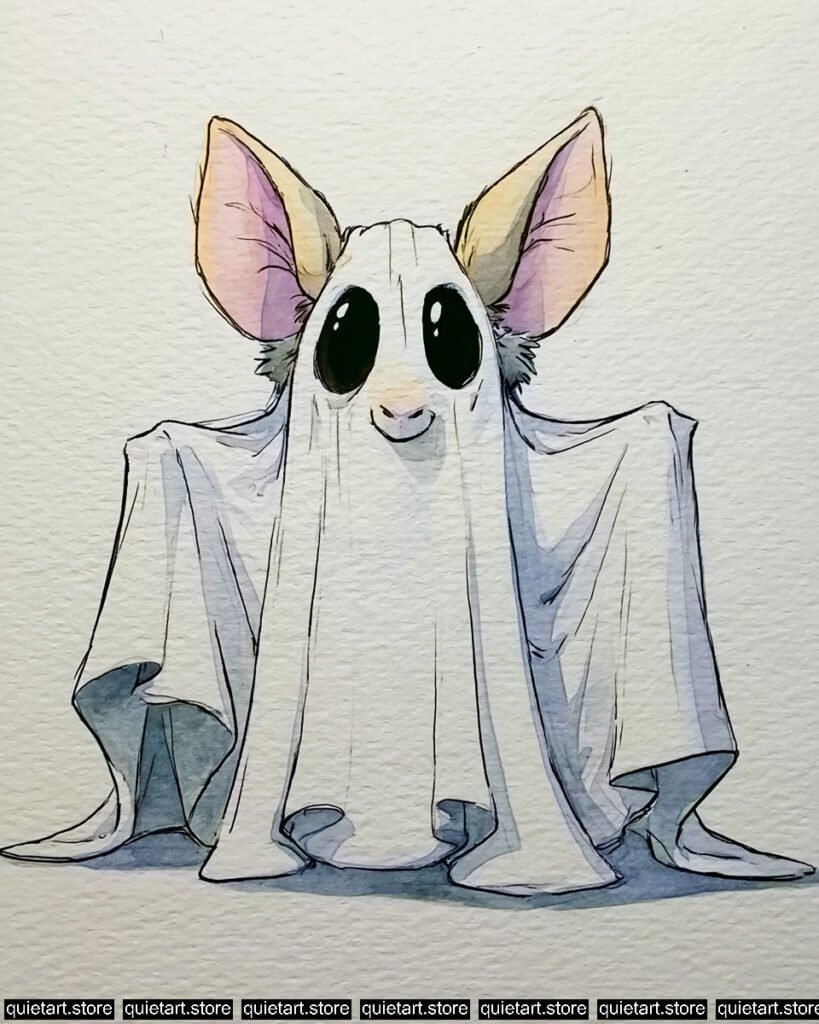
Start with a light pencil sketch on cold-press paper, focusing on the bat’s oversized ears and the sweeping drapery of the ghost sheet. Apply a delicate wet-on-dry technique, laying down subtle washes of muted yellow-ochre on the outer ear edges and a soft shell pink inside the ears. Keep the white sheet mostly unpainted, using wet-on-wet blending with diluted blue-grey washes only where the shadows form along the fabric folds.
Once the initial washes are completely dry, paint the large, glossy eyes with an intense dark grey or black mix, leaving small white unpainted spots for bright eye reflections. Finish the illustration by using a fine waterproof ink pen to trace crisp outlines and add fine cross-hatching along the shadowed folds for texture and definition. Ensure the paper background remains clean to keep the focus entirely on the whimsical character.
Recommended Watercolor Pigments:
- Payne’s Grey (PB15, PBk6) or Davy’s Gray – For the soft, subtle shadow washes along the folds of the white sheet.
- Cobalt Blue (PB28) or Cerulean Blue (PB35) – For the cool undertones mixed into the fabric shadow folds.
- Yellow Ochre (PY43) or Raw Sienna (PBr7) – For the delicate warm golden tone on the outer rims of the ears.
- Shell Pink or Opera Pink (PR122) – Diluted for the soft pink blush inside the large ears.
- Ivory Black (PBk9) or Neutral Tint (PBk6, PV19, PB15) – For painting the solid, deep black eyes with maximum contrast.
Love these watercolor ideas? Get our 30 Spooky Halloween Watercolor Coloring Pages (PDF Download) for even more fun, printable designs to paint this Halloween.
A ghost bee
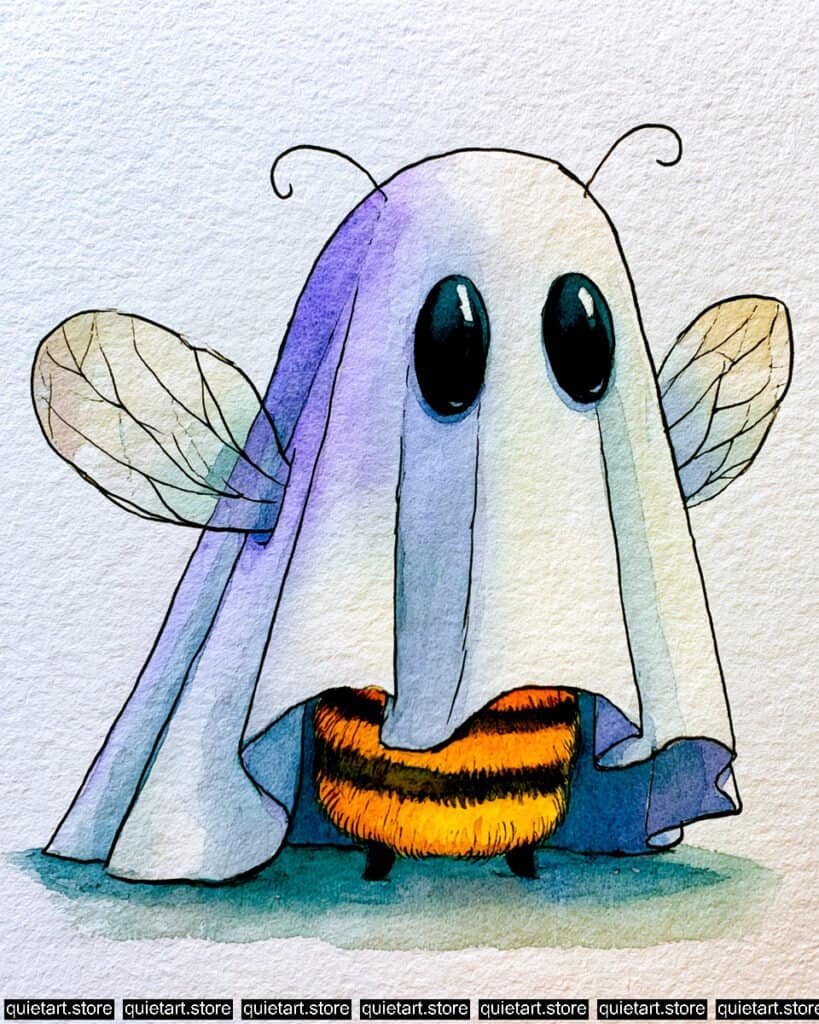
To capture the charm of this illustration, start with a light pencil sketch of the bee character and its ghostly drape, taking care with the folds. Apply a soft, wet-on-wet technique to the ghost sheet, laying down a gradient of cool blue-grey for the shadowed side and a delicate pale yellow-green wash on the lit side, keeping the center predominantly white. For the translucent wings, brush on a very pale cream-yellow wash.
Once the sheet and wings are dry, paint the bold orange and black bee abdomen with a wet-on-dry technique to ensure clean stripes and a textured fur-like finish. Finally, paint the intense, dark eyes and refine the details—such as the antennae, the complex wing vein patterns, and the texture on the bee’s body—using a fine-liner waterproof ink pen over the fully dried watercolor. Create a simple ground wash with a cool blue-green tone to finish.
Recommended Watercolor Pigments:
- Ultramarine Blue (PB29) – Essential for the cool shadow tones on the sheet and mixing for the ground.
- Azo Yellow (PY151) or Cadmium Yellow Light (PY35) – For the warm tones on the ghost sheet, wings, and bee abdomen.
- New Gamboge (PY153) or Indian Yellow (PY139) – For the saturated orange parts of the bee body.
- Payne’s Grey (PB15, PBk6) or Neutral Tint – For the deep black of the eyes and bee stripes.
- Buff Titanium (PW6:1) – Useful for creating the delicate, creamy base tone for the translucent wings.
- Green Gold (PY117, PG7) – For adding the specific yellow-green cast on the lit side of the sheet.
Love these watercolor ideas? Get our 30 Spooky Halloween Watercolor Coloring Pages (PDF Download) for even more fun, printable designs to paint this Halloween.
A ghost cat
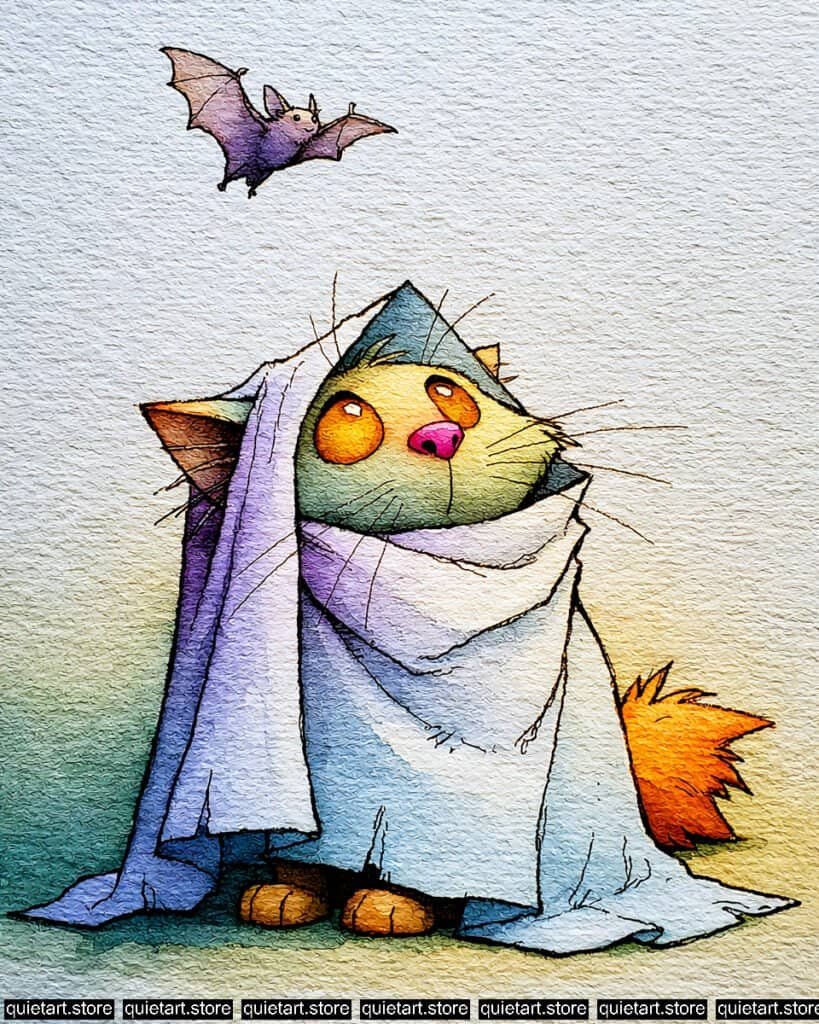
Start with a detailed pencil sketch on cold-press paper, carefully blocking out the cat, its draped blanket, and the small bat flying above. Begin with a soft wet-on-wet technique for the background, blending cool teal on the lower left into a warm golden yellow on the lower right to create a gentle environmental glow. Paint the cat’s face using a smooth gradient from pale greenish-yellow at the cheeks to warm orange around the eyes, adding a punch of bright magenta to the nose while keeping the blanket base mostly light.
Once the initial layers are dry, build depth using a wet-on-dry approach to apply rich purple and cool blue shadows along the folds of the fabric and the flying bat. After all watercolor washes are completely dry, use a fine-liner waterproof ink pen to trace crisp outlines and add detailed cross-hatching to define fur texture, fabric seams, and whiskers. Ensure the bright highlights in the eyes and on the blanket remain untouched for maximum contrast and vitality.
Recommended Watercolor Pigments:
- Cobalt Violet (PV14) or Dioxazine Purple (PV23) – For the deep purple shadow tones on the draped blanket and bat.
- Ultramarine Blue (PB29) or Cerulean Blue (PB35) – For the cool blue washes along the folds and lower drapery.
- Azo Yellow (PY151) or Lemon Yellow (PY3) – For the glowing face gradient and warm background base.
- Cadmium Orange (PO20) or Pyrrol Orange (PO73) – For the fluffy tail, paws, and bright glowing eyes.
- Opera Pink (PR122) or Quin Rose (PV19) – For the vivid, saturated pink nose.
- Viridian (PG18) or Cobalt Green (PG26) – Diluted for the soft green undertones on the cat’s face and background wash.
Love these watercolor ideas? Get our 30 Spooky Halloween Watercolor Coloring Pages (PDF Download) for even more fun, printable designs to paint this Halloween.
A ghost chicken
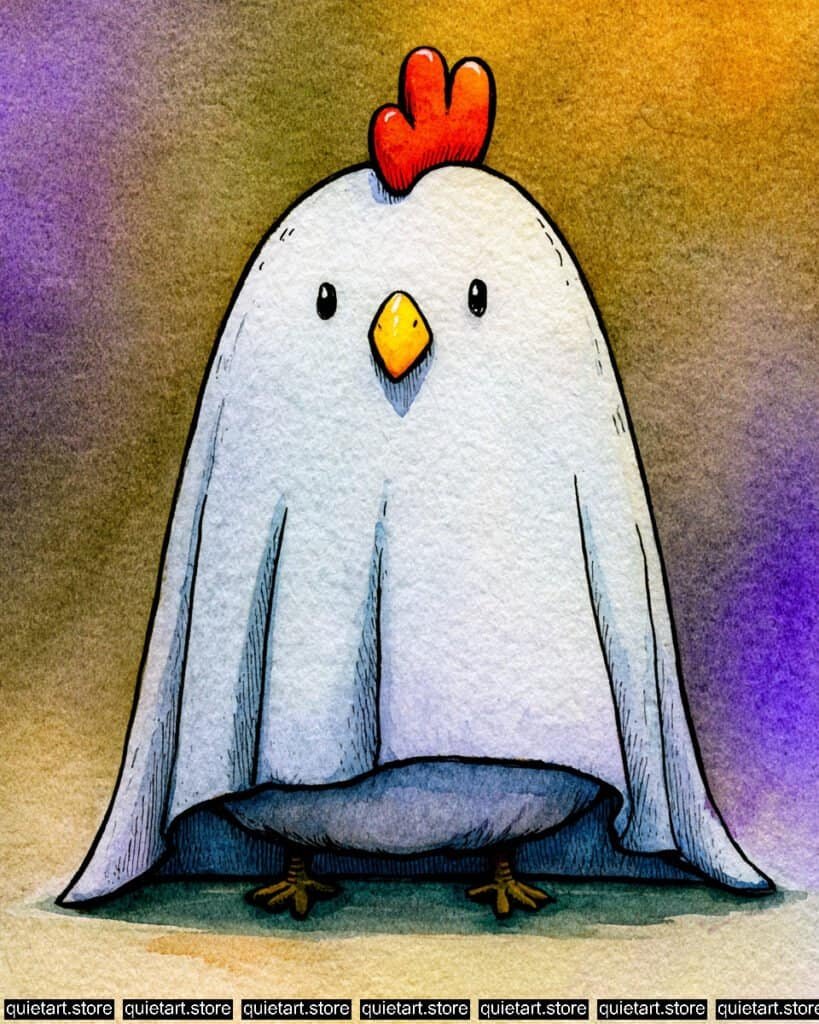
First, lay down a light watercolor wash over the background, blending the gold and purple pigments while avoiding the chicken. Then, work in stages to build the values of the figure, starting with a pale wash for the entire sheet and then adding deeper, cool-toned glazes (a blue-gray or violet) within the shadowed folds of the drape, while keeping the main surface almost white.
Once the background and figure washes are completely dry, use a fine-liner waterproof pen to trace all the detailed contours of the eyes, beak, comb, and feet, ensuring clean lines that mimic a graphic novel style. Finally, apply a concentrated, saturated orange to the comb and a solid yellow-gold to the beak, allowing the pen work to provide the main definition rather than relying on heavy watercolor gradients.
Recommended Watercolor Pigments:
- Cobalt Violet (PV14) or Permanent Magenta (PR122) – For the vibrant purple background wash and figure highlights.
- Azo Yellow (PY151) or Lemon Yellow (PY3) – For the glowing golden background wash and base.
- Cadmium Orange (PO20) or Pyrrol Orange (PO73) – For the bright, saturated color of the comb.
- New Gamboge (PY153) or Indian Yellow (PY139) – For the warm, deep yellow of the beak.
- Payne’s Grey (PB15, PBk6) or Davy’s Gray – For creating subtle, cool-toned shadows within the folds of the white sheet.
- Buff Titanium (PW6:1) – Useful for adding a delicate cream tone to the main sheet area.
Love these watercolor ideas? Get our 30 Spooky Halloween Watercolor Coloring Pages (PDF Download) for even more fun, printable designs to paint this Halloween.
A ghost clothesline
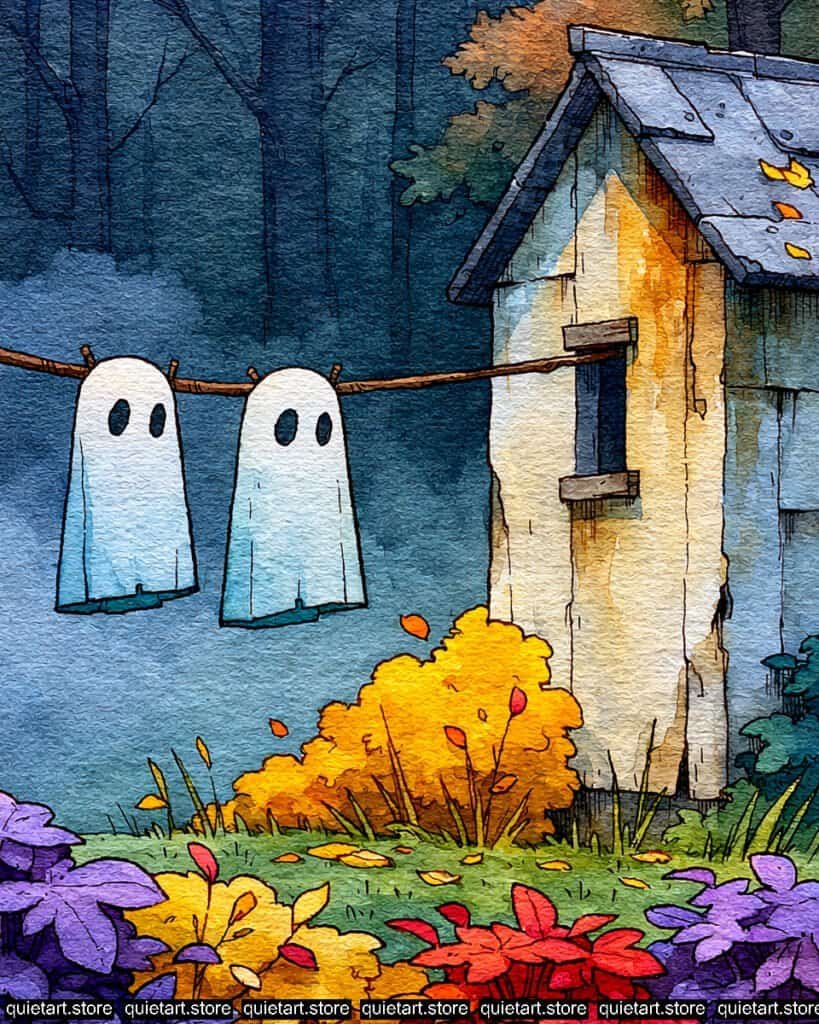
To begin this painting, start with a detailed pencil sketch on heavy watercolor paper. For the first wash, apply a soft wet-on-wet technique to the background sky, allowing cool blues and purples to blend smoothly. For the foreground foliage, paint distinct sections using saturated glazes of color—warm yellows and oranges, bright greens, and deep purples—ensuring neighboring areas are mostly dry so the colors stay crisp and clean.
Once your background layers are dry, build the structure of the wooden barn with layered washes of sepia and grey, saving pure white for the sheet-ghosts. After all the color is completely dry, use a very small brush with rich, dark pigment (or a technical ink pen) to add the crucial, final stage: precise, detailed cross-hatching and outlines. This strong ink work is what defines the textures of the wood, the details of the window and rope, and provides the distinctive “sketchbook” look that makes this piece feel like an illustrative vignette.
Recommended Watercolor Pigments:
- Ultramarine Blue (PB29) – The base for the cool night sky wash and mixed for dark shadows.
- Payne’s Grey (PB15, PBk6) or Davy’s Gray – Key for the structure of the old barn, the window, and creating neutral shadows in the ghosts.
- Permanent Alizarin Crimson (PR177) or Quin Rose (PV19) – For the deep purple foliage in the background and foreground flowers.
- Cadmium Orange (PO20) or Pyrrol Orange (PO73) – For the vibrant, saturated orange flowers and highlights on the leaves.
- Azo Yellow (PY151) or Cadmium Yellow Light (PY35) – For the bright yellow bushes and warm reflections.
- Hooker’s Green (PG7, PY150, PO49) or Sap Green (PG36, PY110) – For the various foliage greens and grassy areas.
- Sepia (PBr7, PBk9) – Essential for the rope, tree branches, and warm brown shadows in the wood structure.
Love these watercolor ideas? Get our 30 Spooky Halloween Watercolor Coloring Pages (PDF Download) for even more fun, printable designs to paint this Halloween.
A ghost donkey
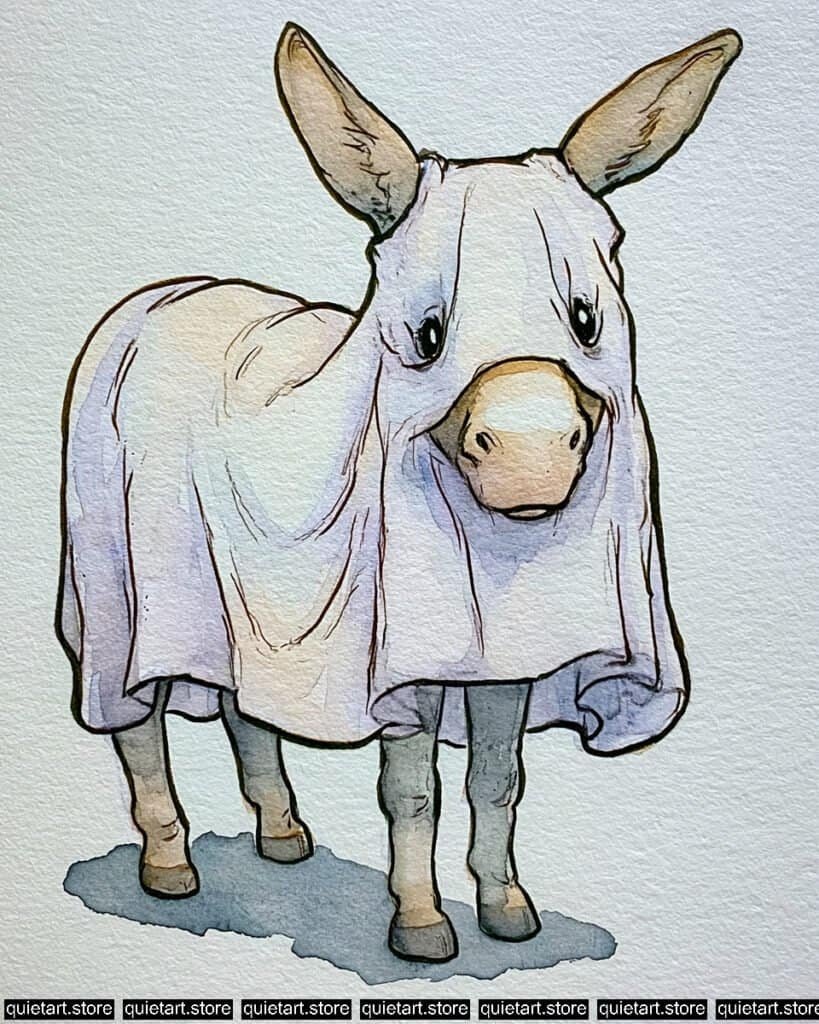
Begin with a clean, light pencil sketch to capture the donkey’s anatomy and the relaxed draping of the ghost sheet. Using a wet-on-dry approach, apply soft, warm earth-toned washes for the donkey’s snout, inner ears, and lower legs, keeping the colors muted and natural. For the sheet, preserve the white areas of the paper for the primary highlights while gently blending subtle lavender and cool blue-grey washes into the shadowed creases and lower folds.
Once all watercolor layers have fully dried, paint a simple, flat cast shadow underneath the donkey using a cool blue-grey wash to anchor the figure to the page. Finally, use a fine-liner waterproof ink pen or a tiny detail brush with opaque dark pigment to trace clean outlines around the form, adding subtle hatch marks along the folds of the fabric and the muzzle for textural definition.
Recommended Watercolor Pigments:
- Ultramarine Violet (PV15) or Cobalt Violet (PV14) – For the delicate lavender shadow tones along the draped sheet folds.
- Payne’s Grey (PB15, PBk6) or Davy’s Gray – For the cool shadow washes on the sheet, legs, and ground cast shadow.
- Yellow Ochre (PY43) or Raw Sienna (PBr7) – For the warm, natural tan base on the donkey’s muzzle and hooves.
- Burnt Umber (PBr7) – Diluted for subtle warm shading around the nose and ears.
- Buff Titanium (PW6:1) – Useful for adding a soft, off-white cream glaze to areas of the fabric and fur.
Love these watercolor ideas? Get our 30 Spooky Halloween Watercolor Coloring Pages (PDF Download) for even more fun, printable designs to paint this Halloween.
A ghost duck
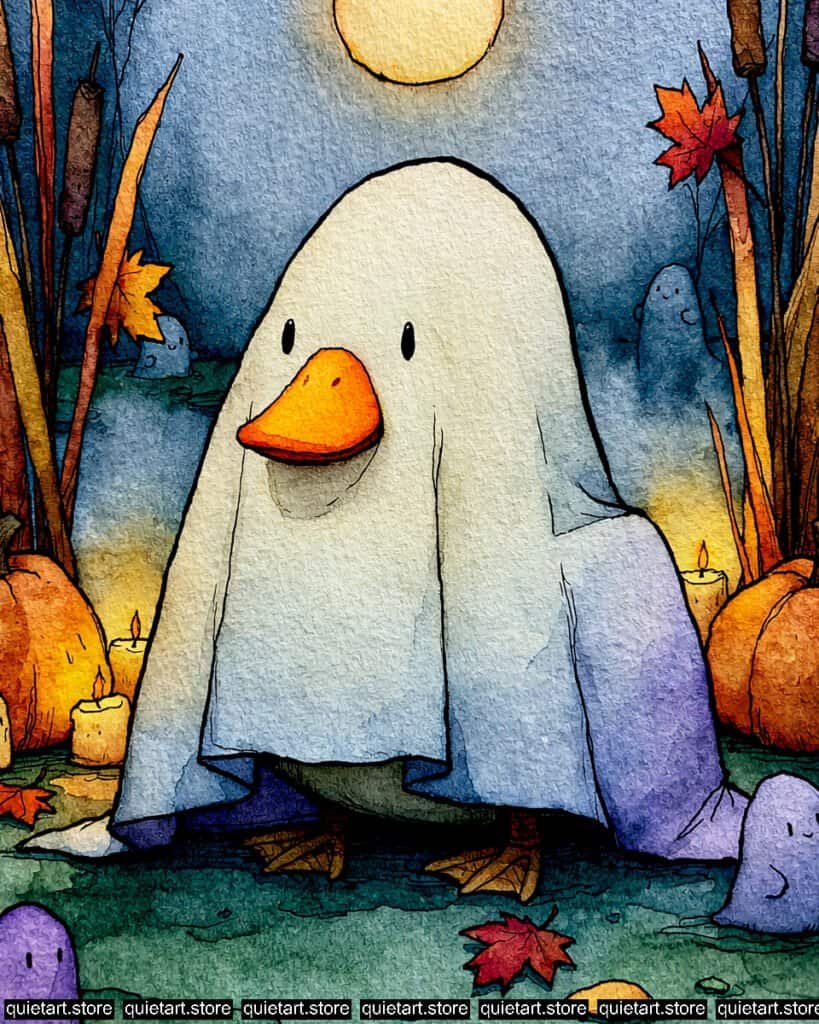
Start with a detailed pencil sketch, capturing the duck figure, the surrounding pumpkins, cattails, fallen leaves, and small spirits. Use a wet-on-wet technique for the background sky, blending deep indigo at the top into a warm candlelit glow near the ground, while keeping the central full moon pure white. For the ghost sheet, apply a subtle wet-on-dry wash of cool grey-blue, transitioning into a soft lavender gradient along the draped side folds.
Once the initial background and body washes are completely dry, build up saturated color on the pumpkins, leaves, and bill using vibrant oranges, yellows, and reds. Finish the painting by using a fine-liner waterproof ink pen or a tiny detail brush to draw clean, defined outlines and delicate cross-hatching texture across the background trees, cattails, and sheet folds.
Recommended Watercolor Pigments:
- Indigo (PB60, PBk6) or Ultramarine Blue (PB29) – For the dark, atmospheric night sky background.
- Cobalt Violet (PV14) or Dioxazine Purple (PV23) – For the vibrant lavender shadow tones on the sheet and tiny ghost spirits.
- Cadmium Orange (PO20) or Pyrrol Orange (PO73) – For the saturated duck bill, pumpkins, and autumn leaves.
- Azo Yellow (PY151) or Lemon Yellow (PY3) – For the warm candle glow, moon halo, and leaf highlights.
- Pyrrol Red (PR254) or Permanent Alizarin Crimson (PR177) – For the deep red maple leaves.
- Payne’s Grey (PB15, PBk6) or Davy’s Gray – For subtle shadow glazes under the bill and along the white sheet.
Love these watercolor ideas? Get our 30 Spooky Halloween Watercolor Coloring Pages (PDF Download) for even more fun, printable designs to paint this Halloween.
A Halloween gnome
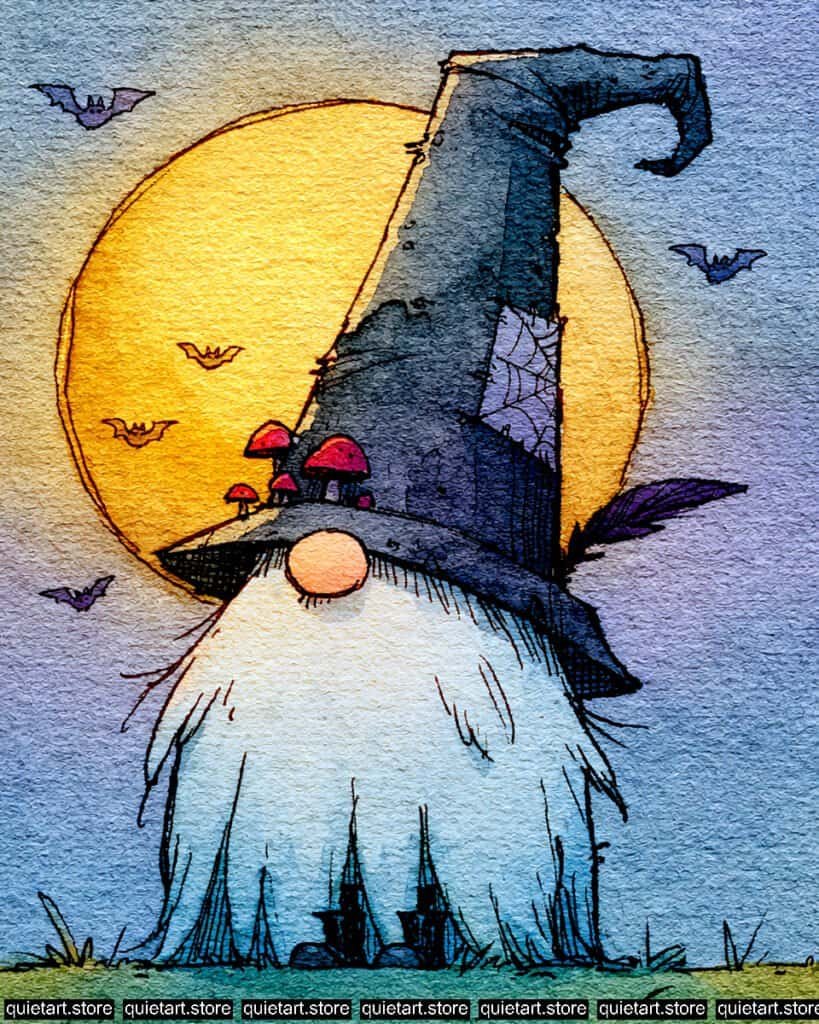
To begin this painting, start by laying down soft, wet-on-wet background washes of cool blue and subtle purple, allowing them to blend on the paper before defining the sharp, clean circle of the yellow moon. Once the background is dry, focus on the figure, applying a deep, cool-toned blue-grey for the witch’s hat while carefully preserving the pure white of the paper to render the bushy, luminous beard with bright highlights. Use precise, fine pen lines (like cross-hatching and dot work) over your dried watercolor to add crucial illustrative details such as the beard texture, the intricate spiderweb patch, the feather barbs, and the bats, giving the piece its finished, graphical look.
Finally, paint the small accents like the vibrant red-pink mushrooms, the delicate peach nose, and the rich teal-green grass, keeping your watercolor pigments translucent but saturated. Be sure to use a very fine brush for the facial details and small elements, allowing the initial washes to provide depth and texture beneath the line work.
Recommended Watercolor Pigments:
- Indigo Blue (PB60) – Essential for the deep, cool witch’s hat and the ground shadows.
- Cobalt Blue (PB28) or Cerulean Blue (PB35) – The base for the subtle cool background washes.
- Cobalt Violet (PV14) – Mixed with blue for the softer, purple hues in the sky.
- Azo Yellow (PY151) or Cadmium Yellow (PY35) – For the bright, saturated glowing moon.
- Quinacridone Coral (PR209) or Alizarin Crimson (PR83) – For the vibrant mushroom caps and subtle nose blush.
- Sap Green (PG36, PY110) or Viridian (PG18) – Used diluted for the soft green grass base.
- Davy’s Gray or Payne’s Grey (PB15, PBk6) – To build neutral shadows or glazes in the hat and beard areas.
- Buff Titanium (PW6:1) – A useful pigment to mix for the soft, creamy nose color.
Love these watercolor ideas? Get our 30 Spooky Halloween Watercolor Coloring Pages (PDF Download) for even more fun, printable designs to paint this Halloween.
A Halloween rustic wooden fence
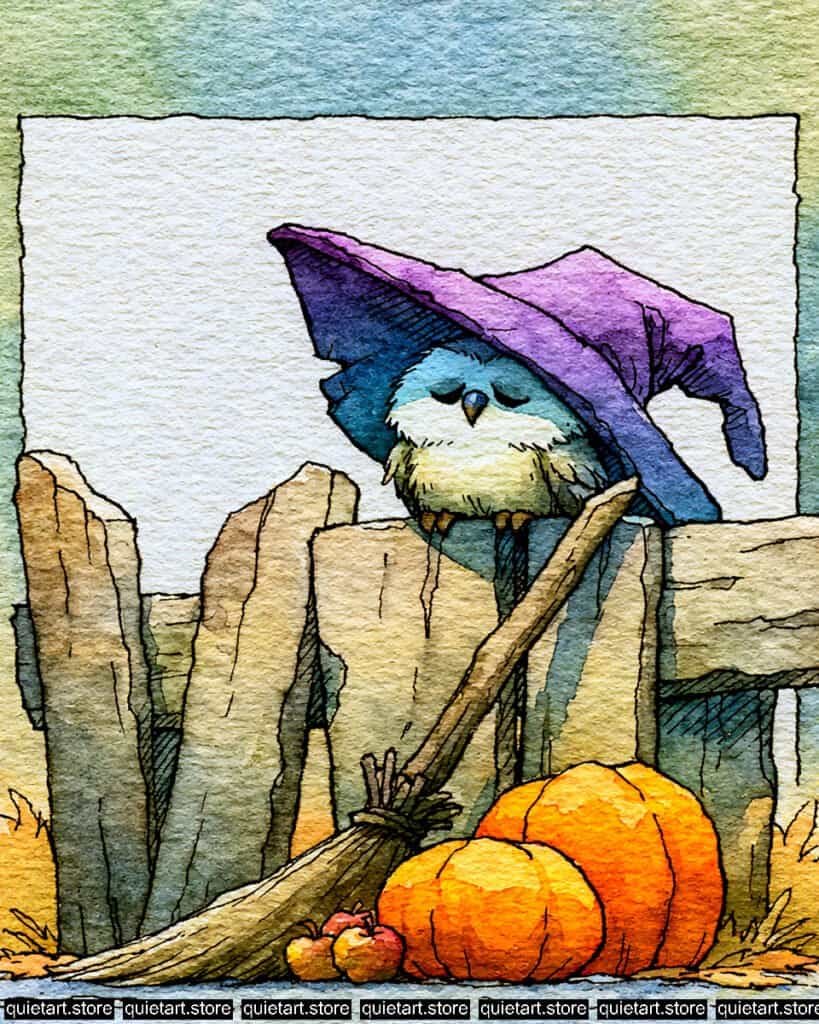
To begin this charming illustration, establish the soft, textural atmosphere using a wet-on-wet wash for the border area, blending cool blues and muted greens while keeping the center light. For the main subjects, apply translucent washes: soft cream for the owl’s body, turquoise-cyan for its head, a vibrant blue-purple mix for the hat, and warm sandy-tan tones across the wooden fence and broom.
Once the initial layers dry, build up color saturation with rich orange glazes on the pumpkins and deep brown shadow glazes along the fence posts. After everything is completely dry, use a fine-liner waterproof ink pen to trace crisp outlines and add detailed cross-hatching across the owl’s feathers, the broom, and the rustic wood structure.
Recommended Watercolor Pigments:
- Dioxazine Purple (PV23) or Cobalt Violet (PV14) – For the deep purple body of the witch hat.
- Cerulean Blue (PB35) or Cobalt Blue (PB28) – For the cool blue tones on the hat brim, owl’s head, and frame border.
- Cadmium Orange (PO20) or Pyrrol Orange (PO73) – For the rich, glowing pumpkins and autumn apples.
- Yellow Ochre (PY43) or Raw Sienna (PBr7) – For the rustic wooden fence, broom handle, and warm base tones.
- Sepia (PBr7, PBk9) or Burnt Umber (PBr7) – For the dark wood grain shadows and broom ties.
- Sap Green (PG36, PY110) – Diluted for subtle mossy green washes along the border and ground.
Love these watercolor ideas? Get our 30 Spooky Halloween Watercolor Coloring Pages (PDF Download) for even more fun, printable designs to paint this Halloween.
A little butler spider
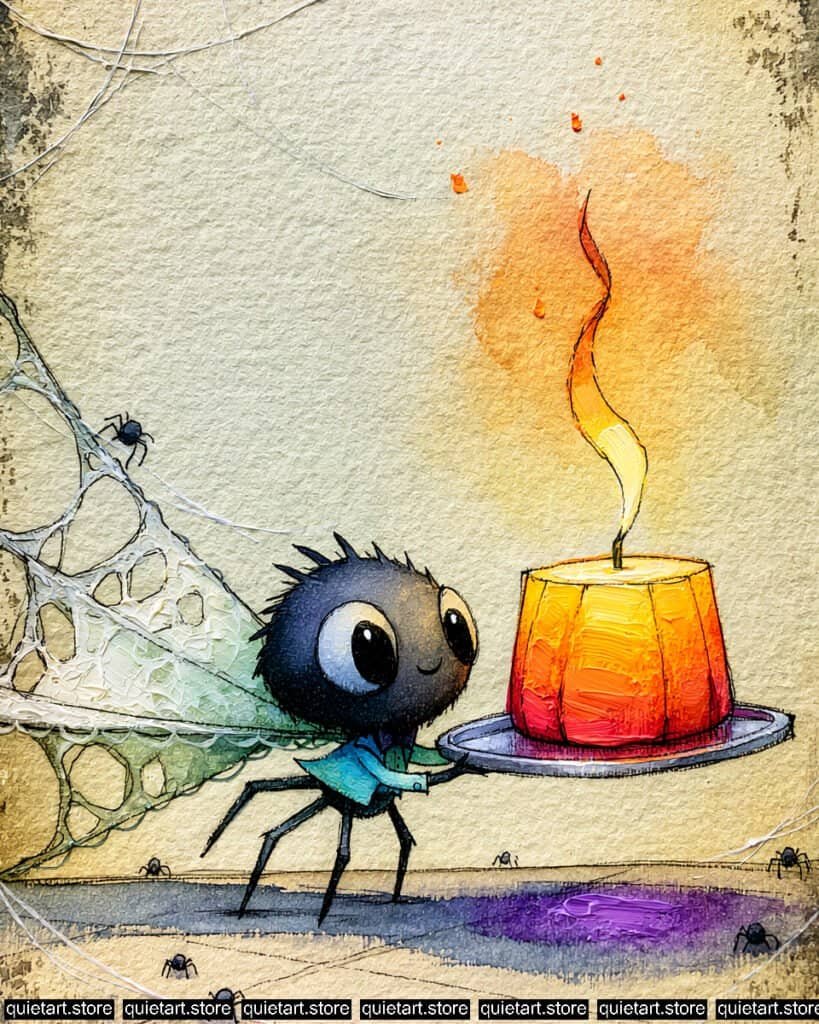
To begin this whimsical piece, start with a light pencil sketch on textured cold-press paper, carefully outlining the spider butler, its serving tray, the candle, and the intricate web on the left. Begin by applying a soft, warm wet-on-wet background wash, blending muted ochre and aged parchment tones while leaving a glowing orange bloom behind the flame. Use delicate wet-on-dry washes for the main subjects—a rich charcoal-black for the spider’s fuzzy head, a cool teal-blue for its small jacket, and a vibrant gradient of lemon yellow to deep red-orange for the glowing candle.
Once the initial color blocks have completely dried, build depth and atmosphere by adding a soft purple cast shadow beneath the tray and applying subtle pale green washes to the spiderweb structure. Finish the painting by using a fine-liner waterproof ink pen to trace clean contours, detail the tiny spider legs, and add fine hatching marks for fur and texture on the head. For the candle flame, preserve the pure white paper highlight in the core to maximize the luminous effect.
Recommended Watercolor Pigments:
- Yellow Ochre (PY43) or Raw Sienna (PBr7) – For the aged, parchment-like background and floor washes.
- Azo Yellow (PY151) or Lemon Yellow (PY3) – For the bright, glowing core of the candle flame.
- Cadmium Orange (PO20) or Pyrrol Orange (PO73) – For the vibrant candle body gradient and background heat bloom.
- Cobalt Teal (PG50) or Phthalo Cyan (PB15:3) – For the butler spider’s cute teal jacket and subtle web undertones.
- Payne’s Grey (PB15, PBk6) or Neutral Tint – For the dark, velvety black head, spider legs, and tray.
- Dioxazine Purple (PV23) or Cobalt Violet (PV14) – For the deep, rich cast shadow pool beneath the tray.
Love these watercolor ideas? Get our 30 Spooky Halloween Watercolor Coloring Pages (PDF Download) for even more fun, printable designs to paint this Halloween.
A jack-o-lantern duck
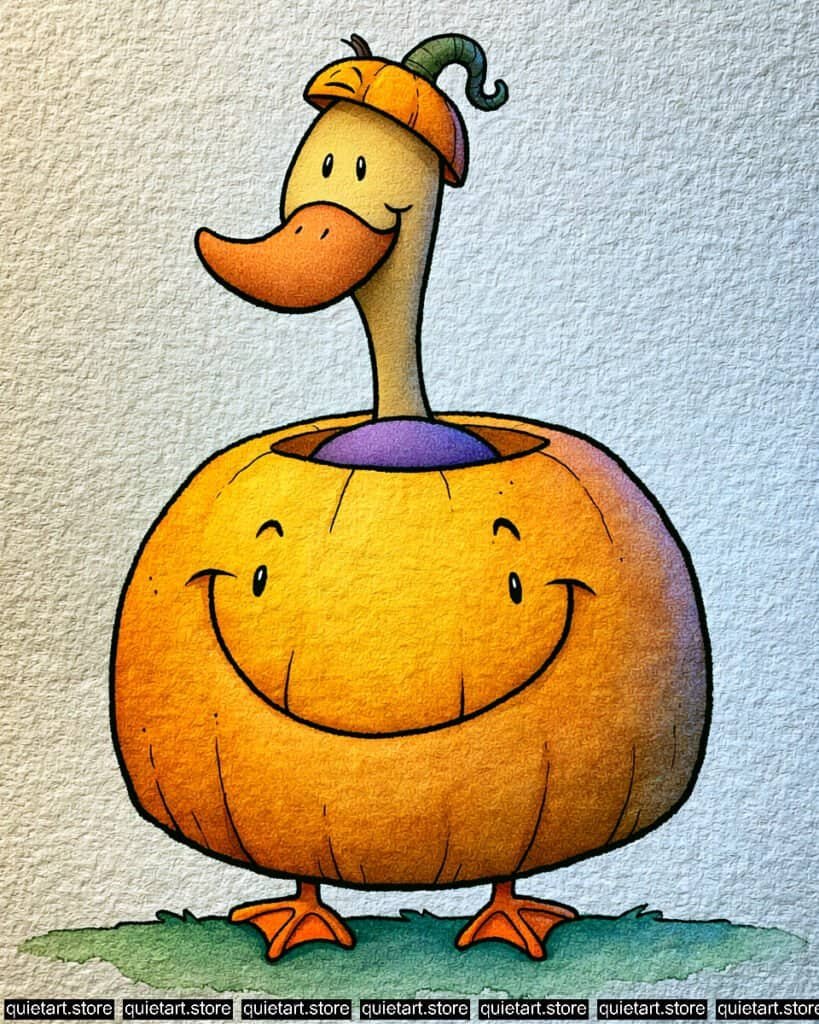
Start with a clean pencil sketch on cold-press paper, carefully defining the round pumpkin body, the duck’s neck and head, and the little pumpkin-stem cap. Apply a soft wet-on-dry technique for the base layers, using a bright, saturated yellow-orange wash across the pumpkin body and bill, a soft warm-yellow for the duck’s neck, and a vibrant purple accent inside the pumpkin collar opening. Keep the background clean and unpainted, adding only a light teal-green wash at the base to ground the duck on a patch of grass.
Once your base washes dry completely, build up depth by blending a rich orange glaze with subtle purple shadow tones along the right edge of the main pumpkin and the small cap to create a 3D rounded form. Finish the piece by using a fine-liner waterproof ink pen to trace crisp contours and add detailed cross-hatching and stippling texture across the pumpkin surface and the duck’s neck. Be sure to preserve bright highlights on the top curves of the pumpkin for a fresh, vibrant finish.
Recommended Watercolor Pigments:
- Cadmium Orange (PO20) or Pyrrol Orange (PO73) – For the vibrant, main body of the pumpkin and the duck’s feet and bill.
- Azo Yellow (PY151) or Cadmium Yellow Light (PY35) – For the warm base wash on the duck’s neck and central pumpkin highlights.
- Dioxazine Purple (PV23) or Cobalt Violet (PV14) – For the purple inner-collar accent and cool shadow tones on the pumpkin edge.
- Sap Green (PG36, PY110) or Hooker’s Green (PG7, PY150, PO49) – For the small curled stem on the cap and the grass wash at the base.
- Burnt Sienna (PBr7) – For adding warm earth shadows and subtle gradients on the duck’s bill.
- Payne’s Grey (PB15, PBk6) – For subtle glazes in deep crease shadows before ink work.
Love these watercolor ideas? Get our 30 Spooky Halloween Watercolor Coloring Pages (PDF Download) for even more fun, printable designs to paint this Halloween.
A magical Halloween fairy tale stone tower
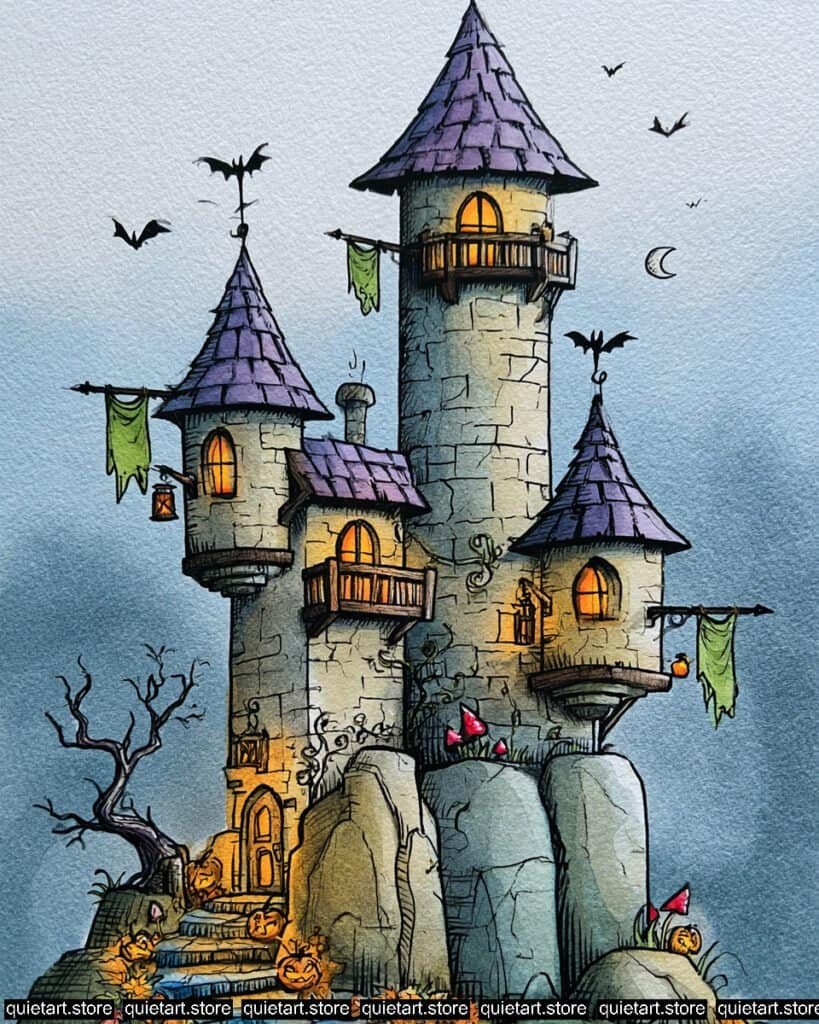
Start with a detailed pencil sketch on cold-press paper to capture the stone tower, pointy roofs, flying bats, and surrounding rock landscape. Begin with a soft wet-on-wet background wash for the dramatic sky, blending atmospheric slate blues and moody grey-indigos while keeping the areas around the windows untouched. Next, apply translucent wet-on-dry washes: a warm yellow-gold glaze inside the glowing windows and lanterns, a rich blue-violet for the conical roofs, and a muted, stone-grey base across the main tower walls and boulders.
Once the initial layers have completely dried, build up form and dimension by adding cool blue and purple shadow glazes along the rounded sides of the towers and under the balconies. Accentuate the details by painting vibrant green flags and bright orange pumpkins scattered along the stone steps. Finally, wait for the paper to dry fully before using a fine-liner waterproof ink pen to trace all the structural outlines, brickwork, tree branches, and small flying bats, bringing out the distinct illustrative style.
Recommended Watercolor Pigments:
- Dioxazine Purple (PV23) or Cobalt Violet (PV14) – For the deep, mystical violet color on the tiled tower roofs.
- Indigo (PB60, PBk6) or Ultramarine Blue (PB29) – For the dramatic, stormy background sky and deep stone shadows.
- Azo Yellow (PY151) or Cadmium Yellow Light (PY35) – For the brilliant, warm glow in the windows and lanterns.
- Yellow Ochre (PY43) or Buff Titanium (PW6:1) – For the warm, aged stone walls and steps.
- Cadmium Orange (PO20) or Pyrrol Orange (PO73) – For the small jack-o’-lanterns and autumn leaves along the base.
- Sap Green (PG36, PY110) or Hooker’s Green (PG7, PY150, PO49) – For the tattered green flags hanging from the towers.
Love these watercolor ideas? Get our 30 Spooky Halloween Watercolor Coloring Pages (PDF Download) for even more fun, printable designs to paint this Halloween.
A mysterious black crow skull
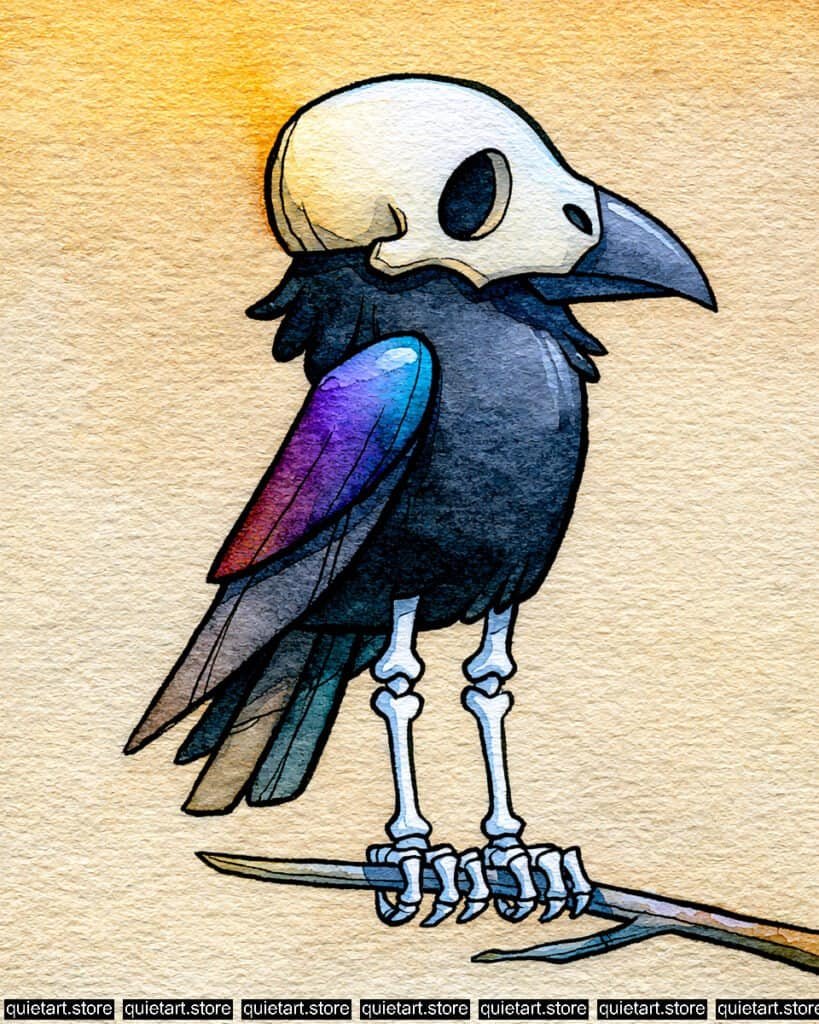
Start with a clean pencil sketch on cold-press paper, carefully outlining the crow’s body, the bone skull mask, the skeletal leg structure, and the wooden branch. Apply a soft wet-on-wet wash for the background, blending warm golden yellow near the top into an aged parchment ochre tone, keeping the main figure clean. For the crow, use a wet-on-dry technique to build up base glazes, laying down a pale cream wash for the skull helmet and a rich dark grey-indigo for the body feathers, while dropping vibrant turquoise, violet, and magenta into the wing feathers to capture an iridescent sheen.
Once the initial layers dry completely, build depth by applying darker indigo shadow glazes to the underside of the crow, the beak, and the hollow eye socket of the skull. After all watercolor layers are thoroughly dry, use a fine-liner waterproof ink pen to trace bold, crisp outlines around the figure and add fine hatching details across the feathers, bone joints, and tree branch. Preserve pure white paper highlights along the top edge of the skull and wing fold for a luminous, three-dimensional look.
Recommended Watercolor Pigments:
- Payne’s Grey (PB15, PBk6) or Indigo (PB60, PBk6) – For the deep blue-black body feathers, beak, and dark shadows.
- Cobalt Violet (PV14) or Dioxazine Purple (PV23) – For the iridescent purple gradient on the wing feathers.
- Phthalo Blue (PB15) or Cobalt Teal (PG50) – For the bright, vivid turquoise highlights along the top edge of the wing.
- Yellow Ochre (PY43) or Raw Sienna (PBr7) – For the warm background wash and subtle shading on the skull mask.
- Buff Titanium (PW6:1) – Useful for creating the smooth, off-white bone texture on the skull helmet and leg bones.
- Permanent Magenta (PR122) or Quin Rose (PV19) – For the deep reddish-pink blend on the lower wing feathers.
Love these watercolor ideas? Get our 30 Spooky Halloween Watercolor Coloring Pages (PDF Download) for even more fun, printable designs to paint this Halloween.
A mysterious mummy
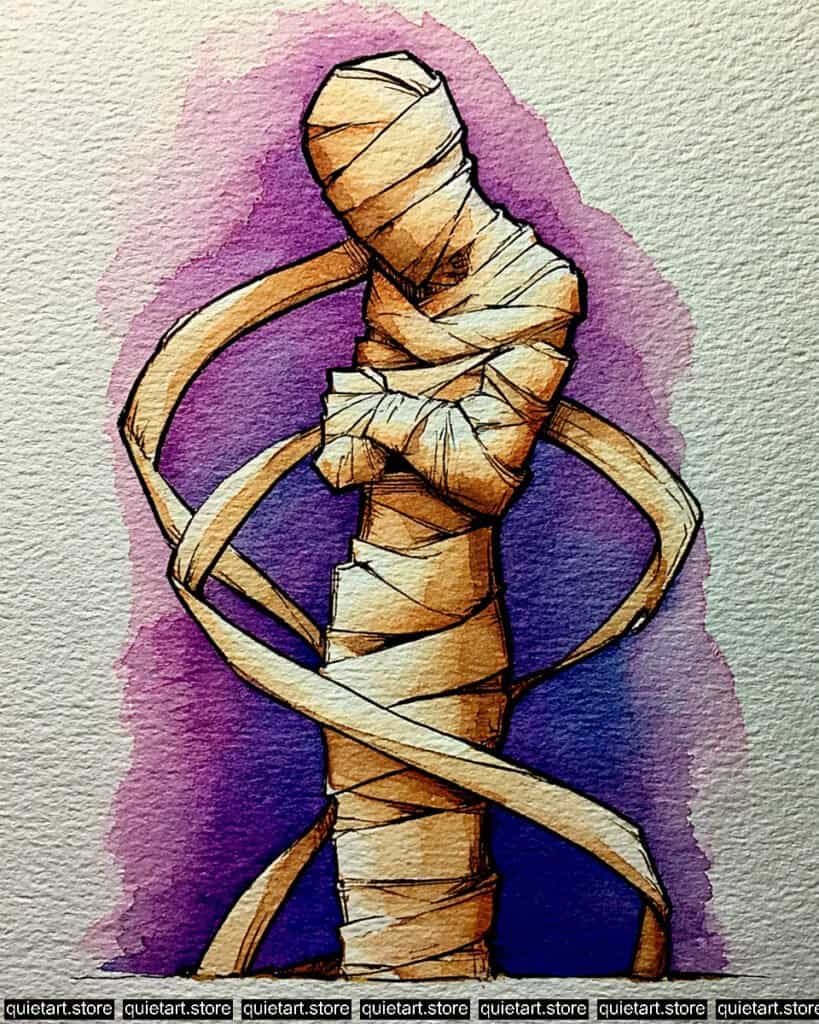
To capture this striking piece, begin with a light pencil sketch on cold-press watercolor paper, carefully placing the mummy figure and the dynamic swirling bandages. Apply a soft wet-on-wet technique for the background, creating a vibrant halo effect by blending intense magenta along the outer edges into a deep indigo-blue directly behind the figure. For the mummy wraps, use a wet-on-dry approach to lay down warm, earth-toned washes of raw sienna and ochre, leaving clean unpainted areas on the top curves to maintain bright paper highlights.
Once the initial washes dry completely, build up depth by applying warm burnt umber glazes in the overlapping shadows of the bandages and along the right side of the figure. After all watercolor layers are thoroughly dry, use a fine-liner waterproof ink pen to trace bold outlines and add detailed cross-hatching to define the aged texture of the cloth wraps and strong form shadows. Keep the background outer perimeter soft to allow the figure and its surrounding aura to pop off the page.
Recommended Watercolor Pigments:
- Permanent Magenta (PR122) or Cobalt Violet (PV14) – For the vibrant purple-pink halo framing the background.
- Indigo (PB60, PBk6) or Dioxazine Purple (PV23) – For the rich, deep dark purple-blue wash directly behind the mummy.
- Yellow Ochre (PY43) or Raw Sienna (PBr7) – For the warm, aged parchment base color of the mummy bandages.
- Burnt Sienna (PBr7) or Burnt Umber (PBr7) – For the warm brown crease shadows and overlapping wrap glazes.
- Buff Titanium (PW6:1) – Useful for creating a soft off-white base coat on the bandage highlights.
- Payne’s Grey (PB15, PBk6) – For adding deep neutral darks before pen work along the figure’s edges.
Love these watercolor ideas? Get our 30 Spooky Halloween Watercolor Coloring Pages (PDF Download) for even more fun, printable designs to paint this Halloween.
A songbird wearing a black witch hat
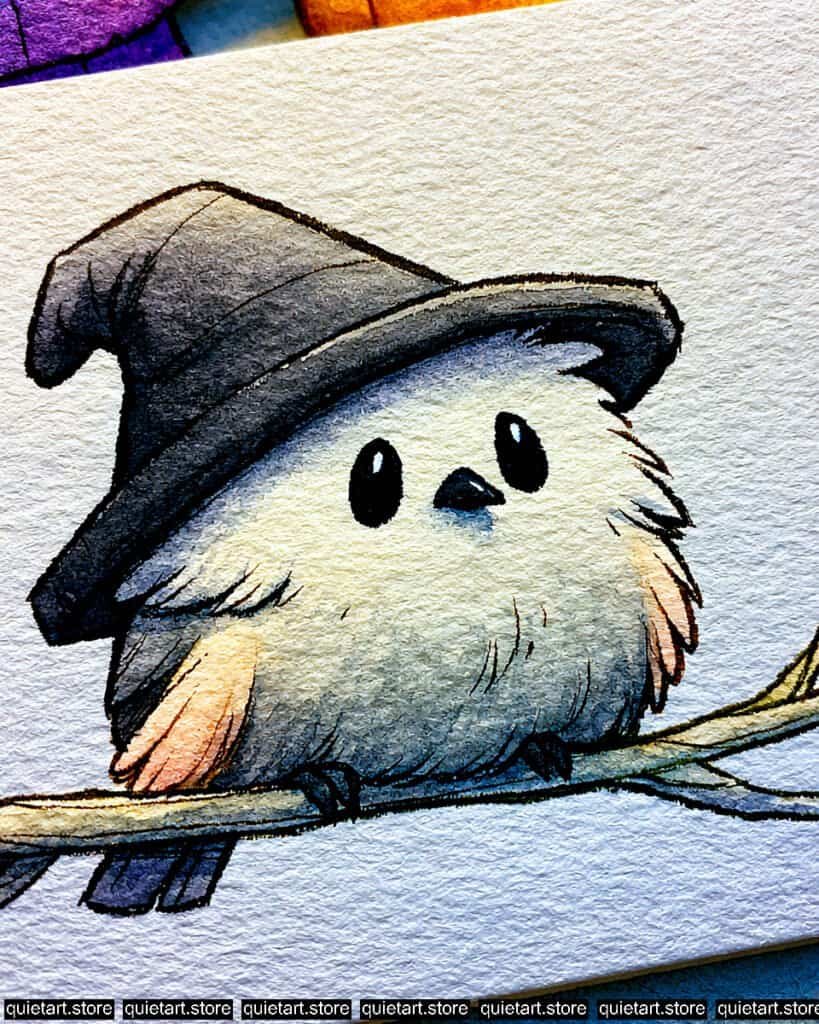
Start with a delicate pencil sketch on cold-press watercolor paper, carefully placing the round songbird, its witch hat, and the slender tree branch. Apply a soft wet-on-dry technique for the base glazes, using a soft off-white wash for the chest, a delicate peach blush on the wing tips, and a smooth warm tan for the wooden branch. For the hat, apply an initial wash of cool charcoal-grey, leaving a slight highlight along the brim and crown fold to establish a three-dimensional form.
Once the initial layers dry completely, build up depth by applying cool grey-blue shadow glazes along the underside of the belly, under the hat brim, and along the tail feathers. After all watercolor layers are thoroughly dry, paint the glossy black eyes and beak using a rich, opaque black mix, preserving the unpainted white paper spots for bright eye catchlights. Finish the piece by using a fine-liner waterproof ink pen to trace clean contours and add delicate hatching marks to define the soft feather texture, hat creases, and branch details.
Recommended Watercolor Pigments:
- Payne’s Grey (PB15, PBk6) or Neutral Tint – For the soft charcoal-grey witch hat, shadow washes, and tail feathers.
- Buff Titanium (PW6:1) – Useful for establishing the soft, creamy off-white tone of the bird’s fluffy belly and face.
- Shell Pink or Quinacridone Coral (PR209) – Diluted for the subtle, warm peach accents on the wing feathers.
- Yellow Ochre (PY43) or Raw Sienna (PBr7) – For the natural, earthy tan base of the slender tree branch.
- Ultramarine Blue (PB29) or Cobalt Blue (PB28) – Mixed into the greys for the cool shadow glazes on the lower belly and under the hat.
- Ivory Black (PBk9) – For painting the deep, solid black eyes and small beak with maximum contrast.
Love these watercolor ideas? Get our 30 Spooky Halloween Watercolor Coloring Pages (PDF Download) for even more fun, printable designs to paint this Halloween.
A toad wizard
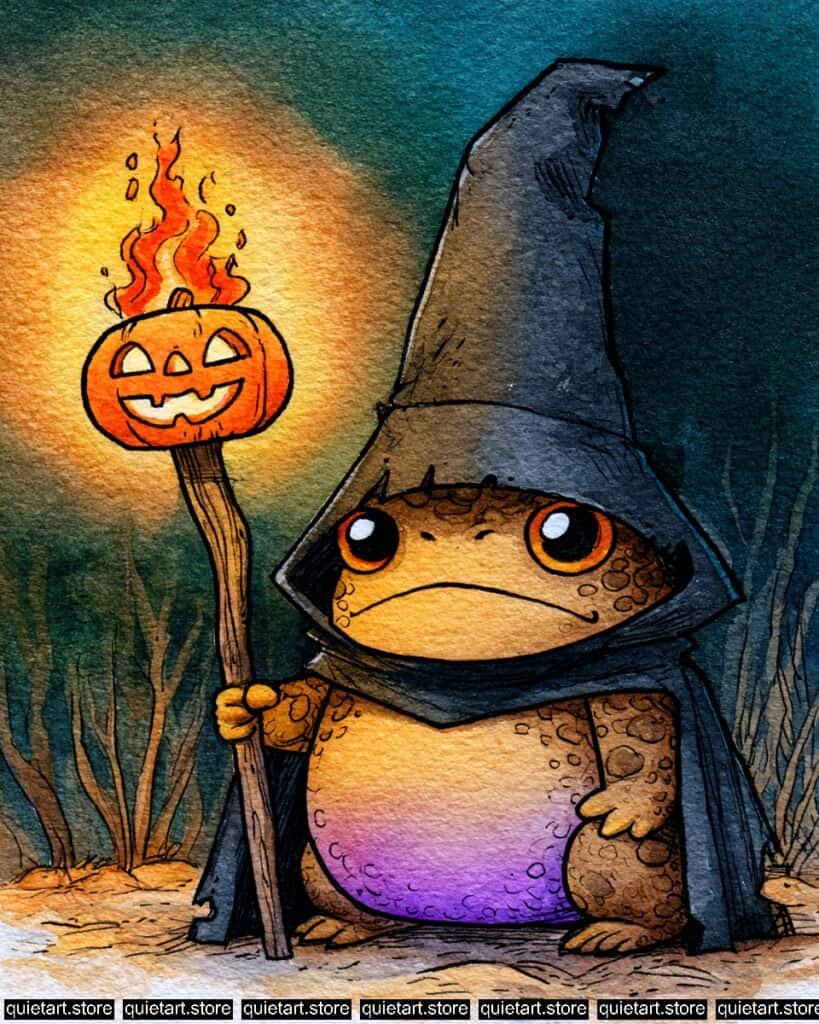
Start with a detailed pencil sketch on cold-press paper, carefully outlining the toad wizard, its pointy hat and cloak, and the flaming pumpkin staff. Begin with a wet-on-wet wash for the atmospheric background, creating a glowing warm golden aura around the staff head that smoothly bleeds into deep, shadowy teal and forest-green tones. For the toad’s body, apply a translucent wet-on-dry wash, laying down a warm ochre-yellow base on its belly that transitions into a vibrant violet gradient toward the lower abdomen.
Once your base layers dry completely, build up form by adding darker olive-brown glazes to paint the toad’s textured skin spots and the wooden staff handle. Use a deep charcoal-black mix for the pointed hat and cloak, leaving subtle highlights along the folds to maintain structure. Finally, after all the watercolor washes are dry, use a fine-liner waterproof ink pen to trace crisp outlines and add fine stippling and hatching details across the skin, hat, and background foliage to complete the illustrative style.
Recommended Watercolor Pigments:
- Yellow Ochre (PY43) or Raw Sienna (PBr7) – For the toad’s warm belly tone, staff glow, and ground base.
- Cobalt Violet (PV14) or Dioxazine Purple (PV23) – For the vivid purple gradient on the toad’s lower belly.
- Cadmium Orange (PO20) or Pyrrol Orange (PO73) – For the flaming pumpkin staff and glowing eye irises.
- Phthalo Green (PG7) or Indanthrone Blue (PB60) – Blended for the deep, atmospheric teal background wash.
- Payne’s Grey (PB15, PBk6) or Neutral Tint – For the dark, mysterious wizard hat and cloak.
- Burnt Umber (PBr7) or Sepia (PBr7, PBk9) – For the wooden staff, skin spots, and foreground ground details.
Love these watercolor ideas? Get our 30 Spooky Halloween Watercolor Coloring Pages (PDF Download) for even more fun, printable designs to paint this Halloween.
A whimsical haunted cottage
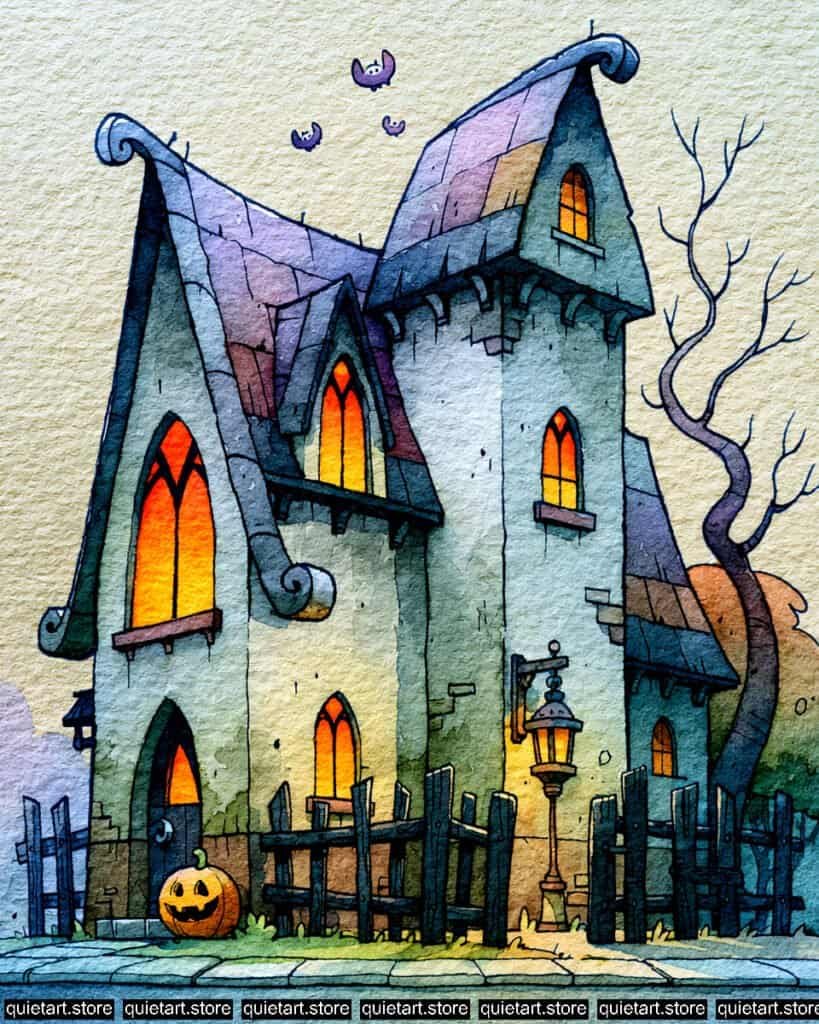
Start with a detailed pencil sketch on cold-press watercolor paper, capturing the exaggerated rooflines, gothic window arches, wooden fence, and surrounding details. Apply a soft wet-on-wet technique for the background, blending pale, warm yellow near the top into a soft lavender wash toward the bottom left. Next, use a wet-on-dry approach to establish the base glazes: a warm yellow-orange blend for the glowing windows and lantern, a soft pale-green for the cottage walls, and a rich violet-blue gradient along the shingled roofs.
Once the initial layers have completely dried, build up form and depth by adding cool indigo and slate-grey shadow glazes along the shaded side of the cottage, under the eaves, and across the wooden fence posts. Bring out the festive details by painting a vibrant orange jack-o’-lantern by the door and deep purple tones on the gnarled tree trunk. Finally, after all watercolor washes are thoroughly dry, use a fine-liner waterproof ink pen to trace crisp outlines and add fine cross-hatching to define wood textures, roof shingles, and stone details for a finished illustrative look.
Recommended Watercolor Pigments:
- Cobalt Violet (PV14) or Dioxazine Purple (PV23) – For the whimsical, deep purple shingled roofs and flying bats.
- Azo Yellow (PY151) or Cadmium Yellow Light (PY35) – For the glowing interior windows, street lantern, and soft background sky.
- Cadmium Orange (PO20) or Pyrrol Orange (PO73) – For the vibrant jack-o’-lantern and warm window gradients.
- Cobalt Teal (PG50) or Sap Green (PG36, PY110) – Diluted for the subtle, pale mossy-green wash on the cottage walls.
- Payne’s Grey (PB15, PBk6) or Indigo (PB60, PBk6) – For the dark, weathered wooden fence, roof eaves, and strong shadow glazes.
- Burnt Umber (PBr7) – For the gnarled tree trunk and warm brown wood accents.
Love these watercolor ideas? Get our 30 Spooky Halloween Watercolor Coloring Pages (PDF Download) for even more fun, printable designs to paint this Halloween.
Adorable zombie
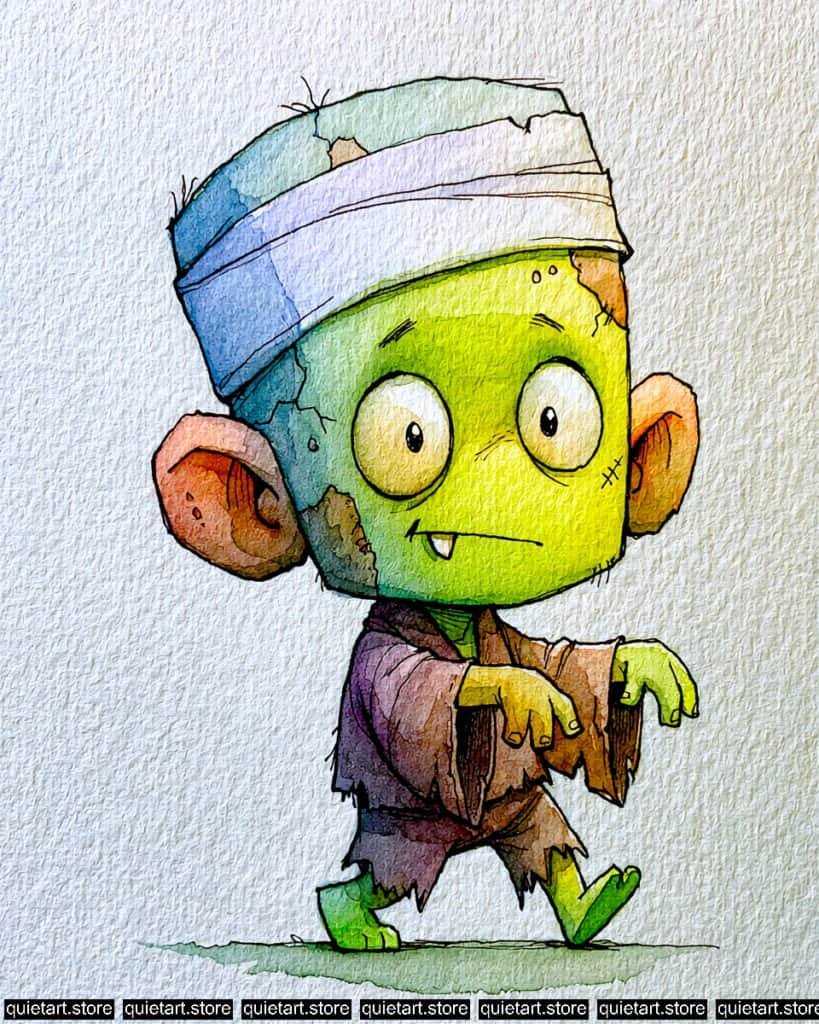
Start with a clean pencil sketch on cold-press paper, carefully outlining the zombie’s large head, oversized ears, head bandage, and tattered clothes. Using a wet-on-dry technique, apply a bright chartreuse-green base wash for the face and limbs, blending in a soft turquoise wash on the left side of the head and a warm peachy-pink wash for the ears. For the tattered shirt, lay down a smooth gradient transitioning from muted purple on the back to warm earth-brown toward the sleeves and hem.
Once the initial washes dry completely, build up depth by applying delicate brown and olive glazes to define skin cracks, ear folds, and shadow areas under the jaw and bandage. Finish the illustration by using a fine-liner waterproof ink pen to trace crisp contours and add detailed hatching marks for texture across the clothing, bandages, and skin creases. Keep the background clean and unpainted, adding only a light green shadow wash beneath the feet to ground the character.
Recommended Watercolor Pigments:
- Green Gold (PY117, PG7) or Lemon Yellow (PY3) – For the vibrant, glowing lime-green base tone of the skin.
- Cobalt Teal (PG50) or Cerulean Blue (PB35) – For the cool teal shadows along the left side of the head and top wrap.
- Venetian Red (PR101) or Quinacridone Coral (PR209) – Diluted for the warm peach tones in the large ears.
- Dioxazine Purple (PV23) or Cobalt Violet (PV14) – For the purple shadow washes on the tattered shirt.
- Burnt Umber (PBr7) or Raw Umber (PBr7) – For the tattered sleeve tones, skin cracks, and earth shadows.
- Buff Titanium (PW6:1) – Useful for creating the off-white base color of the head bandage.
Love these watercolor ideas? Get our 30 Spooky Halloween Watercolor Coloring Pages (PDF Download) for even more fun, printable designs to paint this Halloween.
An adorable kitten dressed as a tiny Halloween mummy
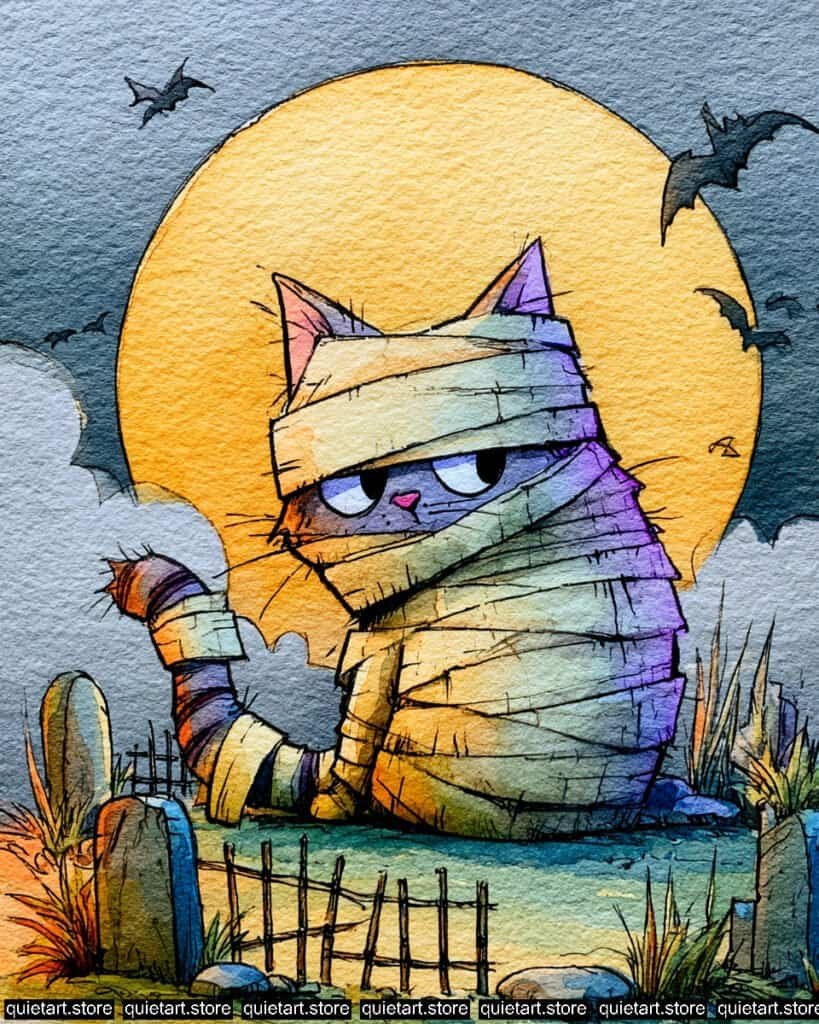
Start with a detailed pencil sketch on cold-press paper, carefully blocking out the cat figure, its mummy wraps, the large glowing moon, and the graveyard elements. Begin with a soft wet-on-wet background wash, blending a rich, glowing golden yellow for the central moon into atmospheric slate-grey and indigo tones for the night sky. For the mummy cat, apply initial translucent washes using a wet-on-dry technique: warm parchment yellow for the front wrap folds, delicate pink for the inner ears and nose, and a smooth gradient from teal to deep violet along the shaded side and striped tail.
Once your base washes dry completely, build form and value by applying deeper violet and indigo shadow glazes under the overlapping cloth wraps and along the base of the tombstones. Finish the piece by using a fine-liner waterproof ink pen to trace bold outlines and add delicate hatching lines across the wraps, fur, wooden fence, and flying bats. Be sure to preserve the unpainted white paper highlights on the cat’s eyes for a crisp, lively look.
Recommended Watercolor Pigments:
- Azo Yellow (PY151) or Cadmium Yellow Light (PY35) – For the bright, glowing full moon background.
- Dioxazine Purple (PV23) or Cobalt Violet (PV14) – For the vibrant purple shadow gradient on the cat’s wraps and tail stripes.
- Indigo (PB60, PBk6) or Payne’s Grey (PB15, PBk6) – For the dramatic night sky, bats, and deep shadows around the graveyard.
- Yellow Ochre (PY43) or Raw Sienna (PBr7) – For the warm, aged parchment tone of the mummy bandage highlights and ground.
- Cobalt Teal (PG50) or Phthalo Cyan (PB15:3) – For the cool teal-blue transitions on the cat’s wraps and grass patch.
- Opera Pink (PR122) or Quin Rose (PV19) – Diluted for the cute pink nose and soft inner ear blush.
Love these watercolor ideas? Get our 30 Spooky Halloween Watercolor Coloring Pages (PDF Download) for even more fun, printable designs to paint this Halloween.
Chicken’s Halloween costumes
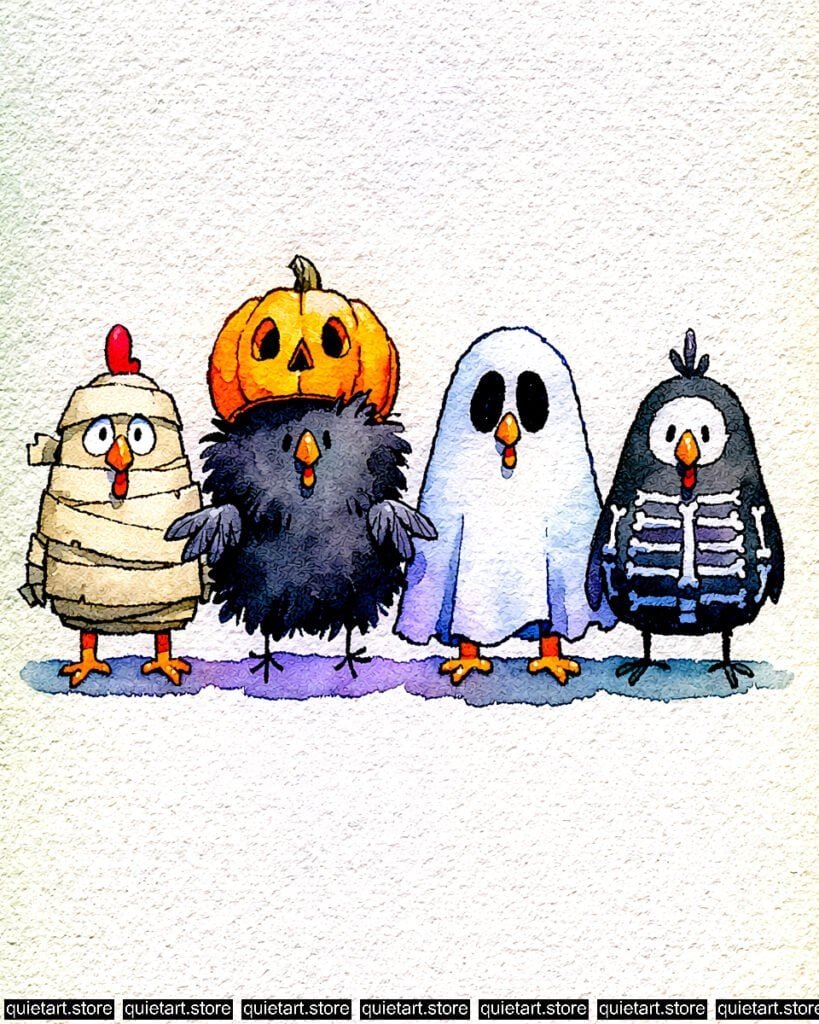
Start with a clean, detailed pencil sketch on cold-press paper, carefully outlining the four chickens in their respective costumes—mummy, pumpkin-head, sheet ghost, and skeleton. Apply a wet-on-dry technique to build up base glazes for each character: a warm parchment-yellow wash for the mummy wraps, a saturated orange for the pumpkin hat and beak accents, a velvety dark indigo-black for the middle black bird and skeleton suit, and a pale lavender-blue wash along the bottom folds of the white ghost sheet. Keep the background clean and white to let the figures stand out sharply.
Once the initial washes dry completely, apply deeper indigo and grey shadow glazes under the mummy wraps, beneath the ghost sheet, and along the skeleton ribs to build 3D form. Paint a soft purple ground shadow beneath all four figures to anchor them together on the page. Finally, use a fine-liner waterproof ink pen to trace crisp outlines and add fine hatching details across the mummy bandages, fluffy feathers, ghost fabric, and skeleton bones, preserving pure white paper catchlights in their eyes.
Recommended Watercolor Pigments:
- Cadmium Orange (PO20) or Pyrrol Orange (PO73) – For the vibrant pumpkin hat, as well as the bright orange beaks and legs.
- Payne’s Grey (PB15, PBk6) or Neutral Tint – For the dark black feathers, skeleton suit, and deep shadow accents.
- Dioxazine Purple (PV23) or Cobalt Violet (PV14) – For the ground cast shadow and delicate purple gradients on the ghost sheet.
- Yellow Ochre (PY43) or Buff Titanium (PW6:1) – For the warm, aged parchment tone of the mummy bandage wraps.
- Cadmium Red (PR108) or Pyrrol Red (PR254) – For the vibrant red chicken combs and wattles.
- Ultramarine Blue (PB29) – Diluted for cool shadow washes on the skeleton’s white bones and ghost sheet.
Love these watercolor ideas? Get our 30 Spooky Halloween Watercolor Coloring Pages (PDF Download) for even more fun, printable designs to paint this Halloween.
Duck’s Halloween costumes
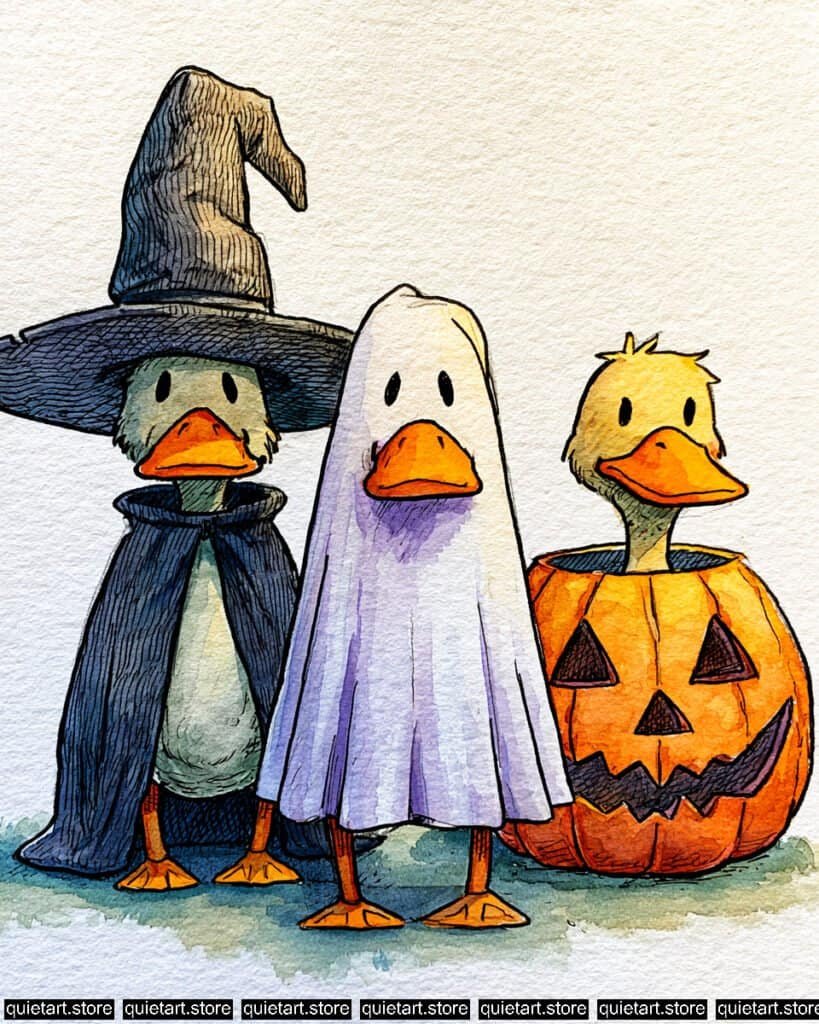
Start with a clean pencil sketch on cold-press paper, carefully outlining the three ducks in their costumes—the witch, the ghost, and the pumpkin. Apply a wet-on-dry technique to lay down your base glazes: a rich charcoal-indigo wash for the witch’s hat and cloak, a soft pale lavender-violet wash for the shadow folds on the ghost sheet, and a saturated warm orange wash across the pumpkin costume and duck bills. For the ducks’ bodies, apply a muted sage-green wash for the witch duck and a warm yellow wash for the pumpkin duck, keeping the background clean and unpainted.
Once the initial color layers dry completely, build form and dimension by adding deeper indigo shadows along the folds of the cloak, ghost sheet, and jack-o’-lantern carved openings. Ground the characters on the page by applying a subtle teal-green shadow wash beneath their feet. Finally, use a fine-liner waterproof ink pen to trace crisp outlines and add detailed hatching marks across the witch hat, cloak folds, ghost sheet creases, and pumpkin texture, preserving pure white paper highlights for their eyes and bill rims.
Recommended Watercolor Pigments:
- Payne’s Grey (PB15, PBk6) or Indigo (PB60, PBk6) – For the dark, dramatic witch hat, cloak, and deep shadow accents.
- Dioxazine Purple (PV23) or Cobalt Violet (PV14) – For the delicate purple shadow glazes along the ghost sheet.
- Cadmium Orange (PO20) or Pyrrol Orange (PO73) – For the vibrant jack-o’-lantern costume, duck bills, and webbed feet.
- Azo Yellow (PY151) or Yellow Ochre (PY43) – For the soft yellow head and neck of the pumpkin duck.
- Sap Green (PG36, PY110) or Hooker’s Green (PG7, PY150, PO49) – Diluted for the muted greenish head and belly wash of the witch duck and ground base.
- Buff Titanium (PW6:1) – Useful for creating a soft off-white base tone on the ghost sheet highlights.
Love these watercolor ideas? Get our 30 Spooky Halloween Watercolor Coloring Pages (PDF Download) for even more fun, printable designs to paint this Halloween.
Halloween fairytale tree house
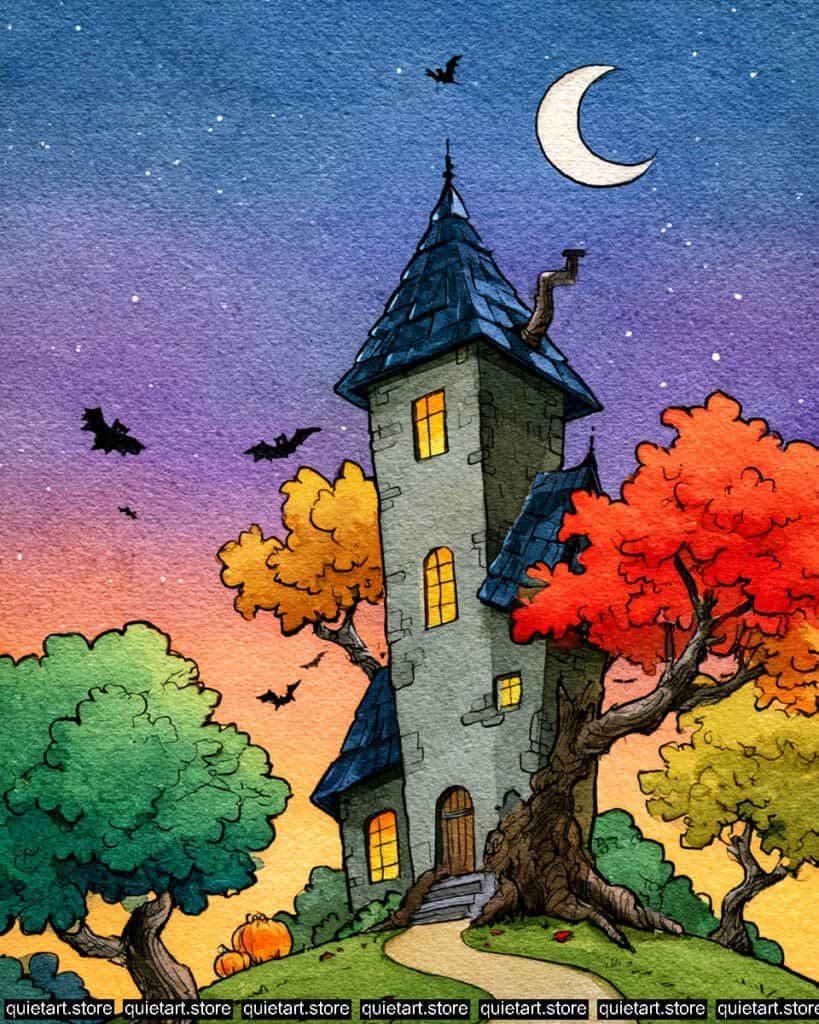
Start with a clean pencil sketch on cold-press paper, outlining the central stone tower, surrounding autumn foliage, crescent moon, and winding path. Begin with a dramatic wet-on-wet background wash for the evening sky, seamlessly blending deep cobalt blue at the top into vibrant purple, warm rose-pink, and brilliant yellow-orange near the horizon while keeping the crescent moon unpainted. Next, use a wet-on-dry technique to apply base layers: warm yellow-orange glazes for the glowing windows, deep indigo-blue for the shingled roofs, muted stone-grey for the tower, and vivid washes of orange, green, and golden yellow across the tree canopies.
Once your base washes dry completely, apply deeper shadow glazes along the shaded side of the stone tower, the tree trunks, and under the roof eaves to build dimensional depth. Paint the grassy hill with a fresh green wash and lay down a light sandy-buff tone for the winding pathway. Finally, wait for the paper to be thoroughly dry before using a fine-liner waterproof ink pen to trace crisp outlines, detail the stone masonry, add tree bark cross-hatching, and paint the small silhouettes of flying bats across the twilight sky.
Recommended Watercolor Pigments:
- Indanthrone Blue (PB60) or Ultramarine Blue (PB29) – For the deep night sky at the top and the dark shingled roofs.
- Dioxazine Purple (PV23) or Cobalt Violet (PV14) – For the central twilight sky gradient and purple tree highlights.
- Cadmium Red (PR108) or Pyrrol Scarlet (PR255) – For the vibrant red-orange autumn foliage on the right tree.
- Azo Yellow (PY151) or Cadmium Yellow (PY35) – For the glowing windows, lower sky horizon, and bright yellow leaves.
- Sap Green (PG36, PY110) or Hooker’s Green (PG7, PY150, PO49) – For the lush green tree on the left and the grassy hill base.
- Yellow Ochre (PY43) or Raw Umber (PBr7) – For the stone tower walls, gnarled tree trunks, and pathway.
Love these watercolor ideas? Get our 30 Spooky Halloween Watercolor Coloring Pages (PDF Download) for even more fun, printable designs to paint this Halloween.
Orange cat with oversized black witch hat
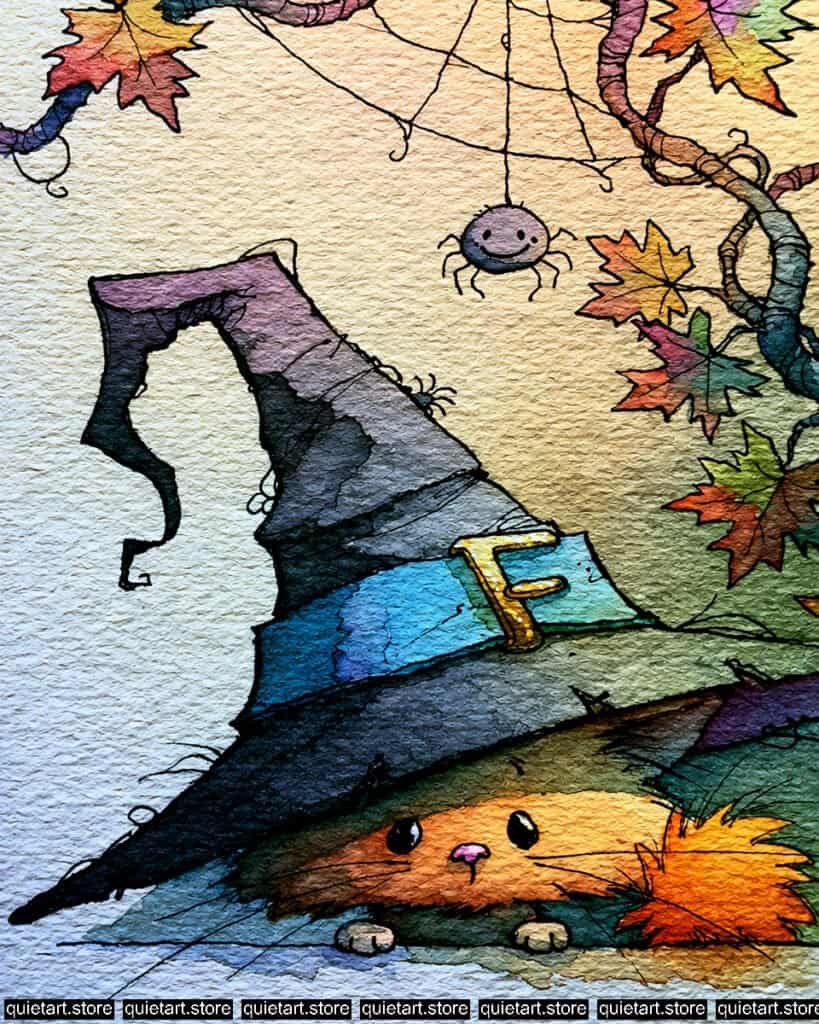
To begin this enchanting piece, start with a detailed pencil sketch on textured cold-press paper, carefully outlining the tall crooked witch hat, the peeking orange cat, the branches, and the dangling spider. Apply a soft wet-on-wet background wash, blending warm parchment tones into a subtle golden-orange glow towards the upper right while keeping the cat figure clean. Next, use a wet-on-dry technique for base glazes: apply a bright warm orange to the cat’s face and fur, a vivid cyan-blue for the hat band with a yellow buckle, a soft purple for the small spider, and a rich dark indigo-charcoal wash for the main witch hat.
Once the initial washes are completely dry, build up depth by applying deeper indigo and violet shadow glazes along the folds and underside of the hat. Paint the autumn leaves using a lively wet-on-wet mixture of reds, oranges, yellows, and moss greens to give them natural color variation. Finally, wait for the paper to dry thoroughly before using a fine-liner waterproof ink pen to trace crisp outlines, detail the fine cat whiskers, add spiderweb lines, and layer cross-hatching texture across the hat creases and tree branches.
Recommended Watercolor Pigments:
- Payne’s Grey (PB15, PBk6) or Neutral Tint – For the dark, weathered charcoal witch hat and shadow accents.
- Cadmium Orange (PO20) or Pyrrol Orange (PO73) – For the vibrant orange peeking cat, fluffy paw fur, and colorful maple leaves.
- Phthalo Cyan (PB15:3) or Cobalt Teal (PG50) – For the striking turquoise-blue hat band.
- Azo Yellow (PY151) or Yellow Ochre (PY43) – For the warm background glow, golden buckle, and yellow leaf highlights.
- Cobalt Violet (PV14) or Dioxazine Purple (PV23) – For the cute dangling spider and purple gradients on the leaf tips and hat brim.
- Sap Green (PG36, PY110) or Olive Green – For the mossy green tones blended into the autumn foliage on the right.
Love these watercolor ideas? Get our 30 Spooky Halloween Watercolor Coloring Pages (PDF Download) for even more fun, printable designs to paint this Halloween.
Warm Halloween cabin
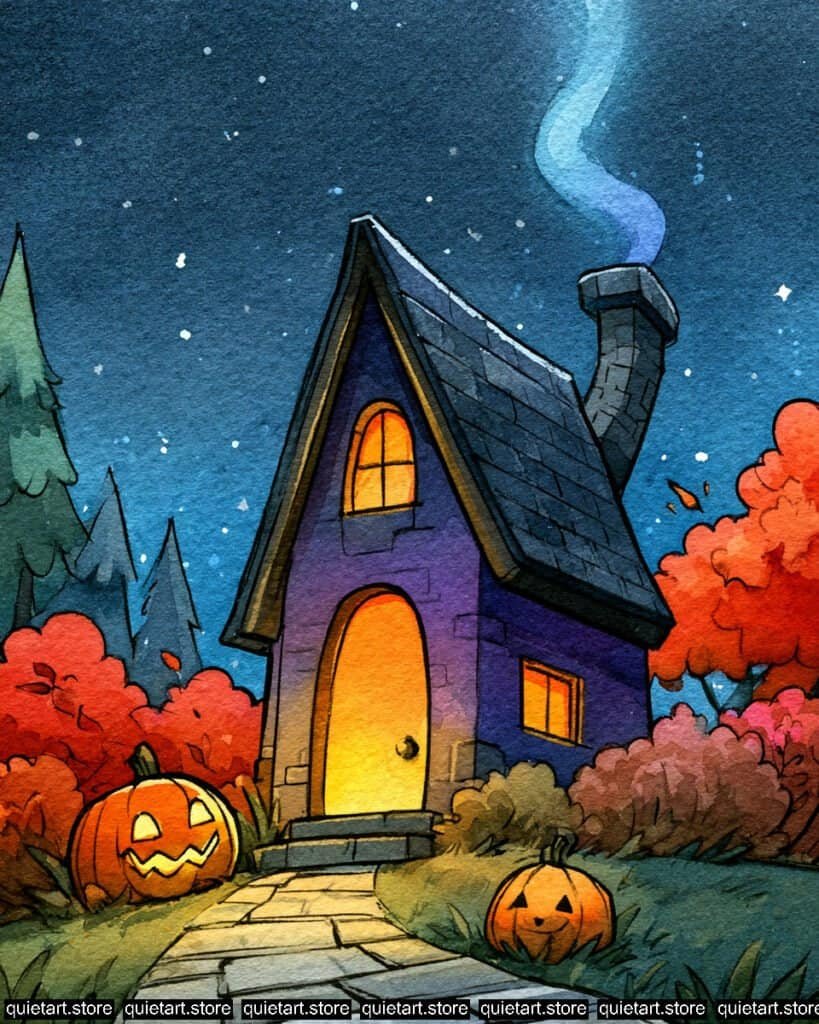
Start with a light pencil sketch on cold-press watercolor paper, outlining the steep-roofed cabin, stone pathway, jack-o’-lanterns, and surrounding autumn foliage. Apply a wet-on-wet wash for the night sky, blending deep indigo at the top into a vibrant cyan-blue toward the horizon, and use a lifted dry-brush technique or light gouache splatters for the stars. For the cabin, lay down wet-on-dry base washes: a bright warm yellow-orange gradient for the glowing door and windows, a rich violet for the front facade, and a slate blue-grey for the shingled roof and stone chimney.
Once your base washes dry completely, build depth by applying cooler blue-indigo shadow glazes along the side wall and roof eaves, while washing the foliage in vivid fiery reds, oranges, and deep evergreen greens. Lift or glaze a light cyan wash rising from the chimney to create the glowing magical smoke trail. Finally, wait for the painting to be thoroughly dry before using a fine-liner waterproof ink pen to trace clean contours, define the stone pathway, add brick textures, and detail the carved jack-o’-lantern faces.
Recommended Watercolor Pigments:
- Indanthrone Blue (PB60) or Indigo (PB60, PBk6) – For the deep night sky, roof shingles, and dark shadow glazes.
- Cobalt Teal (PG50) or Phthalo Cyan (PB15:3) – For the glowing blue lower sky and ethereal chimney smoke.
- Dioxazine Purple (PV23) or Cobalt Violet (PV14) – For the vibrant purple front facade of the cabin.
- Azo Yellow (PY151) or Cadmium Yellow Light (PY35) – For the warm, brilliant glow pouring out of the door and windows.
- Cadmium Orange (PO20) or Pyrrol Red (PR254) – For the carved pumpkins and rich, fiery autumn bushes.
- Sap Green (PG36, PY110) or Hooker’s Green (PG7, PY150, PO49) – For the pine trees, grassy lawn, and stone pathway shadows.
Love these watercolor ideas? Get our 30 Spooky Halloween Watercolor Coloring Pages (PDF Download) for even more fun, printable designs to paint this Halloween.
Whimsical Halloween Pumpkin Child
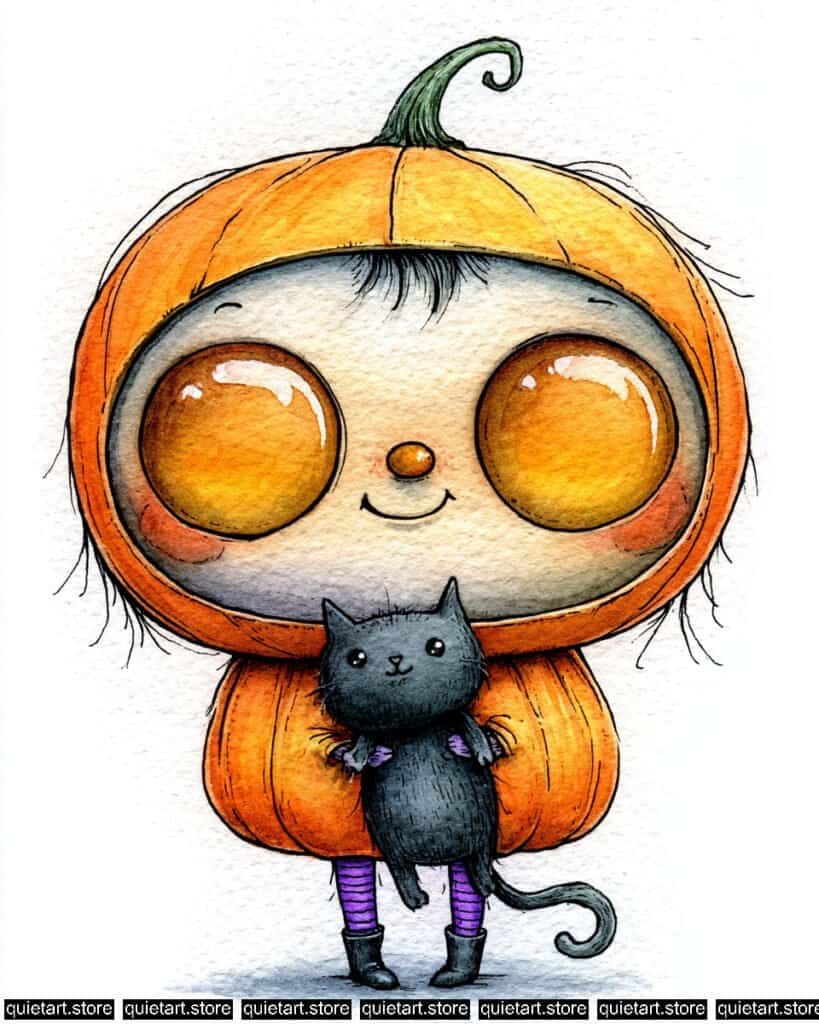
Begin with a light pencil sketch on cold-press paper, outlining the large pumpkin head suit, the expressive face, the small black cat, and the striped legs. Apply a wet-on-dry technique to build up base glazes, laying down a warm yellow-orange wash across the pumpkin suit, large glossy eyes, and small nose, while applying a pale, creamy wash for the skin and a deep grey-indigo for the little black cat. Keep the background clean and white, adding a cool shadow wash beneath the feet to ground the character on the page.
Once your initial base washes dry completely, apply warm reddish-orange glazes to darken the pumpkin ridge shadow creases and flush the cheeks with a soft blush. Paint the striped leggings in a vivid violet-purple tone before defining the deep shadows around the eye sockets and cat’s fur. Finally, wait for the paper to be thoroughly dry before using a fine-liner waterproof ink pen to trace crisp outlines, detail the cat’s fur and whiskers, add hair strands, and outline the pumpkin ridges, making sure to preserve bright white paper highlights in the eyes.
Recommended Watercolor Pigments:
- Cadmium Orange (PO20) or Pyrrol Orange (PO73) – For the vibrant pumpkin suit, orange nose, and glowing irises.
- Azo Yellow (PY151) or Yellow Ochre (PY43) – For the bright yellow highlights on the top of the pumpkin and eye centers.
- Dioxazine Purple (PV23) or Cobalt Violet (PV14) – For the striped leggings and subtle purple accents on the cat’s wings.
- Payne’s Grey (PB15, PBk6) or Neutral Tint – For the dark, velvety black cat, boots, and ground shadow.
- Sap Green (PG36, PY110) or Olive Green – For the curly stem on top of the pumpkin.
- Quinacridone Coral (PR209) or Burnt Sienna (PBr7) – Diluted for the rosy cheek blush and warm pumpkin crease shadows.
- Buff Titanium (PW6:1) – Useful for creating a smooth off-white base tone for the face skin.
Love these watercolor ideas? Get our 30 Spooky Halloween Watercolor Coloring Pages (PDF Download) for even more fun, printable designs to paint this Halloween.
Whimsical Halloween Skeleton
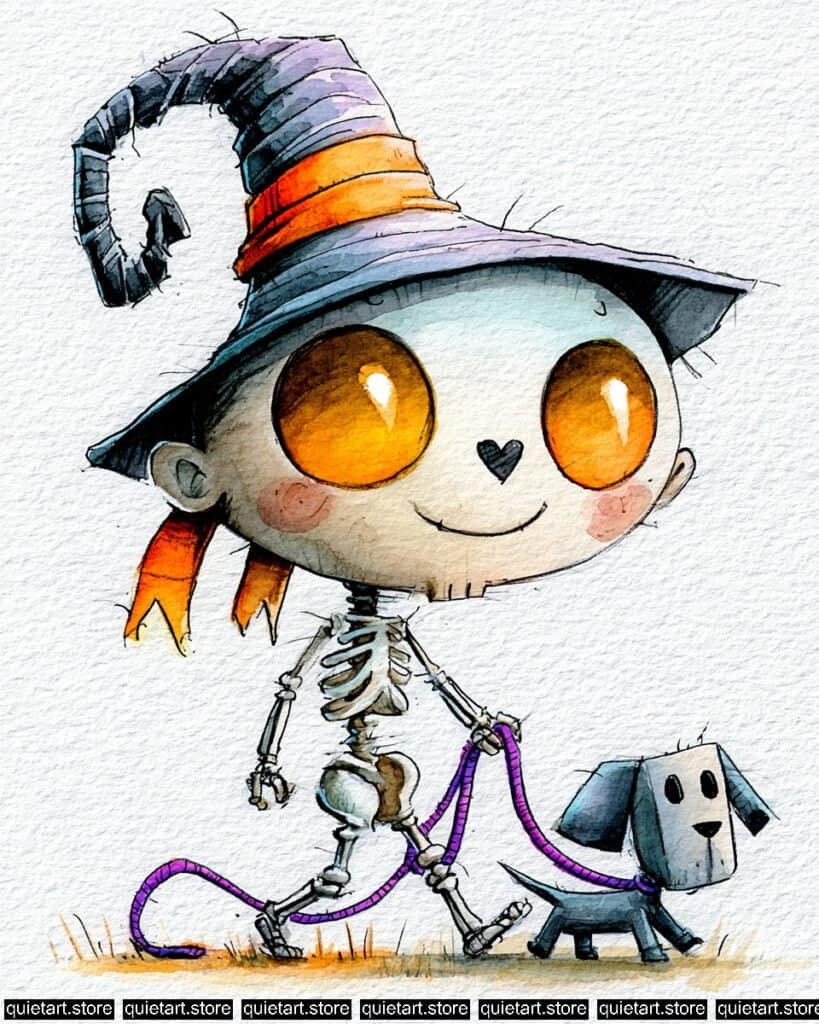
Begin with a light pencil sketch on cold-press paper, outlining the skeleton child, its curled witch hat, the small dog on a leash, and the ground line. Apply a wet-on-dry technique for the base glazes, laying down a bright, saturated orange wash for the glowing eyes, hat band, and ribbons, while using a smooth off-white coat for the skull and skeletal bones. For the witch hat and little dog, apply a cool grey-blue and dark slate wash, adding a vibrant purple-violet streak for the swirling leash and a soft pink blush to the cheeks.
Once your initial base washes dry completely, build form and dimension by adding cool blue and grey shadow glazes along the underside of the hat brim, the bone joints, and the dog’s body. Apply a warm ochre glaze along the ground line to anchor the figures on the page. Finally, wait for the paper to be thoroughly dry before using a fine-liner waterproof ink pen to trace crisp outlines, detail the small skeleton ribs, add stray hat hairs, and define the heart nose, making sure to preserve bright white paper highlights in the eyes.
Recommended Watercolor Pigments:
- Cadmium Orange (PO20) or Pyrrol Orange (PO73) – For the vibrant glowing eyes, hat band, trailing ribbons, and warm ground accents.
- Payne’s Grey (PB15, PBk6) or Indigo (PB60, PBk6) – For the dark, slate-blue witch hat, shadow glazes, and the small dog.
- Dioxazine Purple (PV23) or Cobalt Violet (PV14) – For the vivid purple leash and swirly tail accent.
- Buff Titanium (PW6:1) – Useful for creating a smooth, off-white bone texture for the large skull and body bones.
- Quinacridone Coral (PR209) or Venetian Red (PR101) – Diluted for the rosy cheek blush on the skull.
- Yellow Ochre (PY43) or Raw Sienna (PBr7) – For the warm ground wash at the bottom of the page.
Love these watercolor ideas? Get our 30 Spooky Halloween Watercolor Coloring Pages (PDF Download) for even more fun, printable designs to paint this Halloween.
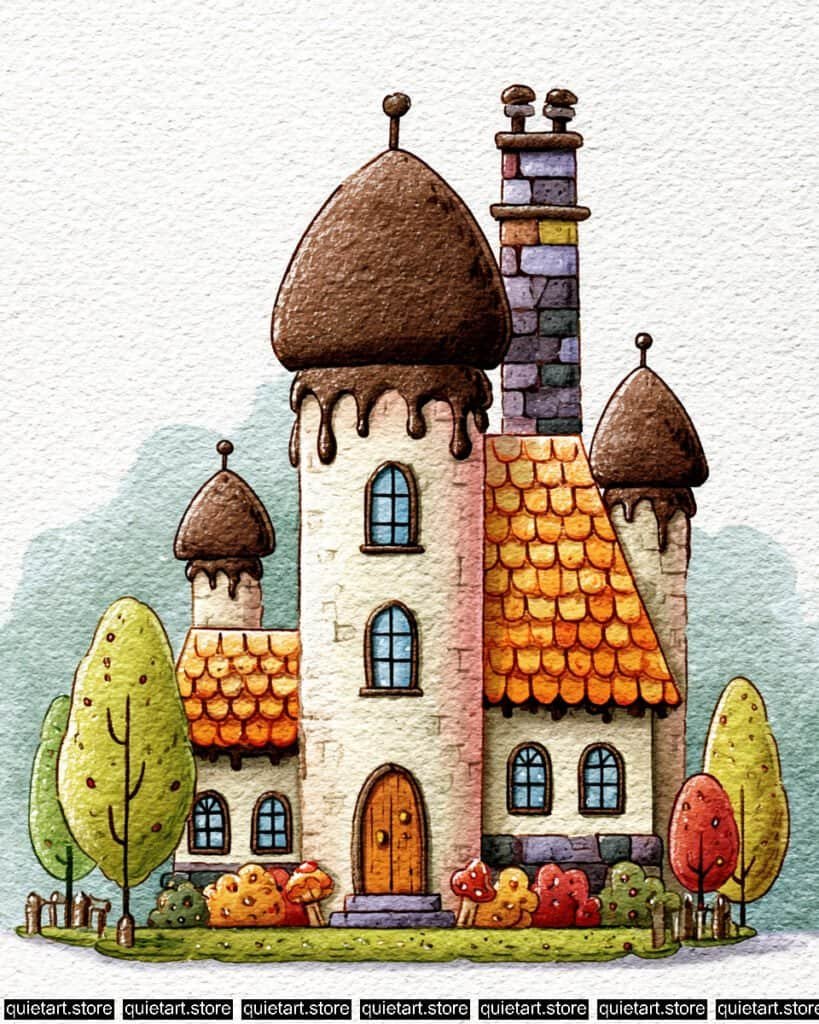
Start with a detailed pencil sketch on cold-press paper, carefully outlining the central towers, chocolate-dipped domes, tiled roofs, and surrounding trees. Begin with a soft wet-on-wet background wash behind the manor, blending light sage-green and atmospheric blue tones while keeping the sky clean and white around the main structure. Next, apply translucent wet-on-dry base washes: a rich, deep chocolate brown for the glossy domes and drippy accents, a warm honey-yellow for the roof tiles, a soft cream-buff tone for the stone walls, and vibrant greens, yellows, and reds across the surrounding foliage and mushrooms.
Once your initial layers dry completely, build form and dimension by adding warm burnt-umber glazes along the shadows of the chocolate drip edges and purple-slate shadows on the brick chimney and stone foundation. Paint the arched window panes with a clear cerulean blue wash to create a gentle glass contrast against the warm building tones. Finally, wait for the paper to be thoroughly dry before using a fine-liner waterproof ink pen to trace crisp outlines, detail the roof shingles, add stone textures, and define the fine stippling and hatching marks across the foliage and trees.
Recommended Watercolor Pigments:
- Burnt Umber (PBr7) or Sepia (PBr7, PBk9) – For the rich, deep chocolate-dipped roofs and dripping sauce accents.
- Yellow Ochre (PY43) or Raw Sienna (PBr7) – For the warm tiled roofs, wooden door, and golden autumn foliage.
- Buff Titanium (PW6:1) – Useful for creating the soft, creamy off-white texture on the main manor stone walls.
- Cerulean Blue (PB35) or Cobalt Blue (PB28) – For the cool blue window panes and atmospheric background wash.
- Sap Green (PG36, PY110) or Green Gold (PY117, PG7) – For the lush yellow-green trees, shrubs, and grass base.
- Dioxazine Purple (PV23) or Cobalt Violet (PV14) – For the colorful brick chimney, stone base, and soft shadow glazes.
- Cadmium Red (PR108) or Pyrrol Scarlet (PR255) – For the bright red toadstool caps and reddish autumn trees.
Love these watercolor ideas? Get our 30 Spooky Halloween Watercolor Coloring Pages (PDF Download) for even more fun, printable designs to paint this Halloween.
Conclusion
Halloween is the perfect season to get creative with watercolor. We hope these 32 spooky painting ideas spark your imagination and help you create festive artwork you’ll love. Don’t forget to download the free printable pages, grab your favorite watercolor supplies, and start painting your Halloween masterpiece!