

Are you looking to master the art of painting trees in watercolor? Each tree has its own unique shape, rhythm, and structure—and learning how to capture those characteristics can take your skills to a whole new level.
As Kerrilyn Cheah often teaches, understanding these details is the key to bringing your landscapes to life.
In this guide, Kerrilyn Cheah will walk you through step-by-step techniques for painting eight different types of trees, from simple basic forms to the majestic oak.
Let’s dive in and start painting!
Contents
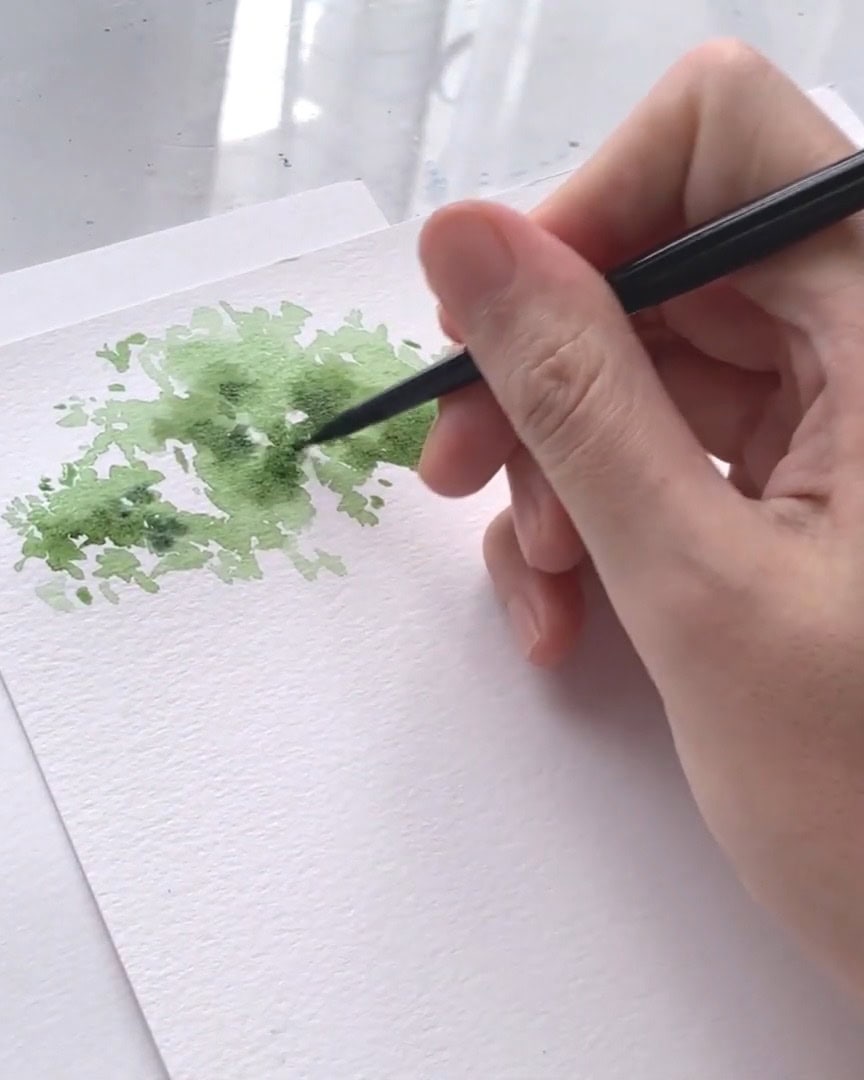
Tree 1 – Basic Tree
Before any brushwork begins, the artist spends a few moments analyzing the tree. A piece of scrap paper is used to study the basic structure of the tree in the reference image.
This helps the artist understand the shapes and different portions of the tree before painting starts.
Looking closely at the tree, several key sections appear: the trunk on the left side, some bigger branches extending outward, and the main tree trunk.
There are also different portions of the tree, with branches grouped together in sections. For example, one portion is on the left, while another is on top and slightly hanging down.
This helps visualize the tree as a whole while also breaking it down into smaller, easier-to-paint sections.
Next, the artist focuses on the light and shadow areas of the tree. This step is important because it helps set the tone and depth of the painting.
From the reference photo, the shadows are mostly around the tree trunk. The sunlight seems to be coming from the top, which is why the shadows fall toward the bottom.
Each section of the tree has its own shadows, and understanding where these are will guide how the paint is applied.
The lighter areas will be where the sunlight hits, while the darker areas will be where shadows fall.

Now that the structure and shadows are understood, it’s time to prepare the materials. For this basic tree, the artist chooses two brushes: a size 6 brush and a size 10 brush.
The bigger brush is used for applying the lighter greens, while the smaller brush adds the darker green tones to create the shadows.
A few greens are mixed on the palette. The artist starts with a light wash of green for the first layer, which becomes the base color for the tree.
This helps build the foundation before adding the darker shades for depth and shadows.

Starting with the size 10 brush and the light green, the artist begins to paint the tree’s first layer.
The shapes sketched earlier are followed, using the tip of the brush to create tiny, irregular strokes that resemble leaves.
The artist starts with the left portion of the tree and works across, adding more color deeper into the tree.
The key here is to keep some white spaces between the strokes to suggest light shining through. These gaps will become important later when the branches are painted.
 Paint the left side of the tree
Once the first layer is down, the artist switches to the smaller size 6 brush to add the mid-tone greens.
More pigment is mixed in to create a darker green, focusing on the areas that are naturally darker in the reference photo—where the shadows fall.
With the smaller brush, placement of the darker tones can be more precise.
The darker green is dropped in carefully, following the contours of the tree and the areas identified as shadowed.
The wet-on-wet technique being used allows the colors to blend softly, creating a more natural look.

As the painting continues, the artist connects all the different portions of the tree. Even though the tree has separate sections, it should feel like one cohesive unit.
The edges where the different sections meet are blended so that transitions are smooth and natural.
The wet-on-wet technique makes this easier, as the paint spreads and merges. The focus is on keeping the sections connected while still maintaining their individual characteristics.

Now that the basic structure is in place, attention shifts to finer details. The darker green is used to add a few more strokes where the leaves and branches meet.
This helps define the tree more clearly and adds depth.
At this point, the first layer has started to dry, so a bit of water is used to moisten the areas that need blending. This step creates soft, smooth transitions between layers.
The tree begins to come to life with more dimension and shape.
Once the foliage is mostly done, the artist moves on to the tree trunk. Dark brown paint is mixed and the tip of the smaller brush is used to paint the trunk, starting from the bottom and working upwards.
The trunk is kept thin and vertical, with short strokes creating the texture of bark.
Smaller branches coming off the trunk are also added. These branches are painted using the same dark brown but are finer and more delicate.
Some white spaces are left between the branches to keep the tree feeling open and airy.

To finish the painting, final adjustments are made. As the paint dries, certain areas are deepened with darker green to intensify the shadows.
This step helps the tree stand out more and feel more three-dimensional.

Tree 2 – Pine Tree
Now the focus shifts to the second tree—the pine tree. This one stands out for its simple yet iconic shape. It’s all about building clean lines and repeating patterns.
When painting a pine tree, the overall shape is considered first. The whole tree resembles a cone. That becomes the base structure in mind.
Zooming in on the individual branches, they look like thin lines branching out, almost like a series of Y-shaped strokes.
The painting begins by slowly repeating that basic Y-branch pattern to build up the full pine tree.

For this tree, the artist paints directly on the paper—no sketching. A darker green is used because pine trees are usually deeper in color.
Starting from the top, tiny strokes are made for the fine leaves. A thin line is pulled off the tip to start the topmost branch.
More fine, short lines are added on both sides while moving downward. The line in the middle becomes the main trunk.
The angle of each branch is adjusted slightly as the tree is built, so it looks more natural.
A reference photo is followed while painting. Studying how each branch curves and where it grows from helps keep the structure accurate.

As the work progresses down the tree, different greens from the palette are mixed. This keeps the tree visually interesting and less flat. The variety in tone adds life and depth.
All the branches grow outward from the central trunk, keeping the shape balanced. Toward the end, the middle area is darkened to give it more dimension.
And with that, the pine tree is complete.

Tree 3 – Cypress Tree
he third tree is the cypress tree. This one is also cone-shaped, but its brush strokes move differently than those of the pine tree.
The simple form gives a unique texture.
The cypress tree is pictured as a cone. That is the basic shape. When the branches are observed, they grow out at a slight upward angle.
So, when painting, the brush strokes follow that upward direction. This helps shape the tree naturally.

The artist starts with the lightest green. To make it warmer, a bit of yellow is mixed in. Then the brush is used with strokes that follow that upward angle—short, loose lines that give the tree air and texture.
Small white gaps are left in between to keep it light and breathable.

Next, while that first layer is still wet, a more pigmented green is dropped into the center of each section.
The wet-on-wet technique lets the color spread outward, creating soft edges and almost forming a V-shape pattern.
The pattern is broken up a bit to avoid making the tree look too stiff or uniform. Some strokes fall slightly out of line to keep the tree feeling natural.

Then, the darkest green is gently tapped into the center areas—just a tiny amount. That soft V-shape is still kept in mind but treated loosely.
A smaller cypress tree is also painted beside the first one to add variety. A lighter wash with more water makes it look farther away.
A touch of the darkest green adds depth and shadow. The second cypress tree is painted with the same technique. And with that, the cypress trees are complete.

Tree 4 – Poplar Tree
The next subject is the poplar tree. At first glance, it might look a bit like the cypress tree, but some clear differences appear once painting begins. The poplar feels light and refreshing to paint.
The poplar tree has a similar tall, narrow shape, but its trunk shows more at the top. The leaves end a little lower, allowing more of the trunk to peek through.
Unlike the dense and tight leaves of the cypress, the poplar has more open space between its leaf clusters.

The artist starts with light green mixed with plenty of water to keep the tone soft. Since more trees are being painted, this one is made smaller.
Painting begins at the top and moves downward. The brush strokes are spaced apart to show that airy, open feel.
The center line is kept clear—that’s the trunk. Another brush is then used to paint in the trunk while the rest is still drying.
Many white gaps are left so the tree doesn’t look too heavy.
These gaps are important. They help the poplar tree look light, fresh, and breezy. The shapes are not made too even or patterned. They are allowed to stay random and natural.

Before the first layer dries completely, a second layer is dropped in to build dimension. This is done while parts of the first layer are still wet, allowing everything to blend nicely and give the tree a soft, natural texture.

And that completes the poplar tree—simple, graceful, and charming.
Tree 5 – Elm Tree
The next tree is the elm tree, a favorite for many because of its beautiful structure made up of separate leafy clusters.
It might look a little unusual at first, but everything comes together beautifully once the branches are in place.
The elm tree has clearly defined bunches. A small cluster is placed at the top, then a slightly larger one below.
At the bottom, the biggest bunch is added. The branches are quite visible in this tree, so that is kept in mind while painting.

A poplar green is mixed with a bit of turquoise for the color. Painting begins with the top bunch. If a puddle forms, the brush is dabbed dry and the extra water is lifted.
Next, the second bunch is added beside it, then a darker green is introduced. That darker tone is placed at the base of the leaf shapes to create shadow.
Since the bottom bunch is the largest, the shadows there are extended more. A side bunch is added before finishing with the big lower one.

Now it’s time to paint the branches. Thin lines are drawn from the top, making sure every bunch is connected to the others and to the main branch.

If the tree still looks off balance, another branch is added to even things out. And with that, the elm tree is shaped and complete.

Tree 6 – Coconut Tree
Next comes something more tropical—the coconut tree. It brings a beach and summer mood into any scene.
The basic shape of the coconut leaf is understood first. It begins with a central branch; from there, the leaflets fan out in a V-shape.
A key detail: the V-shape starts wide at the base and gradually narrows toward the end of the branch.
Beginners often keep the V-shape equally open throughout, but that doesn’t match how it looks in nature.
When painting the leaves, the brush begins at the branch and flicks outward. Practicing with a pencil first can help get used to the motion of the leaf shape.
The tree trunk comes next. Coconut trees often have leaves in various directions—some curve upward, some hang down heavily, and others gently arc.
That variety is included. Coconuts are added in the center of the leaf cluster to complete the tropical feel.

A helpful reference photo is used to study the structure for this tree. Painting begins from the top.
First, a line is pulled down, then curved up slightly. Rotating the paper can help control strokes.
The brush is flicked outward from the center line to create the leaflets. To keep things interesting, the hue of the green is adjusted by mixing in more yellow.
This adds variety and makes the tree look more natural. A brush with a sharp tip is used to easily create fine, delicate lines.
Sometimes, a smaller leaf is added on the side and the greens are constantly shifted for more visual interest.
As the leaf structure is built, the center is darkened with a deeper green to add depth.

For the trunk, yellow ochre is used to extend the top downwards. Then burnt sienna is applied to paint the shadows on one side of the trunk using simple downward strokes.
A few coconuts in the middle finish off the look.

That completes the coconut tree, full of tropical energy and charm.
Tree 7 – Palm Tree
Next comes a palm tree with a structure different from the coconut tree. Palm trees are tall and straight, with a sturdier trunk than the coconut tree’s more curved, slanted shape.
The leaves of a palm tree start further down the trunk rather than right at the top.
The leaves often fan out, creating a shape that resembles an open fan. This fan-like formation is one of the key features that sets palm trees apart from coconut trees.
Practicing the fan-shaped leaves with a pencil first can be helpful.

For the leaves, painting begins at the top with a fan shape, almost like a zigzag motion. A darker green is used for the first layer, then a bit of yellow ochre is added to the mixture for variety.
The next leaf is painted downward, starting at the trunk, following the reference. Palm trees are visually distinct, with straight trunks and open, fan-shaped leaves.

Tree 8 – Oak Tree
Finally, the oak tree is painted. Oak trees have a distinctive rounded shape, often resembling a mushroom.
To capture this, the tree is broken into different clusters of leaves that form that rounded silhouette. The key to painting an oak tree is to keep the overall mushroom shape light and airy.

A size 8 brush, slightly bigger, is used. Painting begins with a darker color, and a second brush is used to add depth. Some white space is left between the clusters, but not too much.
As the painting progresses, the bottom areas where shadows naturally fall are darkened. Finally, the tree trunk is painted using brown.
Once everything is painted and the shadows are added, the oak tree comes to life with its unique rounded shape.

The artist has just finished painting eight trees in watercolor. It’s impressive how a few colors and brushstrokes can bring nature to life on paper.

Wrapping Up
Now that these eight trees have been explored, each with its own character and techniques, it’s time to practice and refine the skills.
Any of these trees can be chosen as a starting point. By experimenting with these methods, watercolor landscapes can be enriched and brought to life in many new ways.